
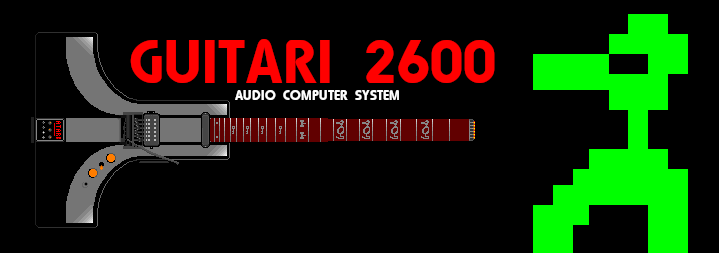
 (aka "The Ataricaster") Headless Polyphonic Synth/Guitar Hybrid |
||||||||||||||||||||||||||||||||||||||||||||||||||||||||||||||||||||||||||||||||
 Okay, this is what I'd consider to be probably one of my most ambitious projects to date. And it's actually not THAT new of an idea. The idea for a Atari "Fuji" logo guitar has been a long-standing idea in my brain that's collected cobwebs for about, uh, 20-25 years. Okay, this is what I'd consider to be probably one of my most ambitious projects to date. And it's actually not THAT new of an idea. The idea for a Atari "Fuji" logo guitar has been a long-standing idea in my brain that's collected cobwebs for about, uh, 20-25 years.
I decided to re-write this whole section, the idea is still somewhat the same, but some things have changed since I'm trying not to stress myself out considering how ambitious this project is. The Graf-X II designed pixel-art mockup (left) is what I originally designed for this project when I de-mothballed it in 2023. The plan is to make a headless electric guitar, using a First Act combination Hexaphonic pickup/stacked Humbucker (8.4K), and possibly a Sustainer, to create a self-contained Synth/Guitar hybrid, shaped like the Atari logoThe History (2001-2024) The original idea for what was originally known as the Flying Fuji later the Guitari 2600 and lastly now I've been calling it the Ataricaster, came about in 2001. Back then, I was a rampant video game collector, and playing in a Nu-Metal band called "Lithium" at the time, and wanted a kinda' funny-cool way to combine the hobby and the band a little. So I designed a guitar that looked like the Atari logo, because I thought it'd look cool, however, my original idea was a bit different in execution. Basically, the guitar would have a headstock originally (shaped like the same logo), and have fretboard markers shaped like various Atari game characters (an idea I may still use, especially if I end up using a headless Yinfente neck that has inlays that pull right out like the Warlock ones did). I planned to just throw a Floppy Diskette drive in the back of the guitar that would drop out demo floppies - as well as would be a ruse to my rampant pedalboard wizardry at the time (making people think it was the guitar making those sounds). When Lithium broke up, I changed my mind on having such a goofey themed guitar, so the project was mothballed from 2003-2018....
The body blank was made but with a whole new idea as to make this one extra "special". See, for the last year or two up to that point, I'd started building guitar pedals, and had built 2 fuzzes, and successfully designed and breadboarded a distortion, a reverb, and not one but TWO functional guitar synthesizer pedals (monophonic). And I had this pickup I'd yanked out of a First Act "rise of the six string" Xbox Controller/cheesy toy plastic guitar thing that was an actual functional electric guitar, but I hated the guitar part of it, and I wanted to use that hexaphonic pickup in a different way from how it was used on the First Act. The First act functioned like a Guitorgan from the 1960's, while hex pickups installed in things like a Roland equipped Strat or Steinberger could take the pitch and pick attack data from the hexaphonic pickup side and send it to a home-built six note polyphony guitar synthesizer (more on that later), that could be mixed with the regular guitar signal and controlled independantly, and possibly, swappable with Atari Cartridge Shells so I could experiment more with this technology on a compact instrument. Then in 2023, I finally got an apartment with an attached garage, and started ramping up "guitar production" to get all my "rainy day projects" such as this finished before I turn 50 years old. This one took me awhile to build up the courage to get started on it.4/11/2024 - Current Progress - Finally Getting Started  The construction of the body is really unique and interesting, because I won't need a router until the very very late stages of design/construction. The "charcuterie board" part of the guitar, will be used as a "Chassis" upon which to place the various eleemnts that make up the guitar, including the Atari Logo pieces, the pickup, the sustainer (yes, this is getting one too), and all of the electronics - minus the cartridge slot for the user-swappable synth cartridge idea.
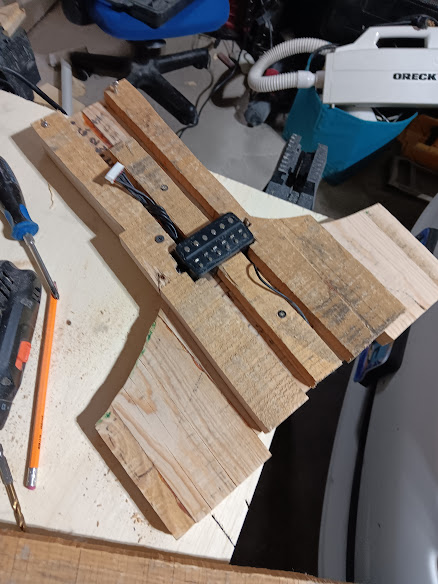
The middle line of the "Fuji" makes this VERY easy to place elements. I just used my Jigsaw to cut out a straight line all the way to the end of the body, then cut off chunks of it leading to the neck pocket and bridge pickup. Then I pinned them on with drywall screws for alignment (also how I'll glue them. I placed the pickup first, with the trickiest part being getting getting the wires out of the way (especially the huge 7-wire molex for the hexaphonic pickup).
Planning - LEDs - Once the base structure and routing is done, the plan is to make concessions to put LED Strip lighting on the edges of the Atari logo, kind of inspired by the one at right. I know I can buy these self-adhesive strips from somewhere like five and below, and link them together between the cavities using slots in the frame of the logo (which is also how I'm doing pickup routing).
The Actual Guitar Circuit will be a basic Eddie Van-Halen style single guitar circuit. 1 500K Pot, code .471 capacitor, and the 8.4K Ohm stacked humbucker on board the pickup/hexaphonic pickup combo out of the Powergig guitar. The output will be fed to a 3-way Gibson style leaf switch to be shared with the synth circuit. A sustainer - either self-designed, or sourced from iSUSTAINER/VEYZ, for driving infinite sustain when the guitar is in either mode - allowing for some real video-game-type sounds.
The Three Way Leaf Switch attaches both circuits to their own stacked mix-pots, and the mixed output of those pots is sent to the output jack. This allows selection and blending of each circuit to the output to allow synth, synth and guitar, or just guitar to the output jack. When switched to one mode or the other, the blend feature is bypassed. Modular synthesizers will be installed into Atari Cartridge shells I can buy on e-bay (3D printed of course, see right), and the controls will stick out of the label side. This will allow the cartridges to have their own dedicated controls for whatever circuit is installed. I was thinking about making them thematically like the O.G. text-label Atari Cartridges. Some ideas include a Ripley cart (might change the schematic to have the second ground be a stereo output for the right side), a basic synthesizer cartridge that has square wave, possibly some CPLD stuff using a PicoPi or some other microcontroller to make a polyphonic synthesizer (and make making cartridges much easier), and maybe even some designs using actual chips even. Who knows. 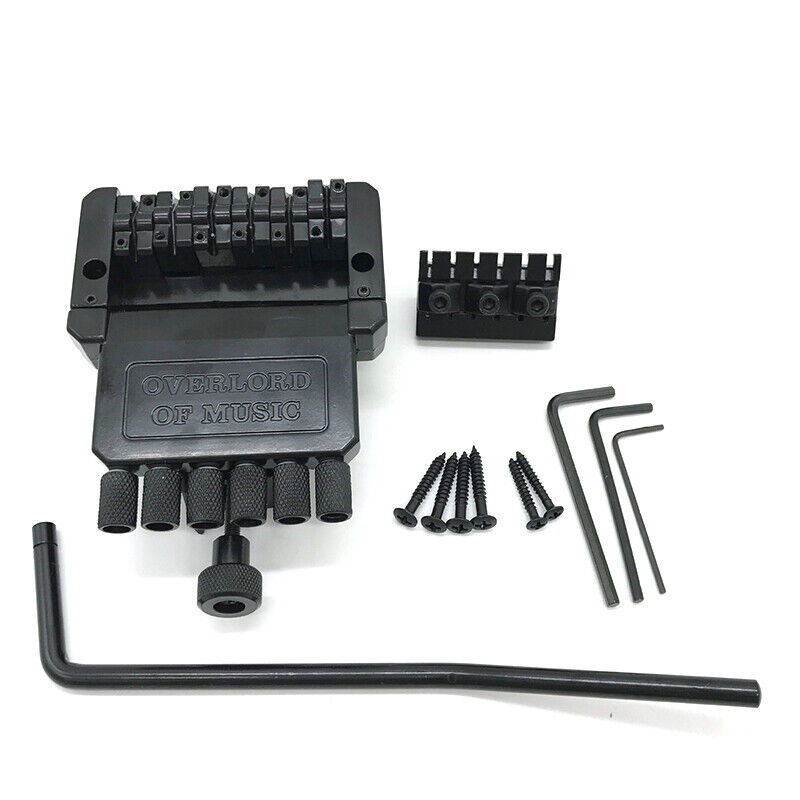

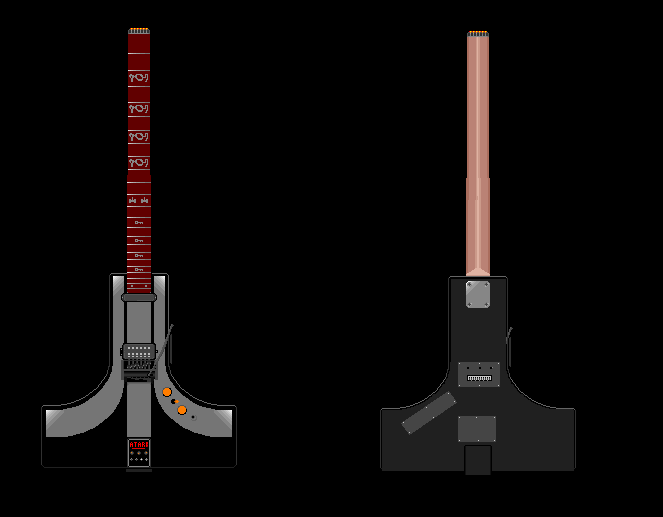
Lastly is the bridge and neck. For a neck, I'm going to use a regular Chinese 24 fret, headless neck, and then I looked at three bridge choices.... Overlord Of Music (Left) - The Overlord of Music bridge is an outright copy of the Steinberger R-Trem, which looks like the non-Transposing S-Trem unit (or like a Trans Trem minus the six Jowl adjustment screws), but it works entirely differently. The S-Trem and Trans-Trem both pivot the back piece and the strings roll over the saddles. The R-Trem pivots on 2 pivot posts on a metal bracket underneath the bridge assembly. It uses the same sort of single spring setup as a Steinberger, but pivots on those posts. However, reports online say this tremolo is HORRRIBLE! First off, it requires double ball strings some say, it has a locking nut to lock the strings in place, the pivot post bracket twists and breaks easily as it's made of cheap pot metal, and to me, it looks kind of cheesy. It also takes up a LOT of real-estate due to that extended back piece. Guyker (Middle) - The Guyker tremolo is a single ball end string setup that feeds the ball ends from the headstock, and then it has six rollers on the tailpiece that you wrap the string around using the provided twistie-hex tool. It uses the same route as a Steinberger trem, but works way better than the Overlord of Music does. The downside of this steup though, is that wrapping the strings is a pain on the fingers because of the tool, and it still takes up a lot of body space. However, it seems to work a lot like a Kahler or Trans-Trem in that the tailpiece section is separate, and tilts forward. Alp Headless (Right) - The ALP Headless, if I run into it again, is seriously tempting. It's like a better, smaller version of the above. The only downside I've seen is the fact that the whole bridge/tailpiece falls down, which might cause yodeling when the vibrato is used and the strings lose contact with the saddles. BUT, it looks like a much better setup for restringing the guitar using a little hand crank, and the tuning adjusters are bigger and more easily snagged. Looks like another Steinberger style route as well, and it takes up the least space of the three....so this is what I ideally would go, except I don't see it on E-bay currently (!?!). Anyway, that's where we are, this one will be coming together quite quickly now. The biggest challenge after the build, will be making the cartridges, which will probably prolong the development in this section (or warrant another section in the "Pedals" Section).4/15/2024 - The body is fully pre-staged 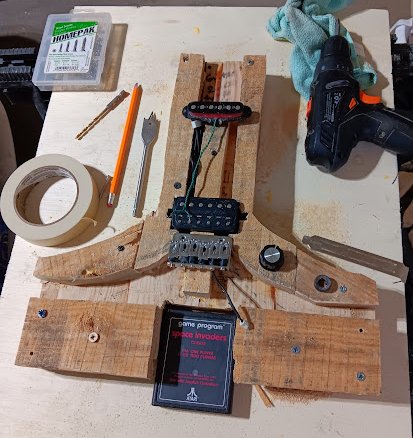 Pre-staged woodwork has now been done on the body, and all the little pieces glued. I did find I put the neck pocket a little too deep, but I have long hands, so that's okay, and it shortens this to a "travel guitar". We can see that hte original idea is coming together nicely. I also have markings for the routes in back. Pre-staged woodwork has now been done on the body, and all the little pieces glued. I did find I put the neck pocket a little too deep, but I have long hands, so that's okay, and it shortens this to a "travel guitar". We can see that hte original idea is coming together nicely. I also have markings for the routes in back.
Building this "mess" was tricky. It was a series of taking pieces of scrap wood, drilling and screwing them on, marking outlines in pencil/marker, and then cutting them with the jigsaw, or by hand when the jigsaw was too big and dangerous to use to make an intricate cut (I'm not losing any fingers getting this done). Then redrilling, re-screwing, placing the pieces like a puzzle, gluing them in place after unscrewing them, and screwing them to set with the wood glue. I'm going to build a huge cavity on the treble side for the battery/batteries, controls, and the other stuff. There might be a second, sideways, smaller cavity on the treble side of the Atari logo with the sustainer circuit board installed into it. The biggest trick to all this, will be the strip lighting, which I'll need to use the self-adhesive side against the wood, and figure out a clever way of hiding the wiring. I'm thinking I might pass the wiring under a row of wires that attach the pieces of strip-lighting together, and use blackouts in spots to blackout the pieces that are not to be visible. I had to add 2 blocks at the bottom to give some weight to the body, and...of course, provide enough depth for the cavities. I got the cartridge slot DEAD ON. Next will be adding aluminum "L" Brackets to the sides for support of my cartridges, and the breadboard cartrige. Nice thing is, the Alp bridge might not need any routing to be installed, but it might need some wooden supports glued in....which might make for a good wiring transition point. 7/2/2024 - Massive Progress Being Made 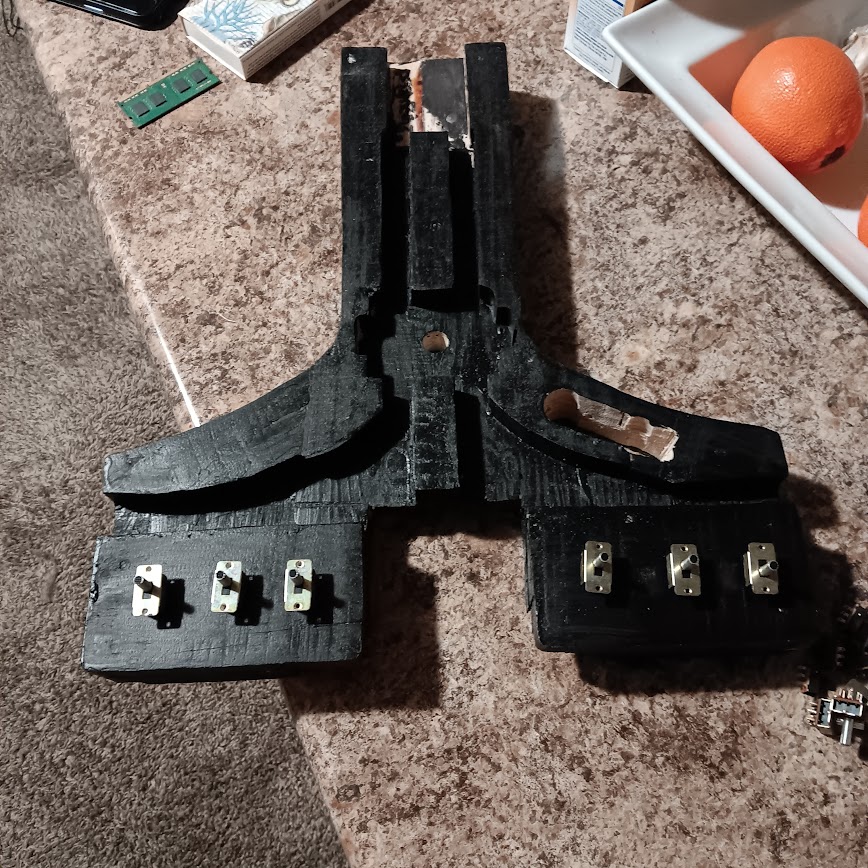 So the body blank has had a LOT of work done since we last talked about this build. First off, I got some 80 grit sanding drums and refined the shape. Secondly, I started fine tuning the frame, the control cavities and the cartridge port cavity have been routed out, as well as the channel in back run for the hexaphonic pickup. I fixed my mistake of assuming I Could find a 22 fret headless neck, so now it's setup for a 24 fret headless 25.5" Scale neck, allowing for the bridge to be properly located. THen it was stained in minwax black stain after a LOT of wood filler, and I mean a lot. This was like someone's nightmare bodywork bondo job, because of all the warped, goofey, reshaped, reclaimed wood. I really need a surface planer. That said, this also means I can build a PROPER bridge mount for it that will still allow the light strips to go past the bridge underneath. I also noticed I now have a nice bit of "sink" to the pickup...meaning I can make that pickup pretty recessed. So the body blank has had a LOT of work done since we last talked about this build. First off, I got some 80 grit sanding drums and refined the shape. Secondly, I started fine tuning the frame, the control cavities and the cartridge port cavity have been routed out, as well as the channel in back run for the hexaphonic pickup. I fixed my mistake of assuming I Could find a 22 fret headless neck, so now it's setup for a 24 fret headless 25.5" Scale neck, allowing for the bridge to be properly located. THen it was stained in minwax black stain after a LOT of wood filler, and I mean a lot. This was like someone's nightmare bodywork bondo job, because of all the warped, goofey, reshaped, reclaimed wood. I really need a surface planer. That said, this also means I can build a PROPER bridge mount for it that will still allow the light strips to go past the bridge underneath. I also noticed I now have a nice bit of "sink" to the pickup...meaning I can make that pickup pretty recessed.
One big move forward though, was finally finding a stockpile of presumably 1970's era "new old stock" never been used switches, which included, much to my surprise, a set of aluminum tipped switches with three bevels in the middle, and guess what else - they are 3PDT!!! Which means I might add something else to this guitar to make it even more of a light show - LEDs! But we shall see about that after my wiring options are planned.
Lighting figured out, Neck and Tremolo ordered - 8/5/2024 
So here was the start of the big challenge of the Ataricaster's lighting. I bought one $5 and one $3, one from Five and Below, and the other from the Dollar Store. Both were a hair different, but thankfully, they put the pinout on the lighting strips so I Could quickly solder them together (and I mean quickly, this is like soldering to a piece of paper. Silverleaf. I might make a diagram later, but the lighting works like this, the lights start on the bass corner of the guitar, come out of the control box via a ribbon cable which turns 90 degress, and then the adhesive light strip starts, it runs down the bass side of the guitar, up to the neck slot - or the middle of that area, where it goes into a hole, and then gets fed diagonally through a channel into the inside left channel of the fuji logo, routes around a screw, and then back up, then behind where the neck heel goes, then down the other side, around another retaining screw, and then back up again, through a diagonal channel, going in the reverse of the bass side, coming out of the top of the treble side "hip" and wrapping back around the treble side, then routs around the bottom of the logo...I may build an extension piece later..if needed...to arap around the bottom of the middle line, and then back over where the start is, where I will have built a plastic retainer clip to hold the piece down and hide the ribbon cable. The control board will sit in a recess under the black plastic to allow it to be powered on. It will all run off one 9 volt battery - possibly with some voltage regulation down to 5v 1A to match the same output as USB.
The neck is also ordered, and will take some special milling for the headpiece. I most likely will end up using the locking nut as the nut part, and then re-attach the wood cap behind it. This is all preliminary though, and me just thinking with my eyes. The goal will be to have it capable of whammying like a locking whammy unit. Also, I Can complete this guitar WITH the strings on it....that way I can make sure that everything goes together as expected. The next part is finishing up the body, the base of the electronics, and starting to prototype the electronics including building a breadboard for the cartridge circuits....here's some ideas with an Atari Label Maker that I did...
8/6/2024 - Bridge Is In - So here's a ROUGH guide on the Guyker W1003 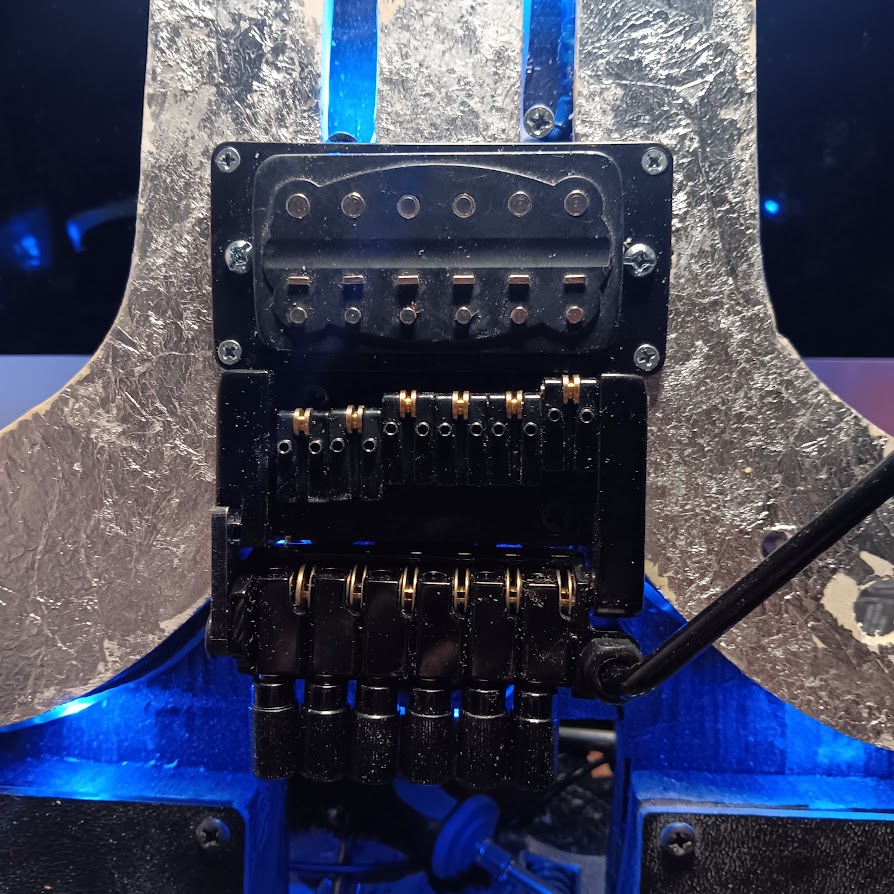 The Guyker W1003 came in early, so that's nice. Had to redesign the guitar slightly for it, knocking out the middle member of the body, and making a "C" shaped cross-block for mounting the bridge to. The spring adjuster stops right where the center line did, so I can generate an illusion by running the light strip around it as the space above the adjuster is perfect for the light strip. I added 2 screws to loop them around on each side under the bridge. The Guyker W1003 came in early, so that's nice. Had to redesign the guitar slightly for it, knocking out the middle member of the body, and making a "C" shaped cross-block for mounting the bridge to. The spring adjuster stops right where the center line did, so I can generate an illusion by running the light strip around it as the space above the adjuster is perfect for the light strip. I added 2 screws to loop them around on each side under the bridge.
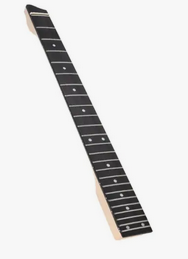
The Guyker W1003 is sort of an odd cross between a Kahler and a Trans Trem (there's also a version of this trem that's a Strat/Kahler crossover). Basically, like a Trans-Trem, there's a tailpiece that pivots and is counteracted by a single spring, and like a Kahler, the pivot is on bearings. There's a lever on the bass side that can lock the trem flat like a hard tail, sort of like the "Trem Lok" button found on Fender Jaguars and Jazzmasters (but better). The bar is press fit and has nice tension to it to stay in place. The strings are inserted into little wheels in the tailpiece sections and then wrapped around the capstans - after being fed through the headpiece and over the nut, which is locking. The saddles are held town by string tension and locked from the side with a hex grub screw, just like a Steinberger, but adjust scissor lift style - unique, but via 2 grub screws like Strat saddles, so kind of neat. The bar action is smooth, and tuners seem pretty smooth too, they have a tiny tool, but I'm probably going to use a tool of my own (actually, a hex bit in a screwdriver would work too). The bridge mounts with 4 flush-mount wood screws, and the back just hangs loose balanced on 2 bearings in the back. So pretty cool design. I'm waiting for the neck to arrive so that we can mill that to size and then put strings on this thing, and try it out. 8/20/2024 - Neck is Installed - That was a lot easier than I expected. 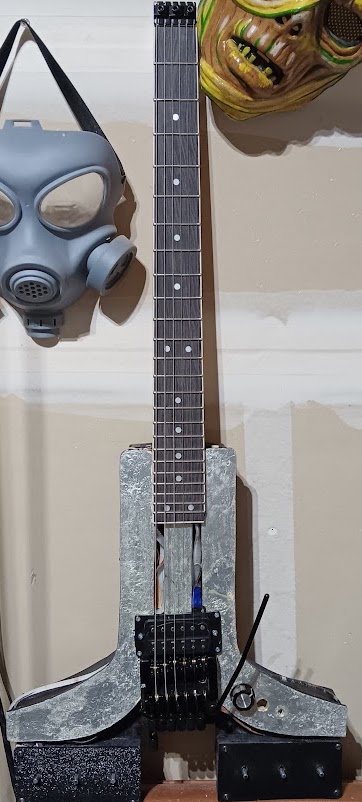  The neck came in, so here's a bit about it - it's 24 frets, 25.5" Scale, looks like Zebrawood for the fretboard (or some other chinese form of Rosewood), has a zero fret, and a regular fret, and had a "piano" shaped headstock. But this is the Ataricaster - the Guitari - the Flying Fuji - and it's got that military-esque locking nut to hold the strings up top.....so of course, we had to change that! The neck came in, so here's a bit about it - it's 24 frets, 25.5" Scale, looks like Zebrawood for the fretboard (or some other chinese form of Rosewood), has a zero fret, and a regular fret, and had a "piano" shaped headstock. But this is the Ataricaster - the Guitari - the Flying Fuji - and it's got that military-esque locking nut to hold the strings up top.....so of course, we had to change that!
So the headstock was cut flat, then a shelf cut for the locking nut was filed in with chisels and a Stew Mac tuner jig with adhesive sandpaper stuck to one side to flatten the place. Instead of using hte Nut, I used the Zero Fret, and ran the grooves for the locking nut over it. While there is some mild buzzing, I think some adjustment to the design might help this a little bit. The headpiece is held on with 4 screws, two I have not put in, two I have in Floyd Rose locking nut style to hold the headpiece on for now while I get the angles/adjustments right. This guitar is essentially a prototype.......for a LOT Of things! And one of them is my own ideas for Headless guitars. So the nut shelf is like that for a Floyd Rose R3, with the slots going over the top of the Zero fret, and it pulls down nicely enough to sound okay with open strings, but it does buzz a little. That said, the Bridge did need to be relocated about 1/4" forward as 25.5" was exactly at the edge of the bridge (!!!!), so Some more chiseling was done, and the bridge was moved forward, and then the pickup cavity hollowed out some more. This actually turned out to be a good thing, because it allowed everything ot adjust properly, and let me see that the screws for the bridge go deep enough (and how much more I can go if needed be later on). Once I did that - put on some Ernie Ball Paradigm .009s, and checked intonation, I had it pretty well dead on! Only G and the low E needed some actual adjustment, and adjusting this Guyker W1003 is EASY! Though I did lose the lock screw for the saddles, and turns out I had it tall enough to allow me to top-mount the bridge. The neck is held on by TWO screws right now. They are right about the tuners being a bit...uh...a pain in the fingers but the pitch up rate is more than adequate enough that it's not as terrible as some people make it sound...that said, might try my drill next time. The Truss Rod is dual action and I'm glad to say there's some metal tubing leading into the actual truss rod adjustment first, and it's a dual-action truss rod. This got the action really low and fast and got the guitar sounding pretty mean already....and it's not even wired up yet. I decided to lop off the molex connector for the stacked humbucekr connection since that's more apropriate for that application. The plan is to systemically put the guitar together system-by-system. First, as we have done here, get the string attachment, tremolo, string path, and neck subsystem sorted out. After that, Lighting, I damaged my lighting strip so one side only shows green...but that's fine, since I might replace ALL of it with a much brighter and more easily hidden LED tube lighting with more LEDs and possibly the capability of being run at 9V. After the lighting is done, then we focus on getting the Electronics for the GUITAR section done. Which is a simple single (Stacked) humbucker into a 500K Pot and a kill switch, into a 3PDT switch (for the Preamp), and then back into a 3-way Selector Switch for the GUitar/Mix/Synth function. Once that's together, it all goes to the Mono jack (bottom jack in the back) and the guitar will be playable as an ELECTRIC GUITAR for the time being while I Work out the synth section. The plan for the synth section is to build a cartridge port scenario in back, and a breadboard "cartridge" that sends all the signals from the divided pickup, a 9 volt battery, all six hexaphonic pickups, ground, left out, right out, and mono out (To the selector switch), and send them to a breadboard where I can start wiring up my prototype cartridges for this thing. The cartridge port can be disabled/turned off using a toggle switch on the bass side back (which also includes a "Stereo Mode" switch above it, and then the master power for the lighting). Most - if not all switches - will have an LED Light to tell you when the functions are ON! This is to make sure this thing doesn't eat up batteries like candy since there's a lot of battery powered stuff on board. 8/20/2024 - Pre-Wiring Test Drive - The AtariCaster Already Lives 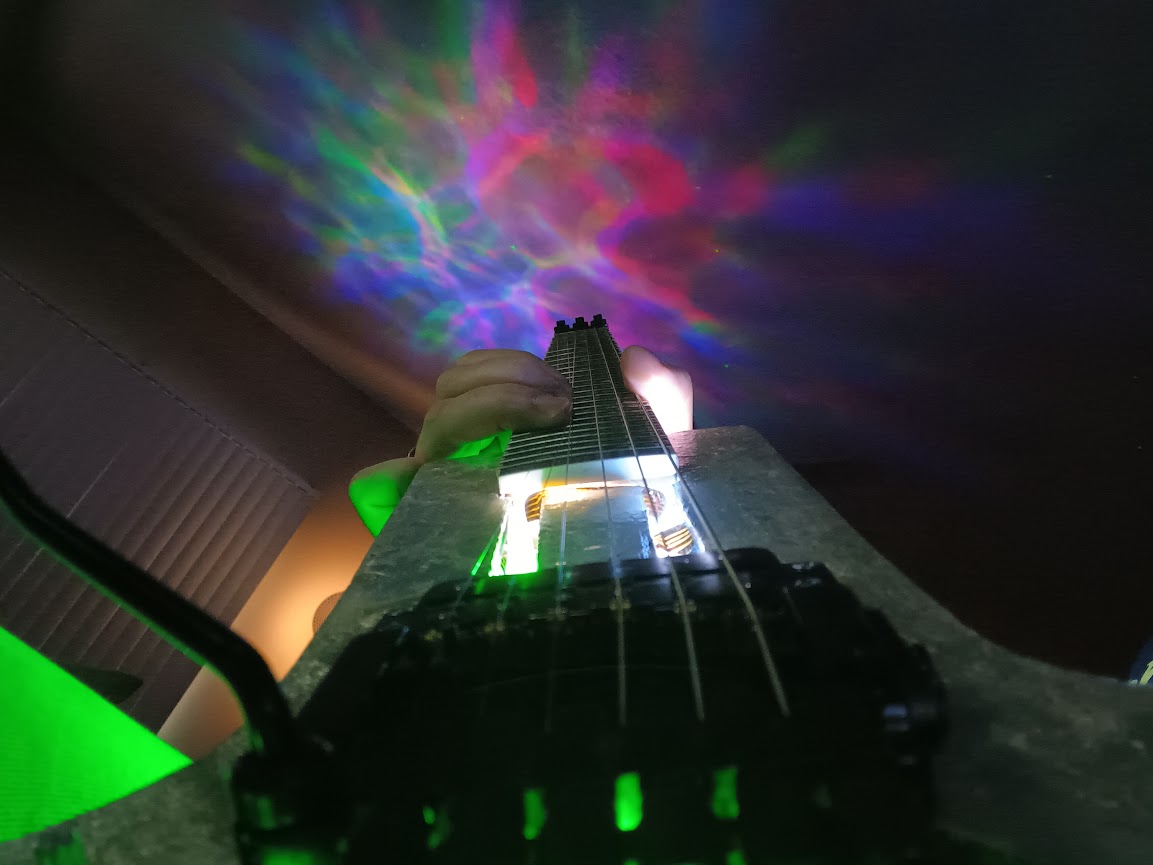 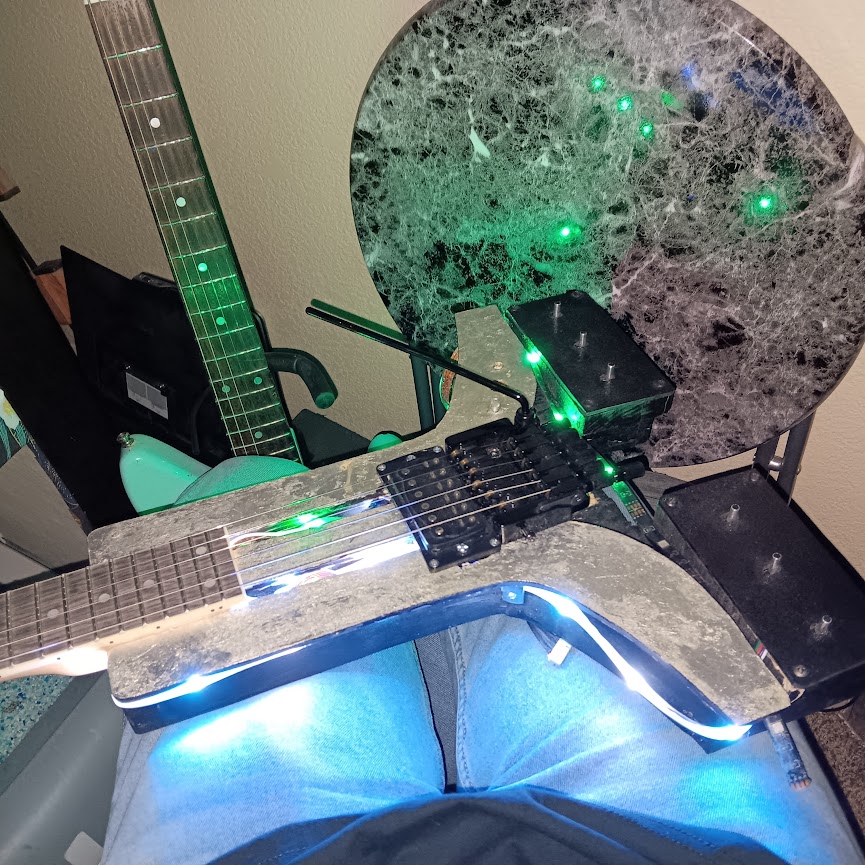 So tonight, I decided in a wild bout of lunacy to bring the Ataricaster up from the garage and take it on a unplugged, un-wired, fully acoustic test spin, and wow. First off, the Guyker bridge stays in tune, really good. My idea on how to setup my headless nut works perfectly (I figured out I could reduce buzz by clamping the locking nut entirely closed, now there's no buzz and it's REALLY good sustaining and stays in tune perfectly with the Guyker W1003 whammy enabled). The acoustic sound for what initially was thought to be a "novelty guitar" now is giving me some second thoughts with regard to construction..... So tonight, I decided in a wild bout of lunacy to bring the Ataricaster up from the garage and take it on a unplugged, un-wired, fully acoustic test spin, and wow. First off, the Guyker bridge stays in tune, really good. My idea on how to setup my headless nut works perfectly (I figured out I could reduce buzz by clamping the locking nut entirely closed, now there's no buzz and it's REALLY good sustaining and stays in tune perfectly with the Guyker W1003 whammy enabled). The acoustic sound for what initially was thought to be a "novelty guitar" now is giving me some second thoughts with regard to construction.....
First off, acoustically, this thing has it! That magic to it. It vibrates like it's alive, it sustains like crazy, it stays in tune really well, and even with high action the neck plays VERY fast. It feels very stable, and I feel comfortable bending notes around like a lunatic. Also, it sits VERY comfortably, which is surprising. you can really wrap your body around it and get really up close - like my Jag-Stang - and lean into it. The stock bridge height MIGHT need to be lower....by a hair, because the neck body coupling is EXCELLENT. Actually, a cool thing about sitting and playing with this body is I can literally pretzel my right leg over the bottom corner which makes it more stable than even a Flying V...so basically, I created a guitar you can sit with as a dude with your leg up and it's bloody comfortable. It's also pretty darned short length-wise - about the same as a Harmony H802 - around 36" total or less - so this thing MIGHT even be TSA approved, lol. So basically, I've built a killer travel guitar platform. My wife likes the looks of it but I was just realizing something while writing this...seems this MIGHT be also a good design that works with the female form as well - which means, it works for everyone. There's no protruding stuff up top to get in the way of one's chest! One of the top complaints I've heard about guitars from Women (that's part of why St. Vincent's model is shaped the way it is). It's also pretty small, and fairly light...around 5LBS, and it's made of dense wood. So....I'm thinking after this one is done, I might focus on making another one that removes the ATARI livery and acts as some kind of interesting shaped, ergonomic, all-gender-friendly body design. Hopefully, by that point, I might have some of the synth circuits worked out (analog AND RPi nano/Arduino)....I think we know where I might be thinking of going with this. My only gripe is I might need to find a more elaborate way keeping the whammy bar collar in place, but the rest is running great as/is, and the intonation is dead on.9/02/2024 - Wiring Has Begun, and Final Lighting has been Installed 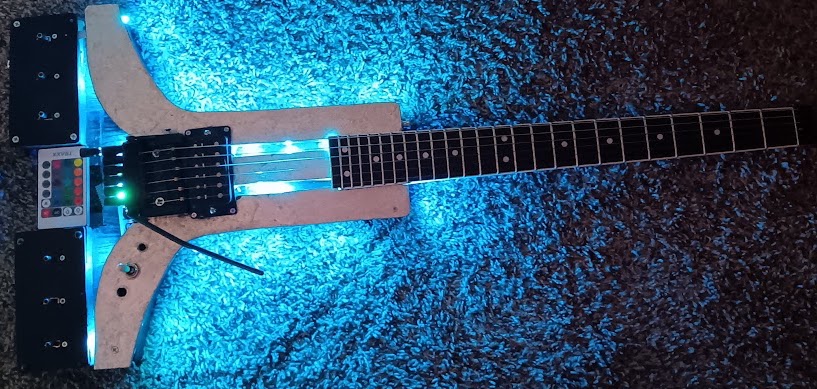
So first thing, the lighting rig has been entirely redone. I went back to Five-and-Below and bought some strip lighting WITHOUT The rubber, and it worked out SO much better, so no more clips, and it's all one very very long strip that came on a reel. I think I only had to cut off TWO LED's and pinch with adhesive in one spot to finish it up. Now it looks really nice and the LED's are far better hidden. You can see above in my favorite color of course, hehe. So the lighting is done. Wiring for this should be easy, just need to take the positive and negative leads from the USB and run them to the positive and negative leads of a USB B port or USB-C cable or something. Then put that port on the switch, and on the other side, have my 6VDC battery box.
9/4/2024 - Electronics are now (mostly) in... So the Guitari now has most of it's electronics....let's talk about the many layers of a big project like this...... The first layer of course, is the guitar part. Basically, a 10.5K Stacked humbucker gets sent through a single 500K pot with Treble Bypass cap into a 3-way selector that connects to the MONO out of the Synthesizer connector. That then goes through a switch with it's own red power LED for the Power Amp, and can be bridged in by a secondary switch that lights up and activates the Sustainer circuit - which also lights up a green and an amber LED depending on whether it's in harmonic or natural mode - before then being sent to the output jack and bridged over to the secondary part of the Stereo Circuit to be mixed in as a part of the left channel (And throwing the stereo synth into mono mode - middle switch on the bass side). The next layer is the lighting system. A set of lights I bought at Five-And-Below are run around the guitar and powered by a 9 volt battery, or USB. The 9-volt battery drives it with the switch in the DOWN position (live), Display is UP, which means it has to be plugged into a USB cord. Alternatley, I might be adding velcro for a USB POwer Bank. The LED Controller board is notched in under the control plate and has it's Infared sensor sticking up between the stereo mode and lighting switches - it's a little black thing. Lastly is the switch closest to the Low E string - this feeds another 9 volt battery into the cartridge port. The cartridge port has the following pins....
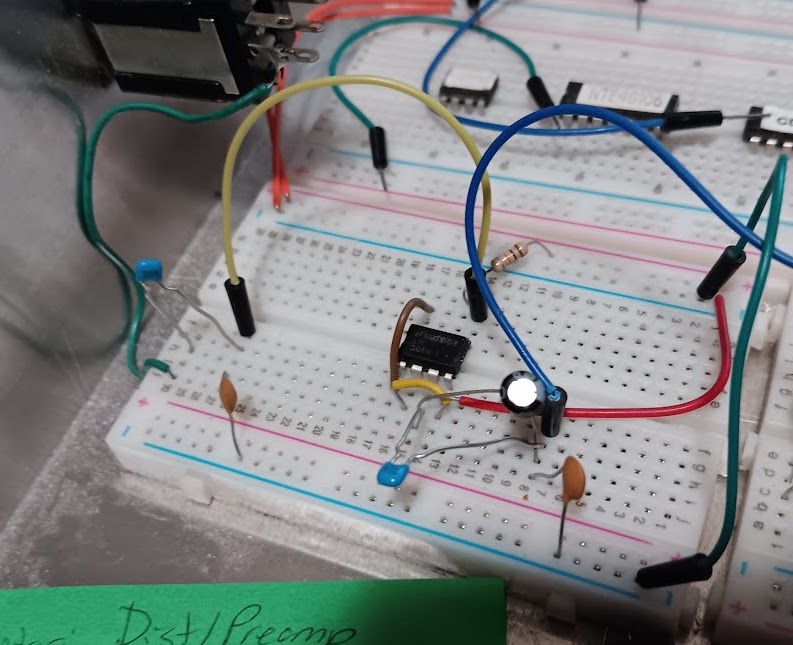
THe first piece of development for the synth side, is to build a cartridge port-board. Basically, what I need to do is see just how loud each of those divided pickups are, and see how much amplification they need. I might be driving up to six op-amps total right off the bat (LM386 most likely) to amplify each string of the hex pickup before it's sent into the guitar synth - driving them at least up to a level similiar to a regular guitar pickup. The power and outputs + ground are all bridged to the cartridge directly, and then that powers the cartridge port. The on/off switch has a red LED that's on when the cart port is active. After this I/O board is designed - then I will be expanding the breadboard to have a card edge or pin-hole socket, and then the guitar likewise will have the opposide side socket to attach with. After that, we can get to the fun activity of designing cartridges for it. I still plan for a stereo guitar cartridge first (easy), and then move on to maybe a simple CD40106 based synthesizer where each pickup becomes an oscillator, and they are all mixed down - which was the true intent of this build - to create a six note polyphonic guitar synthesizer that plays, feels, and is intuitive for a reguilar guitarist to play, and can mix the synth with the regular guitar signal or even isolate the guitar or synth so that it can be a dynamic sonic tool both int he studio and live. Tonights test on the guitar side proved that this guitar sounds exactly like I wanted it to, twangy, and a bit clacky - like a...well...Atari 2600 would sound if it were a guitar. Sorry, no just jamming a humbucker in a vintage console box like all the other guys are doing here...there's a sonic and visual aesthetic to this thing. Basically, I snagged up a Loverboy boot and started playing along with - it's got the right on-stage atittude. While cleaning up the garage after tonights tech session, I also rounded up some parts to build a custom driver for the synth indended to be hidden near the neck picket. This will make it look like there's not a pickup there, just some high tech black block. The goal is to have the guitar have infinite sustain so I can do synth pad-like things with the synth, and utilize the sustainer when soloing - this even includes doubling up the sustainer with the preamp ;). 9/9/2024 - Up and RUnning as a Guitar....Breadboarding Pending 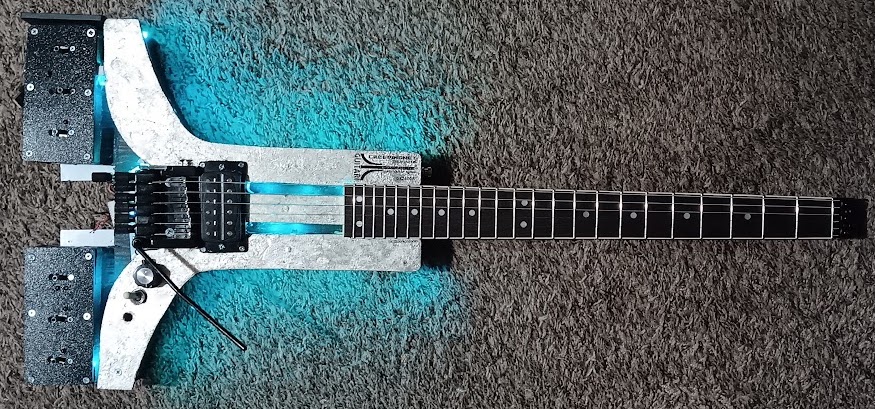
I do have a small lighting issue on the top corner, but I fixed it in a bit of a janky way. I'm thinking soon, I might want to install the protective plastic that goes around the lighting to protect it from damage while the guitar is being played. Probably going to need to mill that out of acrylic. Worst comes to worst....might have to re-run lighting again, or patch in a strip with a soldering iron....but I'm going to wait on that for a little bit. The guitar is going with me on a vacation to noodle around and have fun with. It's also the second guitar of mine to get a Waterslide decal (another custom build for a family member is the first). Overall though, very happy with how it's turning out. May still do some more breadboarding on the amplifier, but we shall see. 9/22/2024 - Been Sick, Small Improvements 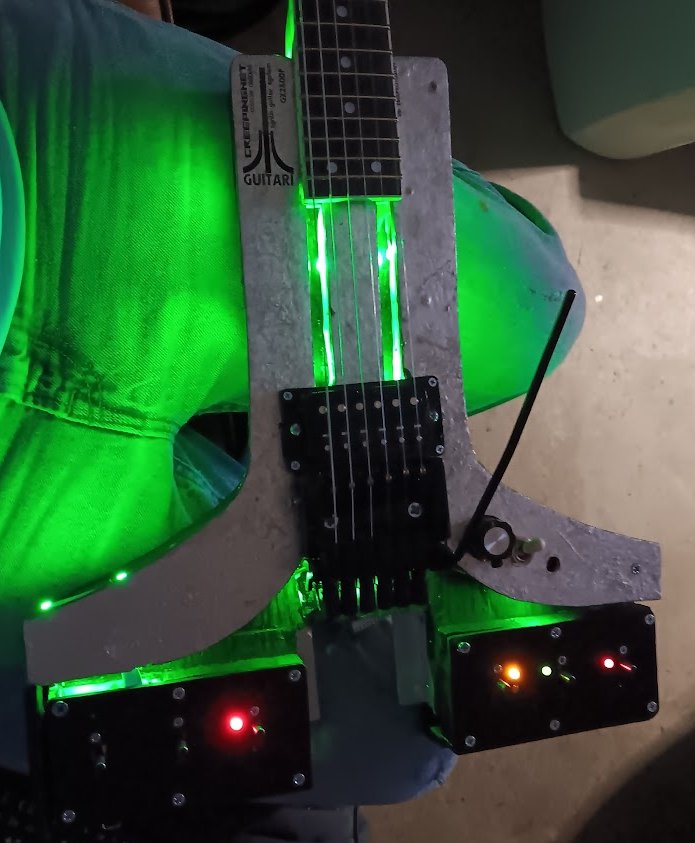  Small update today. The lighting issue was fixed last week on Wednesday after work with some replacement LED strips from Five and Below. All I had to do was plug it in and cut the extension off the bottom. This should fix that whole "blank LED" issue I was having on the one side, and it's a better layout than the first. I also bought a spare. The Kill Button has been ordered as of that day as well. Should be in tomorrow. Small update today. The lighting issue was fixed last week on Wednesday after work with some replacement LED strips from Five and Below. All I had to do was plug it in and cut the extension off the bottom. This should fix that whole "blank LED" issue I was having on the one side, and it's a better layout than the first. I also bought a spare. The Kill Button has been ordered as of that day as well. Should be in tomorrow.
I've been sick so activities have been off until tonight. I found out I used the wrong resistors on the Preamp LED (running 2 470 ohms in series), so I swapped the resistors and the LED out since I think I blew the other LED. So now it looks right. So that means everything is ready for it's internal boards to be installed. I am contemplating flipping the switch for the LED strip over as well - so every down position is off, so I might do that as well. I'm hoping I can go to work tomorrow, personal life has been personal hell the last 5 days. While sleeping and listening to YouTube videos during, I came across a video of an "atari Punk Console" - so that's the new Cart design idea on the right. The Atari Punk Console is a DIY synthesizer-sort-of-thing that's really cheap to make. Turns out there's a kit with 2 VCOs in it, which means, I could probably cram THREE into a cartridge with full on amplification for the synth, and some absolute nuttiness to ensue. Basically, feed E and A into #1, D and G into #2, and B and High E into #3, make them pan-able, and maybe find a way to mute or gate the darned thing so it only makes synthy sounds when the guitar is playing.12/16/2024 - Cartridge interface is in - Preamp Fixed, Sustainer in Progress 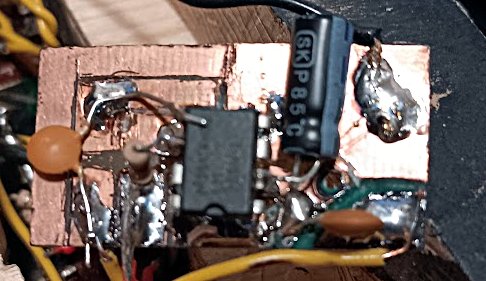
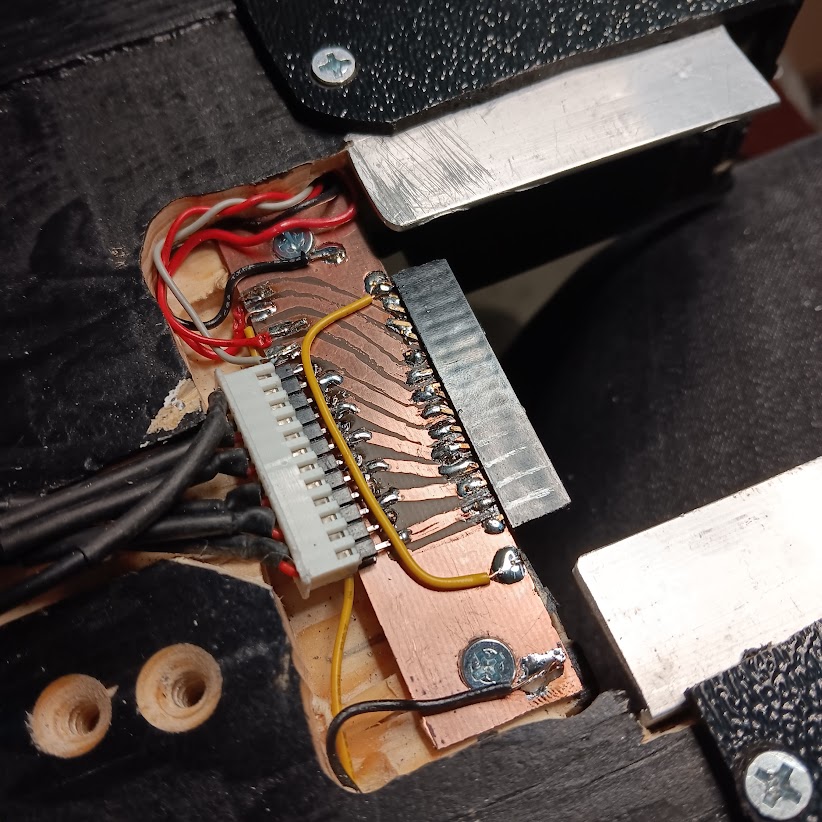
First I found a problem with my Preamp, it was sounding blatty and not as killer nor cutting as it did on the Breadboard, turns out I did nothing wrong on the circuit, I had a really crap connection to the PCB via Solder....so I resoldered a better jumper between pins 1 and 8 on the LM386, and now that mean sounding Distortion I really like is coming out of this thing. Still, not bad considering I whipped up the board with the longest time spent waiting for the Ferric Chloride to etch out the traces. This thing sounds VICIOUS through a Fender-style amp model, and through a Distorted Marshall-esque amp it fattens up the sound and gets kinda' a Warren Cuccurullo (Missing Persons era) kinda' vibe...think Mental Hopscotch or Noticeable Ones on the EP and first record on the ol' Vox Winchester. BTW, that's another one of the "influences" on this guitar design was Warren's crazy guitars he was using in Missing Persons including the MAG Guitars Missing Link, Vox Winchester (which he got from Frank Zappa), and the Performance Guitars Vision models (which were a remake of his old Zappa-begotten Winchester guitar seen in all the early MP videos). The Ataricaster is sort of the same thing, a crazy Zappa-esque guitar with on-board electronics and 80's vibes, but headless like a Steinberger (which crazy enough, Warren used those during his tenure in Duran Duran). We have cartridge interface now, I use pin-headers to ensure that the cartridge stays in contact with all my jumping around. Did a test, the synth ideas are going to work. However, I'm running low on chips. Here's the pinout from bass to treble side.
The reason I had 3 grounds was because getting pin alignment right was a bit goofey....I might be a tad off as I think I have 2 pins for mono out as well....so I'll correct later. Each String coming out of that Hex Pickup comes out REALLY hot, and gets quieter when they all are ganged up. I did a test Guitari-2600 megasynth quickie breadboard, which sounded like some kind of looney sawtooth fuzz. I need to study more electronics on getting proper separation between the six strings. I have also done some testing with separating the strings, that First Act Hex Pickup is surprisingly well isolated...if I wanted I could even make a cartridge that turns off certain strings, or even use an Arduino to retune individual strings....something like a built-in Guitar-Output Variax of sorts. I do have ideas to see if I can make circuits or find stuff I can interface with the Variax port on my 500HD, and interface with MIDI and use the Ataricaster as a six channel six note polyphonic MIDI Controller. I also came up with three Cart variants...type 1, Type 2, and Type 3. I'm starting with Type I and II carts. I think the first tcartridge I should build though, is a simple cartridge that allows the hex pickup to be output in stereo and panned to the stereo jack (which I need to fix the whole stereo subsystem....I got some things wrong on it), or mixed and used to play with the bridge pickup sort of like a 2 pickup guitar or a Fender Esquire. The idea I have is to have each string go to six individual pan-pots (one per string), and then those go (in varying quantities) to two LM386 op-amps that act as a distortion unit. Then a secondary mixdown to MONO after that which is sent to the regular output jack. Could be an interesting firt cartridge. I also did some experimenting with my own Sustainer, the driver seems it works well enough, but the problem I'm having is with Amps either making the driver super-hot, and leaking out paraffin wax, or with getting enough gain to drive the strings to sustain. I'm apparently a pretty good amp maker even through I'm laughably rudimentary at it (might be making my own guitar practice amp in the not TOO distant future to use up parts and jam around the house on a rig 100% my own with MY sound). I may have to toy with a more ferric outer casing for the driver. Another Idea I had was to make a 4 ohm tiny-bar-magnet driver using a Neotymium magnet where the coil is only 2mm tall. I've read somewhere a lower impedance coil is easier to drive the strings with, so I'll experiment and see where this goes.. I have three coils I've made, a Strat Type, a H802 type, and the Mini Coil I'm trying out on the AtariCaster. The Ataricaster coil is the first one I've done with a Ceramic magnet instead of Rare Earth (Neogymium Hard Disk Magnets). Either way, for someone whose been at this for six months or less off/on again, it's doing pretty well. 2/25/2025 - More Work on the Sustainer 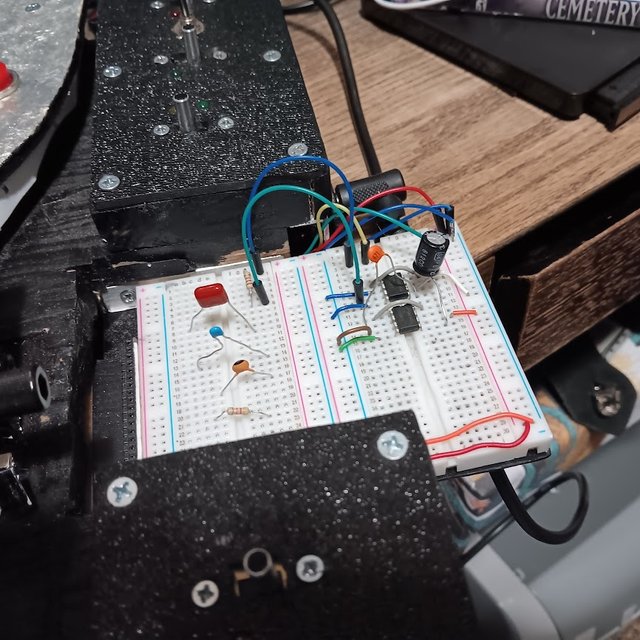 So the project is continuing, though I've been quiet in recent months. That's because a lot of what I'm doing is very very boring right now - it's basically just coming up with my own driver, and amplifier board, for a built-in Sustainer. So the project is continuing, though I've been quiet in recent months. That's because a lot of what I'm doing is very very boring right now - it's basically just coming up with my own driver, and amplifier board, for a built-in Sustainer.
The Ataricaster's Sustainer Driver is the most bare-bones, basic, sustainer driver I've ever made. It's basically a cheap single coil ceramic magnet, with two pieces of 1/16" thick ABS plastic glued to each side, and then wrapped in electrical tape and potted in paraffin wax, measuring in at the perfect 3mm tall. It sits between 4mm and 2mm from the strings in the neck position, and is just low enough to clear the 24th fret with a proper setup. This wires down to the two switches closest the cartridge port on the bottom treble side, the first one controlling the phase of the driver (ie Natural and Harmonic mode), and the other one controlling the sustainer being on/off. The driver itself works great and seems to have little trouble driving the strings with a good amount of gain behind it. Everything has female pin-headers on it so I can attach any one of a lot of strange amplifiers to the guitar and power them and drive them via the 9-volt intended to be used with it. Right now these wires feed into the cartridge board in the back of the guitar so that I can properly test the circuit as it will exist inside the guitar. I've been trying several circuits including a basic LM386N by itself, to TBA2030A, to combos of those. Last nights driver was the best so far: 2 ganged LM386s ganged by a 471 or 224 capacitor with a 220 or 200uf on the output. This got everything from the open Low E to the high E on the 22nd fret to be driven! That's a challenge most first-timers can't get to. But it's heck-a-noisy, so noisy it's pretty much unusable in it's current stae. Both amps are on 200x gain so I think excess gain is a big part o the problem. Unfortunatley, I don't have any trimpots with a good value to them yet (or that are not yet modified to work with my breadboard). Seems 50K would be a good value for that job. I'm also planning to get some JFETS (J201s) to experiment with the classic Fetzer-Ruby setup, and maybe even build off of it (ie add an AGC or something). Either way, it's getting close to somewhere in between my tame iSUSTAINER TB-60 on the KRamer and the chaotic VEYZ on my Explorer. Updates - April 27, 2025 - Nearing Completion....doing some final tweaks to the basic built-in electronics 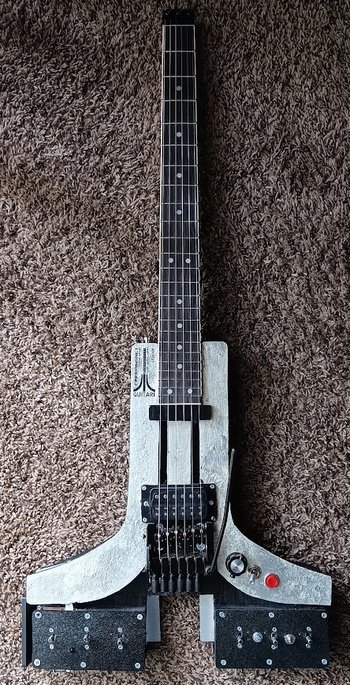 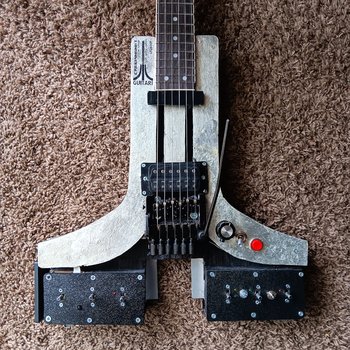 It's been awhile. Anyway, AtariCaster has been in a steady case of being worked on "behind the scenes". Currently it's the only project really being actively worked on as I wanted to get it to a point that I could start developing circuit boards for the cartridge system (and maybe learn how to mix two individual systems together via pickup selector switch, or knock a line level signal down to a low-level signal). I've been doing some behind-the-scenes experiments in this area....but ya' know, it's going to take me awhile. And I'm thinking about moving that cartridge slot back parallel with the tuners on the tremolo. It's been awhile. Anyway, AtariCaster has been in a steady case of being worked on "behind the scenes". Currently it's the only project really being actively worked on as I wanted to get it to a point that I could start developing circuit boards for the cartridge system (and maybe learn how to mix two individual systems together via pickup selector switch, or knock a line level signal down to a low-level signal). I've been doing some behind-the-scenes experiments in this area....but ya' know, it's going to take me awhile. And I'm thinking about moving that cartridge slot back parallel with the tuners on the tremolo.
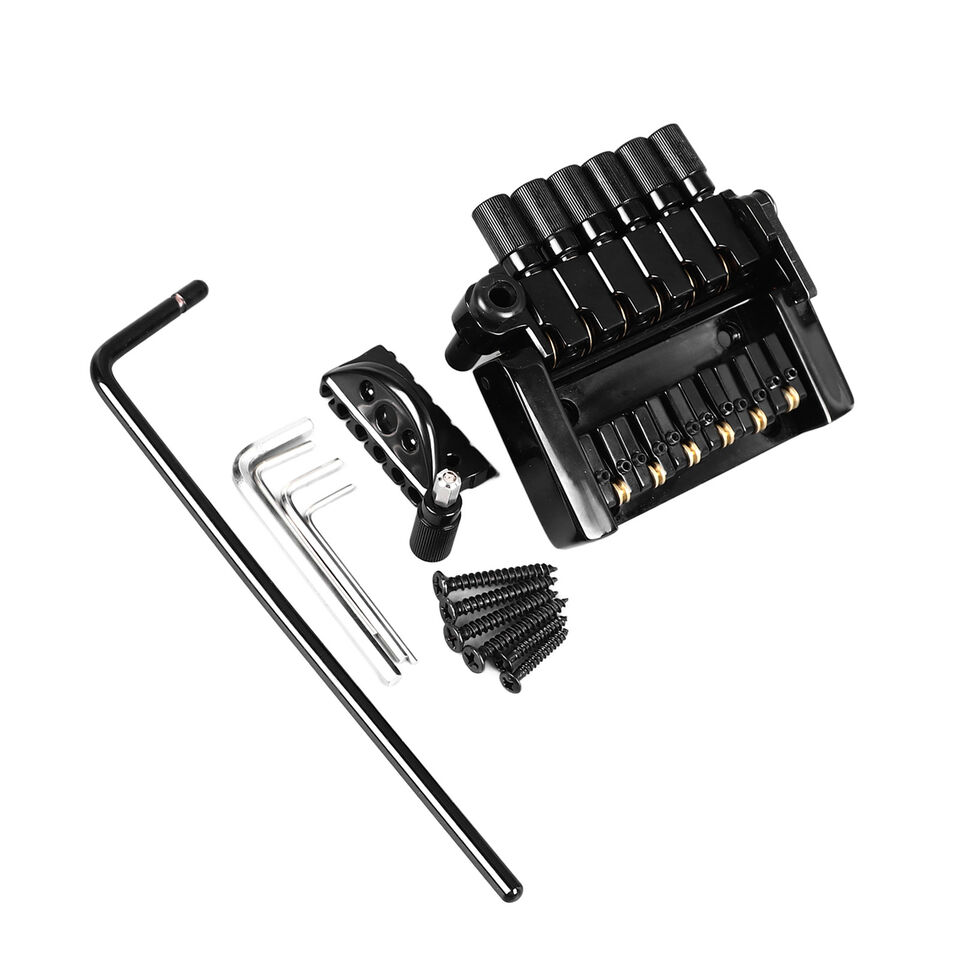
The first thing is, I gave in and decided to try one of those infinite sustainer boards from e-bay. I initially tried ordering this board from AliExpress (Big mistake, they tried to ask for MORE money after I paid asking price). So Instead, I decided to go to my ole' rusty, musty, and kinda-sorta-trusty world of e-bay, and pick one up for around $57 total IIRC. The board came with a lot more than the pciture shows including some wire, and a 1MEG ohm Pot for the gain (!!). Judging by the fact it also features two IC chips, and only onme is an LM Series op amp (I think it MIGHT be an LM386, but I'm not 100% sure, the other is a TBA820ML - so both chips are in a series with the ones I'm experimenting with for my own though my circuit is FAR different). 
Now, this meant that I had a new caveat when it came to this....since it came with a 1M Mini pot, and I had no trimpots in that size, I decided just to slap another control - a knob - between the Sustainer levers. So that's where the 1M Pot goes, that controls the gain, so unlike my other two Sustainers....this one actually is controlable from the top of the guitar. I used pin headers, as I planned, but attached to the BACK of the board and at a right angle, so that the board could sit in it's slot comfortably. It took me more than a couple of months to get around to troubleshooting the device. FIrst and foremost, this project was REALLY eating up family time a good bit, a few things at home happened between here than there, and for the end of March and early April, I got sick with a REALLY bad cold that left me laid up on the couch for about 3 weeks with a bad cough and a screwed up voice. Then some other shit happened. Then last night I had the urge to check it out and found I broke the link between the driver inverter switch and the sustainer control board - that's ALL that was wrong. 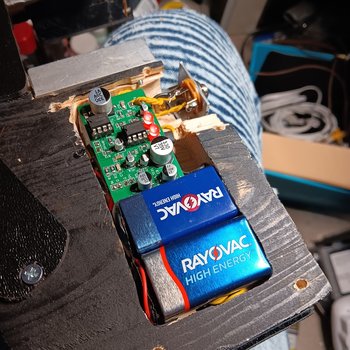
As you can see, the cavity on the treble side is VERY tight when it comes to the electronics. Turns out I cut out JUST the right amount of wood to allow me to flip the FUzz board over - which also got some new mods in a proper power inverter resistor added to the board, which has fixed the "blast" mode setting, and gave the fuzz even MORE gain, and also, tightened up the sound a considerable bit. This board is UNDER the 9 volt batteries. The battery closest to the Sustainer controls the sustainer board. The sustainer board sits flipped over, which also holds the molex cables in place (which are somewhat folded over each other). It also lets the red LEDs light out out of the back of the guitar while on. Nice. What's also nice is this switch doubles at FATTENING up the sound when I'm playing with distortion so the guitar sounds more like an angry old Les Paul with DiMarzio Super Distortions...almost an Elliot Easton-esque tone...cool (and very apropriate for a guitar with aesthetics based off a game console from 1977). That said, there IS Some improvement required for some things. First off my driver needs a different potting method done, I'm thinking superglue, or some kind of ultra-thin adhesive...which means I may need to rewind the driver, which is fine, as I've already done that a couple of times, and this time, remove the ax, and replace the wax with cyanoacrylate. Another modification I might make is a custom molex connector on the driver side...so I can experiment with different driver designs. That's kind of what this guitar is...as I have an idea later for a sustainer driver that can retrofit to any guitar non-destructively (I really badly want one on my Jag-Stang or Music Master) by running the circuit under the pickguard and using SMD circuitry. The reason for m y idea to re-wind the driver, is because I'm getting oscillations and and I can hear some microphonics when I attempt to use the Sustainer with the gain pulled up really high, but having the adjustable gain via the 1M pot really helps to make it already quite usable as is. Other than that, it achives my goal as it will fire off at least the lower strings by themselves without plucking them. Harmonic mode is a bit messy though due to the microphonics. The cool side affect though, is the on-board fuzz interacts with the Sustainer in a pretty pleasing way, giving it more strength and allowing for some surprisingly synthy type sounds. That said, I'm not sure if the battery is full-up but it's doing pretty good already for being used on a bunch of different designs, including my own. This tells me though that I need to pot my drivers better. I might be talking more about and researching driver design on my own somewhat so I can come up with stuff that's not ripping off Sustainiac or Fernandez/Kramer/Floyd Rose. One other neat note is I MIGHT have an in on making some guitar synthesizers using ST32 chips. I just got my hands on one of those STLINK v2 programmers for my Atari 2600 UnoCart - so strange how the console is now begetting me capabilities for the guitar through new experiences in using a cartridge emulator. This would allow me some pretty complex synthesis in a smaller size, and this might be something I can translate to pedal form eventually as well. |


 The side pieces of the fuji will be done the same way, the straight sections (and some of the fanned out curvature) line the edges of the neck slot, and the pickup slot. So all routing is done using a Jigsaw. This means I don't need to listen to my screaming loud Black & Decker router for 30 minutes while I cut out cavities on this build, and can use the much-quieter jigsaw. Same thing, pin in place with drywall screws, for alignment.
 The Strip Lighting I'll buy is the same stuff from Five and Below I've had before, so about $15.00 worth. These strip lights will change color chromatically, and I'll be using blackout pieces in spots to cover up where the lights need to xfer over between sections - likely where the neck joins the body. The "under-glow" will come from behind some panels that will be silver-leafed to cover the LED lights when the guitar is in brightly lit rooms or off. They will be driven by either three or four AA batteries, or by a single 9 volt shared with the sustainer and/or guitar synthesizer circuit.

 The switches are mounted under ABS Haircell Plastic (Black) sheeting - yes, the same kind you use to make a pickguard for Paul Dean style guitar - because it looks like the plastic found on an Atari 2600 system. The switches stick out of the stop through small slots. I'll probably label them at some point, but right now most of their use it tenative. The one furthest on the treble side is for a PReamp, the second two up from that are for the home-made Sustainer system I'll be using, the next one is a Cartridge On/Off switch that removes the 9VDC from the Cartridge, and another one that acts as a master power switch to cut off the power to the entire guitar to save batteries. There's going to be possibly as many as THREE 9 volts in this guitar with the lights, preamp, and sustainer on-board and those will live in the bass-side cavity, while the treble side bottom-most cavity will be for most of the circuitry. The switch slots were cut with a 3/4" spade bit on the outermost positions, and then cut the slot with the Jig-Saw. This allows me to have a "Multi-Layer" setup inside the guitar that allows for a large amount of custom electronics in the designated cavities. All the regular guitar stuff goes in the single short 3" wide cavity under the right side "wing" of the "Fuji" logo - using the top hobby-craft wood layer to anchor pots/switches/toggle to. Both output jacks (it will have a secondary STereo one on the bass side) are hidden under recesses on the back next to the cartridge slot....so right angle plugs might be...uh...interesting to say the least.

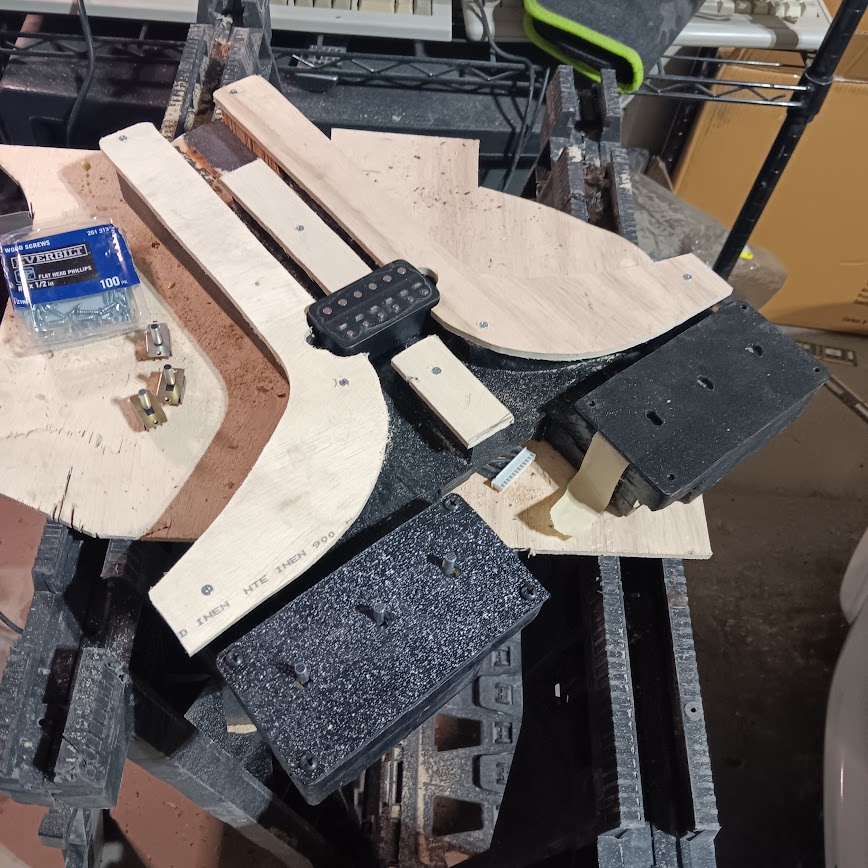 The Fuji Lgoo is made out of "Craft Wood" and then screwed to the top. I will later be gluing them on...and then filling in the holes and silver-leafing the logo (edges might be done with a silver-pen, and I may use Silver Spraypaint before the paint work. The way I made this was by tracing out one edge of the logo roughly to the guitar shape, then taking a second rough-cut piece that was slightly bigger, taping it to the first piece, "cutting" it to shape using an 80 grit sanding drum (I did that a lot for this part), then putting them on the guitar, getting the spacing right, which is supposed to be a little wider than the body so that we have a "Channel" for the LED strips on the outside of the guitar (it's also a "showpiece" remember). I'm tempted to get some more Haircell PLastic and then put it around the edges of the body shape to finish setting it off - and then cutting out the back side too and using a dremel to cut out the back covers so they look seamless.....though I might take the cheaper route...add some wood, reshape based on the outline, and then finish that way....but we'll see. The Hexaphonic pickup was then placed on TOP of the side pieces with them aligned, then they were taped back together, and the pickup route ground out. This was done this way for 2 reasons - 1 to not facilitate the need for a pickup ring (Which won't work with this pickup anyway, it had a fixed height from the factory), and 2, to allow me to slip some bare wood blocks under the bridge screw holes as support braces for the bridge when that's installed. THat way, when the bridge is installed (Assuming I don't need to recess it at all), and I can have the bridge tightly braced/attached to the body. I plan to buy some special long long wood screws (maybe coarse thread drywall ones) to make sure it takes through the support blocks and into the "Frame" (the main body block). Speaking of......
 One of the first ideas will be a simple "Stereo Guitar" cartridge, which will basically just boost the outputs of the divided pickup and allow them to be panned left or right. The idea is each divided pickup will be able to be panned to one side or the other, making it a stereo guitar. There might be some additional filtering and other functionality added to the circuit to allow for further EQing/tweaking of the signal. It'll be a very simple cartridge, and more-or-less designed, to teach myself how to make a simple mixer.
 This will be a stereo/mono switchable simple guitar synthesizer, most likely based on the CD40106 (and possibly an attempt to use each oscillator for each string at that). Might also just call it the Guitari 2600 Synthcart or some other retro-ish thing. THe idea is to have a six note, polyphonic synthesizer built into a modular cartridge that fits into the guitar, and can either be output in stereo, output in mono, and/or mixed with the regular guitar signal so I can double track it.
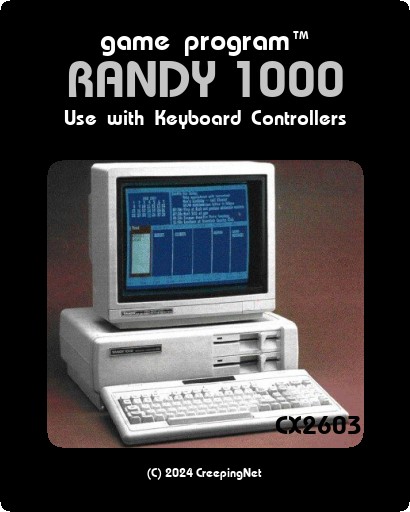 Basically, a basic six note polyphonic square wave synthesizer, plug n' play, simple, sounds like the old Tandy 1000/PC Jr. 3-voice sound chip (well, more like TWO Tandy 1000's playing in mono or stereo, lol) - also can be doubled with the guitar sound. Basically, a polyphonic version of an idea I had for a simple monophonic pedal.
 If I could figure out how to swap a guitar signal into a FM Synthezier...this might be a working idea. Basically....run the output of the hex pickup into a YMF262 or something, and then run it output to the stereo jack and/or mixdown to the guitar mono signal (or both). Might be the first SMD device based until I made, as well as AD/DA converter based. We'll see though.
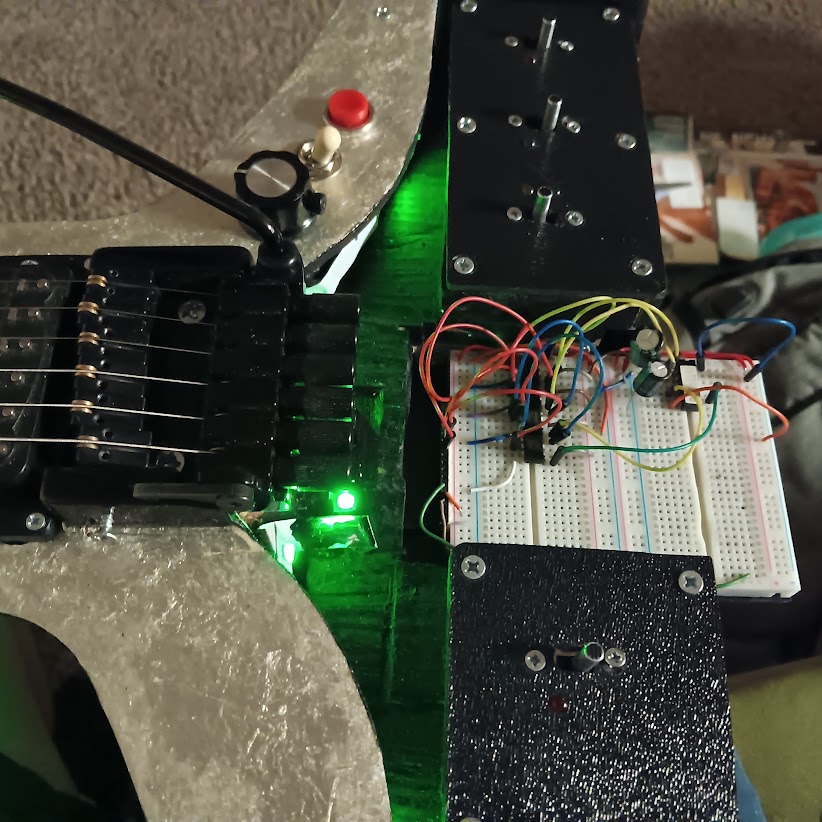
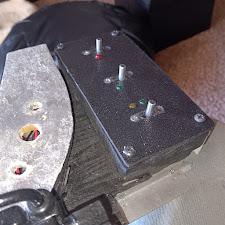 Next up, speaking of LED's I now have LED's put into the control panel and a lot of pre-wiring done. After vacation later this month, I"ll be ordering the kill switch, anbd by then I should have 10 more brand new pots coming in. I'm using the Radio Shack knob I have laying around for the volume knob. The Kill switch is Atari Orange and should look great on this guitar. The toggle switch is already in....might get a black or orange tip for it....maybe. But that's finishing touches. The Red LED on the bottom is for the PReamp On signal, the Green LED is for the Sustainer board, the Green and Amber LEDS are for the SUstainer mode switching. On the bass side will be one red LED for the Cartridge Port power. I have found the third 9v Battery holder for that - there's 3 9v and 3 AA batteries driving this thing in the end. That's a lot of power, but htey fit in the slots perfeclty.
 Lastly, a lot of metalwork has been done to the guitar. The aluminum brackets for the output jacks are placed (along with the stereo and mono output jacks), the switches are now screwed into the panel for ease of serviceability (something I decided upon after thinking about the Fender Jaguar again for awhile), and all the basic switch wiring is done on the treble side (the bass side does not have as much). I have never done so much metalwork in my life. Also, the rear cover plates are done. The ones for the control cavities actually BEND over the back, which I did by heating the plastic tabs with a lighter and then slowly bending them over a screwdriver - looks factory made...well...factory-made-ish I guess. But it looks good. I also test fitted my Warlords Atari game in there just to see what it would look like with the various Synthesizer cartridges installed.
 So the Guitari has been up and running for about 2 weeks now fully since I got the load of 500K Pots in. Here's the assessment so far, sounds like a Telecaster - that's awesome, but no hum, even more awesome. The overall tone is pretty freakin' rad. And I have my new distortion circuit designed to put in it. This same circuit is also being reproduced for the first cartridge - the stereo guitar cartridge. Basically, it's a simple LM386, some capacitors, a resistor, and it sounds FAT.