
| CreepingNet Trashmaster II |
  Way way back in high school, 2001, a bizzaro beast was built, using all the cast-off parts from guitar projects that were rejected for various reasons. I was so desparate for ANY kind of second Offset, that this was the result, possibly the most insane and craziest mix of parts. Way way back in high school, 2001, a bizzaro beast was built, using all the cast-off parts from guitar projects that were rejected for various reasons. I was so desparate for ANY kind of second Offset, that this was the result, possibly the most insane and craziest mix of parts.
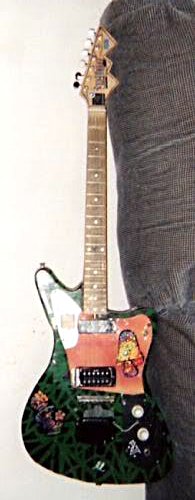
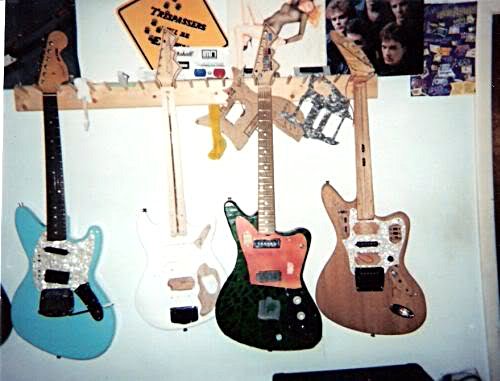
So the project started off when my mom, in her infinite wisdom, said "let's put lattice on the car port" so she could put some kind of koi fish pond in to entertain her collection of cats that rivals my guitar collection. One of these involved burning up a 1/4" Router bit on a knot in a long, pressure-treated pine board. So this was taken back to the shed. I also had some then 11 year old sheets of construction grade plywood, and a bin of parts, including a then disused Harmony H804 neck that I attempted my first headstock design on. So the original build ensued as follows. The now chambered pressure treated pine blanks were cut into three pieces and glued together. I had a wacky idea to do the INVERSE of what Paul Dean did with his Dean Machine guitars - a chambered BODY instead of the chambered neck thing. So yeah, we had a body with resonance slots in it. But oh wait, it gets even more amusing..... So I needed a solid top to put on it so I did not have visible fluted channels. So the 11 year old 1/4" thick construction grade plywood was cut to the shape of the guitar on a bandsaw and NAILED to the top with TItebond II glue. THen the final shape, made to look like a Fender Jaguar (and copied from the hacked-up Tesico bass body in the wall photo). For a neck, I used the modified, stripped down original neck to my Harmony H804, which featured my first fret job. IT had a mixed set of the original six-on-a-plate tuners, with the low E and A strings replaced with cheapo Diamond backs (I cut the two "Dead" tuners off with a hacksaw). Zero fret replaced with a huge bone nut, 3 string trees, and abalone inlays, and a crazy logo on the headstock drawn on in gel pens. The body was painted like a Peavey Patriot some guy at the Auburn Guitar Shoppe brought in one day in smashed condition, which I reglued back together for the guy and got everything running better than new on. He had taken Testors paint to th eblack Peavey and did this crazy ivy-like pattern, so I did the same thing to the top of the guitar. The pickguard was from the old Teisco guitar, it had the broken 3way Leaf Switch from a 1977 Aria SG copy in it that I rebuilt for a classmate (I got it to work by taking it apart and bending the leaves back together). The pickguard and control plate plus white witch-hat style knobs were from the Teisco. A Harmony H802 Anti-Foil pickup was put in the neck moutned to an upside down Humbucker frame. A cheap $25 Ibanez LA Neck position pickup was put in the bridge. The original non-adjustable bridge and tailpiece were installed after I Could not afford a Jaguar Vibrato and fgloating bridge, as well as the claw tailpiece painted up in heavy marine paint. The resulting guitar looked like shit, but played surprisingly well.....but the crazy part about it was the SOUND. The week the guitar was done, Lithium went into the studio and recorded "Crystal" - and this was the guitar I used for that whole song. What came out sounded fucking amazing! So it became the dedicated "Crystal" guitar. Later I wound up writing "Dain Bramage" on it, as well as "Too Much Amanda" - which are on the Soundclick pages. IT was dismantled in 2005 and was to be retrieved, but I still have not been home in like, 20 years so it's unlikely that that's going to happen. Above is the Trashmaster's first studio session in Mike Squier's FX Studios in May of 2001 - so over 20 years ago. So next comes, why would I want to make a remake of this guitar? Well, let's start talking about the new one. New Trashmaster Build - May 2024 - How I build a Guitar Body using cast-off-wood So how this started was my wife collects stickers, and her friends give her stickers, and there's free stickers. I have not had a punked-out sticker guitar in years, and she said "you should build one we can put stickers on"......okay.....but what should I build. I thought for awhile and the best idea that came to mind was to reprise the Trashmaster in the end.
The deepest (and biggest pain in the ass) pockets to route are pockets for the pickup selector when using a Gibson style leaf-toggle, which I have to almost max out (sometimes even fully max out) the router depth or even make the bit stick out of the collet a little more to get to the right depth. Rhythm Circuit routes are a REAL pain because you have to be VERY precise, and it needs to at least have a deep channel where the roller wheels are so they clear the back of the body - but not be so deep you get a hole in the belly contour. Luckily on this one, I'm reprodcing a modern version fo the two wobble-switches from the old Teisco pickguard the O.G. Trashmaster had. Except this time they are DPDT rocker switches designed to stick through a rectangular hole in a panel, and can be ganged together in a group of three. Once all that routing is done, then the neck pocket is checked, any rough spots in routes are cleaned up with a Dremel if needed be (80 grit sanding drum), and then it's ready for Final Shaping and the belly contour. I do the belly contour about like what a weapons maker in ye-olde days probably did to sharpen a saber! Basically, I take an 80-grit, tall and wide sanding drum, and run it over the back of the guitar in the right area about 45 times to get it ground to the right depth, withotu going too deep. Any sharp edges and inconsistancies in the shape are later sanded out using 80 grit on a random orbit or vibration sander. Then the last piece is taking my template, re-tracing hte body, and then grinding the body down to final shape at 80 grit. This is where I get the shape and countours all done right. This one I did not do as much of that, because I wanted it to look a little more home made like my older builds - so I wound up with kind of a neat looking, smooth, rounded hexagonal shape for the treble side. The next thing will be designing the electronics, deciding on the bridge, and figuring out what I'm doing for a pickguard. I know I want that Univox/Teisco looking lower part, that's what made it look unique, but I also want to maybe reprise the crazy finishing the original had - ie six different cans of different spray paint. But aluminum, now that I have some good metal cutting blades....is also an attractive potential idea, and accurate to what the original Trashmaster had in it.5/17/2024 - Setbacks...HAHA NO....when building a Garagecaster like this.....  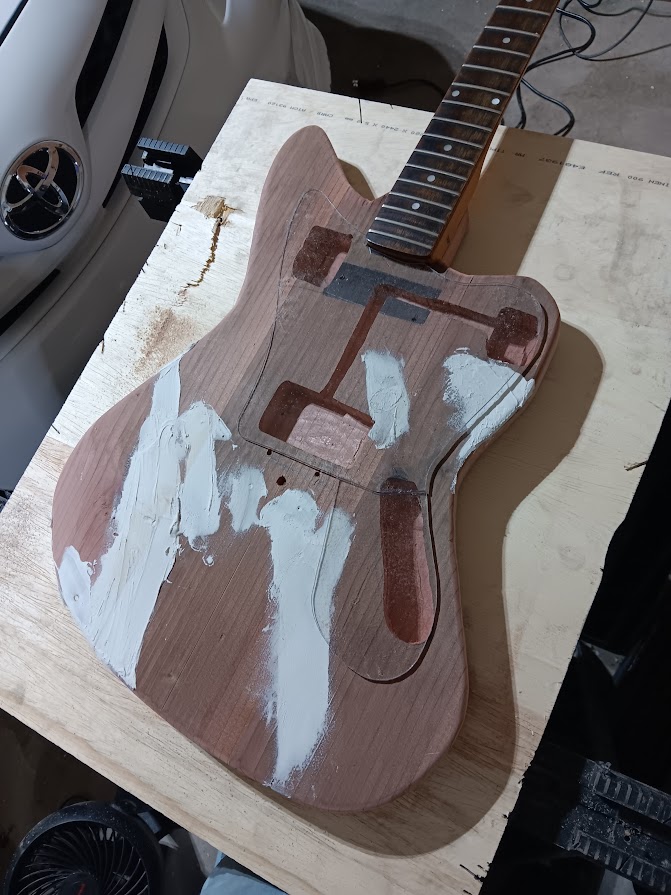 You let "life" GUIDE the process. That's how I made the original, that's how I'm making this one. Although it's going to be a different-ish (and assumedly a much better) instrument. There's a TINY possibility that the old one may turn up again someday. So I'll want some difference in this one. Then I'll have two XD.
Anyway, I bought a huge can of regular white wood filler. The body's cracks, drill holes, and other stuff are all being filled and sanded flat. I'm letting the back go overnight because I ran out of 80 grit sandpaper tonight when my last one came apart. I found the home made neck plate, that's on it now. I need to engrave it. I used 1.5" long metal coarse thread screws to hold the neck on. It fits perfectly and is perfectly straight. The pickguard was a discovery, I've been using regular plexiglass since high school on some of my builds, regular "Acrylic" as they call it these days. However, I found out LEXAN is the way to go. That stuff tools so much better, and is so much easier to deal with. The new pickguard improves on the shape of the original. This was after spending 30-45 minutes in Home Despot trying to find 1/8" thick aluminum stock. I decided instead, this go out, I'll spray the lexan from the back, then the finish gets protected from sweat/acid, and stickers can be removed at a later date if I decide to sell/trade/not have a sticker guitar anymore. As for paint....whatever is on hand. I think I have some black, silver, and white......this could look rather 70's compared to the 60's look of the original. I used regular wood screws from the hardware store (pack of 100 for $8), and picked the best spots to stick them. It looks pretty nice. There is some more routing that will be needed. I'm going to widen the cavity for the volume/tone/output jack, and possibly hide another preamp in there, or something equally as nuts. I'm toying with maybe tossing in what I call the PSP Preamp (Pursuit Special Preamp) - basically my remake of the preamp from the "Guitar Handbook", lol. Make thing thing loud, fat, and distorted to all hell. We'll see though. A lot of this is building with weird shit I have laying around. I do know I want three stackpole rocker switches.....this is the wiring idea.... 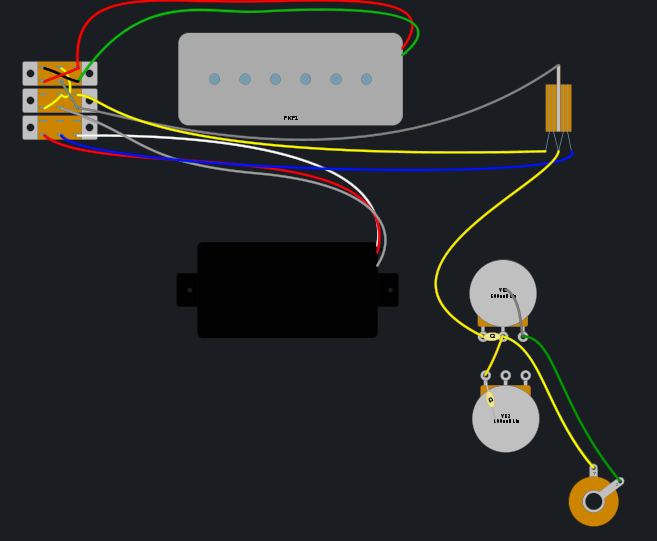
Basically, one more switch than the original - one for phase of the neck pickup, another for series parallel (yeppers, two or three coils, depending on if the humbucker is split or not), and then of course, the old-school-creepingnet 3-wire coil split found on EMG select pickups. Then everything feeds into a 500K volume and tone control, and then the output jack (supposing I don't decide to jam more stuff in there yet). 5/24/2024 - Painting, the Fine "Art" of my High School "Use up all the Spraypaint" lunacy 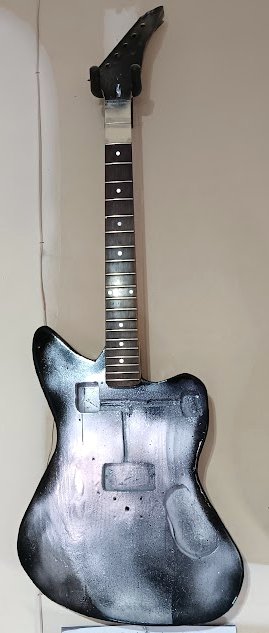 The original Trashmaster had two incarnations, the original Lithium one (the one in the picture up top), and then one I lost all the photos for on MyFileHut, or My Photo Hut, or some other crazy website back in the early 2000's - the incarnation an Ex called the "Crackmaster".
Basically, what I'm doing here is taking every cheap 1960's guitar, crossing it with every cheap 1980's guitar, and then pollinating it with some pro grade wiring and fretwork, and ending up with an inexpensive ass kicker. It's basically like a Teisco TG-6 knocked boots with a Danelectro/Silvertone 1449, and got some Fender Jaguar/Jazzmaster DNA mixed in. The result is basically a hardtail, crazy fleck finished offset with some pretty interesting wiring options.
Next came some black paint. On the headstock, since the primer was dry, it just sorta went right on in one thick coat, then I flecked it with the silver paint. 

The body, however, was a different story, I wanted the paint to soak into imperfections, so I hit it while the primer, in a thick coat, was STILL wet. This resulted in the crazing, crackling, and wacky results I wanted. Then I hit it with silver to fleck, too much silver, then I hit it with BLACK on the sides in a faux sunburst sort of pattern. Once these are done, I'd hit it again, trying to get a crazy balance, and the results were even wilder than the original. I have "Black chrome" sections, I have sections where it looks like a nuclear melted Dano 1448, and sections that looks like a Fender Jaguar in Silverburst - all three very pleasing results to me. We want a very heavy in character finish because it blends those stickers in together when we sticker it up. I call this color "Nuclear Silvertone" for now. It looks like a Silvertone that survived a nuclear storm. I also kinda' like it because it reminds me of Mad Max's interceptor after it was made into Razor Cola - kind of fitting. What am I talking about? The last incarnation of Mad Max's car (once called the Last V8, Black on Black or the Black Interceptor) - basically, 1973 Ford Falcon XB Coupe. IT rolls over and gets turned into the below in the last movie. Kind of a fitting fate for the Trashmaster's design. I also have 2 gold Skull Knobs I might employ somewhere...probably on teh tip of the STrap Locks though. 
June 21, 2024 - Finishing Up So here's everything leading up to this project being finished. The guitar is finished, it's playing really well, and it's taken a HUGE Struggle with the electronics. First off, I found a better CLEAR material - Lexan Polycarbonate - vs. the Plexiglass Acrylic stuff I was using before. Lexan seems to take heavy tooling a whole lot better than Acrylic does. Acrylic tends to crack and shatter if over-worked with tooling. But Lexan seems to take to it far better, and is a far more durable product. The pickguard and control plate are Lexan, while the Truss Rod Cover and later the additional rear-route cover for the switches. Also, the EMG Select was fixed using a bar of Lexan epoxied, taped, and screwed to the bottom of the pickup. So the pickup is now properly mounted, with 2 wood screws threaded into the lexan and 2 springs. It's slightly off-kilter, but hey, so was the original. The biggest pain in the ass after milling the lexan and plexiglass parts - was getting the bloody SWITCHES working. I ordered two sets of switches, not realizing one set of them (in black) were actually 4P2T (!!!) - basically, a rocker switch with another DPDT switch attached to the side and actuated by the same lever (Lever Switches like this are basically slide switches with a Pac-Man shaped tilt mechanism attached to them). The other switches were far cooler, grey switches......BUT, those switches presented a new problem.....they don't exactly work like the regular DPDT switches I'm accustomed to - the pinout is way weird (to me). 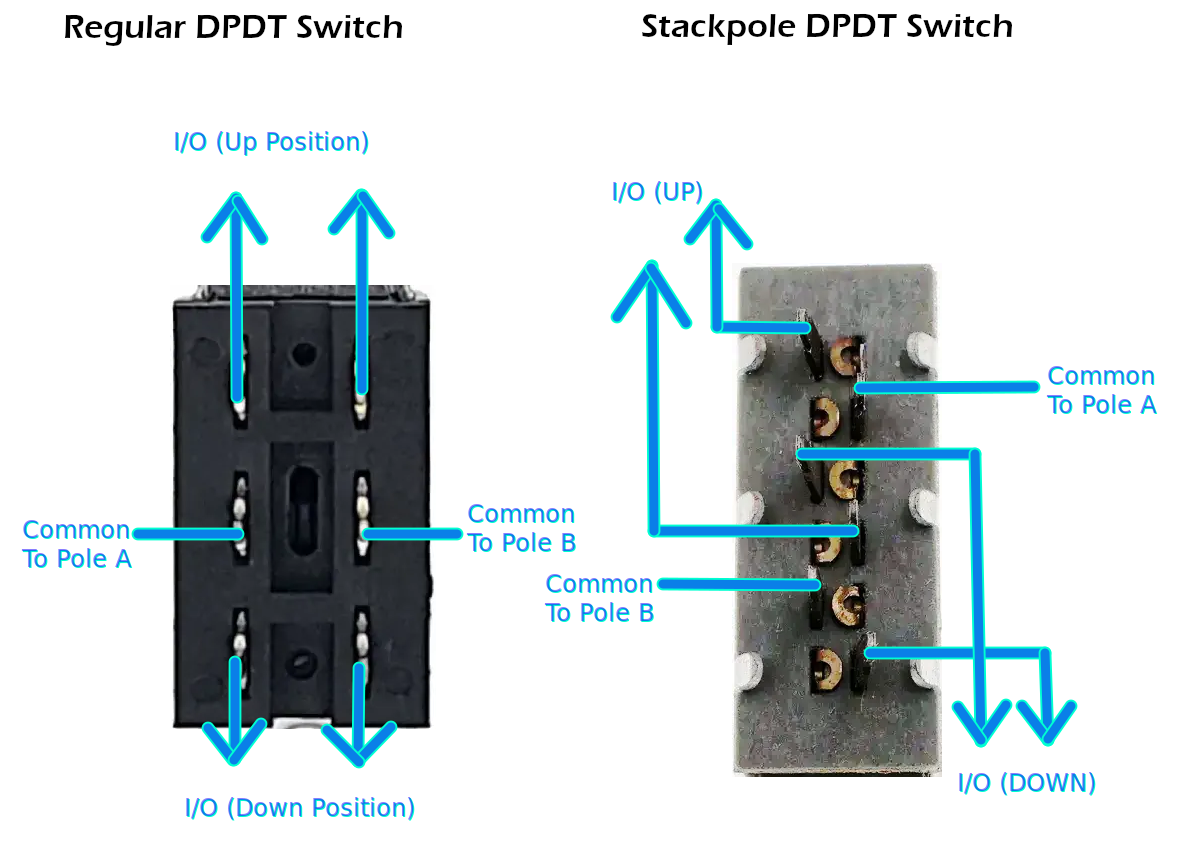
Basically, I figured out fast that the switches don't work the way I think they do. I had to tone them out with a Multimeter to figure out that actually, the lugs do the same thing as a regular DPDT switch, just the layout is VERY different. Basically, one contact on the upper left and lower right pivots a contact between two contacts on the opposite side. This made building my first guitar with a Series-Parallel setup (further complexified by phase reverse for the neck pickup, and the Single/Humbucker modes on the bridge pickup) made this tremendously tedious....it also made it less fun by the fact my soldering iron had a VERY torn up and worn out tip. (it's since been replaced). I did, however, manage to get the switch cluster working, but the other problem was that these bloody things needed a route through the whole guitar because the guitar was not thick enough to hold them, this lead to a funky, interesting looking control cluster where the screws hold up the switches AND screw into the wood. The whole guitar was wired with leftover wires from a computer power supply cable harness from a PSU that died. Most of it is basic primary colors (red, yellow, blue, white, black), and visible running through the guitar somewhat - a very TIGHT harness with cable ties running through it. I had to put an extension and heat shrink on both pickups to feed them the they they go. Initially I planned to use a a Stratocaster style bridge, but then changed my mind afterward because the Strat bridge was just too low, and the screws did not feel solid enough, so that junky old bridge was scrapped, and swapped out with the Fender Jaguar's old ABR-1 Tune-O-Matic that's been sitting dormant for awhile. Initially this was installed with wood screws and washers and intonated - those wood screws would make the pilot holes that would become the holes for the furrels and NASHVILLE style tune-o-matic posts, which necessitated drilling the mounting holes on the ABR-1 to fit the Nashville posts - but resulted in a very sturdy fitting bridge, and perfect height and action when I was done. That's one way the original guitar kinda' sucked to play, it had high action, and was very slow compared to my other guitars (I'm used to racehorses like my old red Kramer, Nikki, the Paul Dean, and the Jagmaster - that have low, fast, aggressive action. This one is a lot lower and faster. The wife put stickers on it at that point, which was a week or two long oredeal involving digging through hundreds of stickers a friend had sent her for...uh....only knows what reason...but anyway, we found a lot of cool ones and put them on the guitar to finish it's punked out, crazy look. Today, the grommets and height adjusters for the TOM came in, I had to drill out the bridge to fit the posts, now it fits perfectly, I also had to double-check the wiring, change the neck pickup mounting (to make it sit lower), and milled out a new toggle switch tip out of a aluminum spacer I use for installing circuit boards in custom guitar pedals. This looks cool and sets off the home-made look of the guitar, plus it makes thwacking it between selections easier. Resoldering things with a new soldering iron made the wiring a lot more reliable and now the guitar sounds how it should. 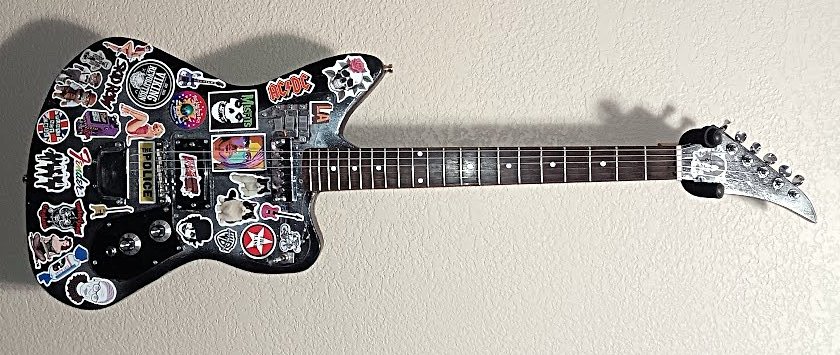
The initial playtest was playing through P-Model's first two albums, especially since I finally got the crazy note patterns for the parts on Health Angel and Artmania thanks to watching a Japanese guy play them on YouTube. There was some mild tuning drift at first....probably because the strings needed to settle in first, but after that, it was ready to rip. |


 The first step in making a body is to find a board or enough boards with enough wood to build a full body. In this case, three will suffice, they are a bit wider, and thinner, than the boards I used back in 2001. This makes for a lightweight body. I use a hand planer on boards like this that are already flat, just to address them to perfectly flat so they stick together. I think this might be for the strat I'm working on, but you get the idea. It doesn't take me very long to plane, I just want to make sure ALL Edges fit together flat, that way then I have the most durable glue job possible. The way I play guitar, this thing needs to be able to handle a lot.
 After the board is planed and glued, it's clamped with three long clamps over night and let to dry for 24 hours. I use Titebond II wood glue for this, which is what I have used since I started building guitars for myself as a 14 year old in 1998. This is why I want the mating surfaces to be really nice. I also don't worry about the board faces yet - because I'm going to be sanding the hell out of these things in the end. Yeah, not really much to say here, just basically three boards clamped together overnight. Usually before I glue, I make sure to test the outline of the guitar on the board to make sure that it's going to fit, and also find the centerline of the center board. Offsets are the trickiest because of their asymetrical nature (that whole 10 degree tilt thing I believe is one of the reasons early Production Jag-Stangs had wacky neck joints, Jag-Stangs have one of the hardest bodies to make). That said, I've been building offsets since 1998, so that body style family is pretty easy for me now.
 Now we see the freshly cut out body, I use a 3.5" long, coarse tooth, fast-cutting, jigsaw bit, and I work in sections, and take my time too. That's very important. I try to stay about 2mm outside of the outline, especially on complicated shapes such as your classic Offset style body (which is this). In particular, the body horns (treble side nub is one of the biggest pains in the ass because it's one of the biggest "look makers" on the guitar). Once the shape is cut out, the next thing is to hand-plane the arm contour on the corner. I do this by hand because it allows me precise control on the bevel. I like my bevels rounded ala Kramer or a Fender Stratocaster, so that's what I do. Those sharp bevels you see on a lot of copy guitars and other brand's designs are a little "rough" looking to me, though they can be cool on a straight-lined guitar like a Vee or Explorer type body. But that's just my personal preference. Basically, I'm a lot like Leo Fender when it comes to contours - form follows function. I'm also a big guy and I like a guitar that I can play for at least 3 hours without feeling fatigued by it.
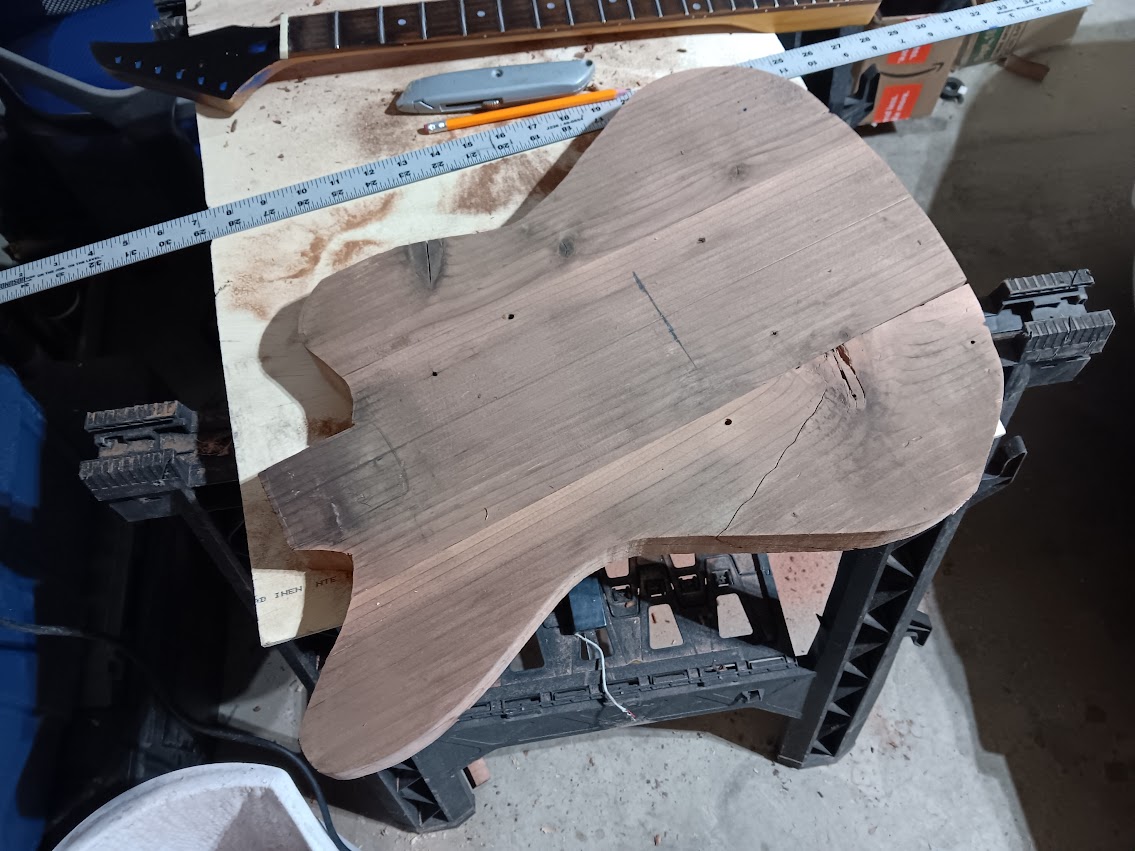
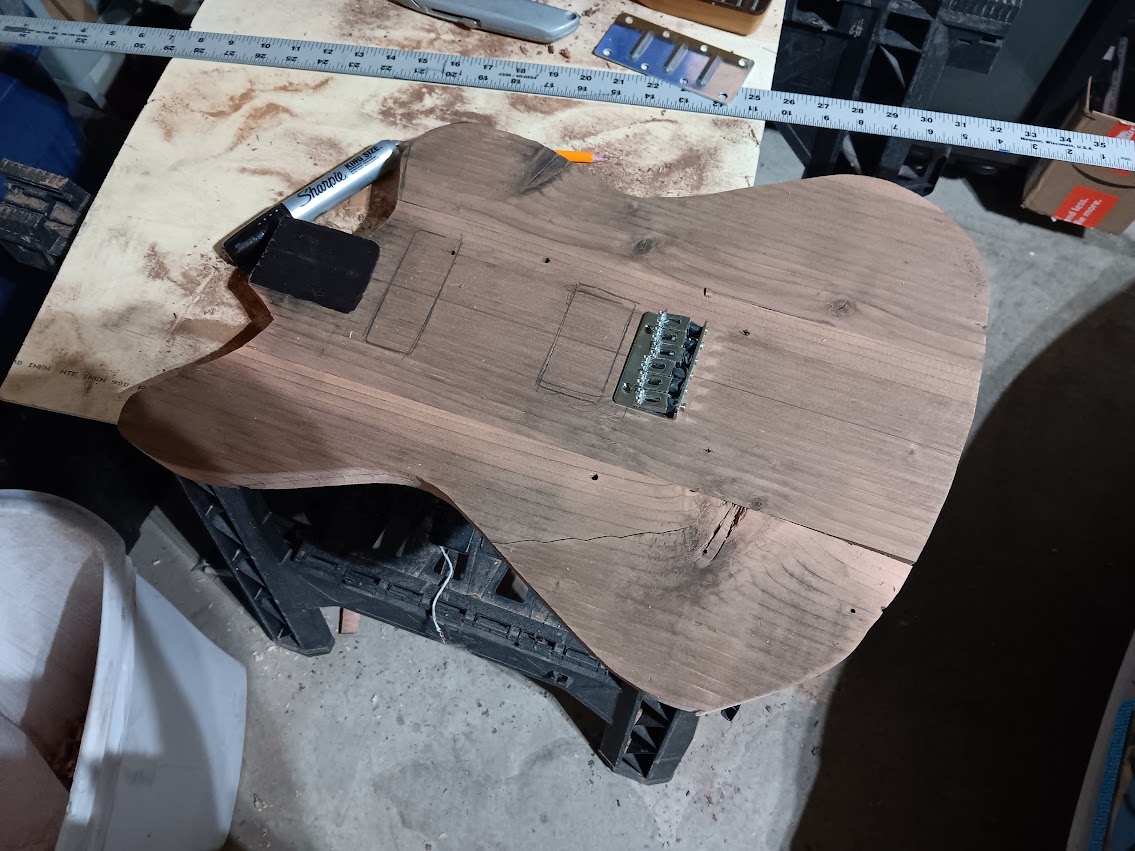 After that I start pre-planning the neck, neck alignment, neck pocket depth, pickup placement, bridge placement, and all of the control routes. Most necks are about 1/2" (Paul Dean style) to 3/4" inch deep - which is totally dependant on what kind of bridge the guitar is going to have. Rule of thumb is most Fender-based hardware designs like Floyd Rose Originals, Strat Trems, Strat/Tele Hardtails, Offset bridges - sit almost 3/16-1/4" lower than most Gibson-based designs (Tune-O-Matics, Stop Bars, Leo Quan Badass Bridge - hence the Paul Dean comment). So a shallower pocket might be needed if you use a Leo Quan Badass Bridge or a Tune-O-Matic (this is a major reason why everone shimmed their Jaguars, Jazzmasters, an dMustangs in the 90's when they put a Tune-O-Matic on them, it wasn't just string breakover angle). I start with a centerline, mark with pencil, and place the pickups, and try to give about 2-3mm of clearance for the pickups. I'm more leniant if the guitar has a pickguard to make routing easier and faster. I also have to plan for the wires carrying the signal through the body, and whether or not it has a control plate or not. Once it's all finalized, I usually paint the cutout areas with a magic marker and then routing is done.

 Routing is all done with a plunge router - currently I'm using a Black & Decker that's seemingly getting close to it's last legs. I bought it at a thrift shop for $25 many years ago in Seattle, and a lot of guitar projects have been touched by that thing. It's ugly, it's beat to hell, it's loud, but it gets the job done and does a great job. I use a 1/4" wide 1" tall router bit. If the wood is more dense (ie oak/maple/some other stupidly hard wood), I'll pre-drill first, but if the wood is softer - like this stuff - I'll just route it out in a few clear passes. On this one, the neck pickup does not need a route because the tall neck socket (as I'm still deciding between a Tune-O-Matic and a Claw Tailpiece similiar to the original, or this crappy STrat tailpiece I have with the springs replaced by heat shrink tubing). So instead, the beauty of Harmony H802 pickups, Goldfoils, and a lot of Rickenbacker style pickups with a shallow route, is they can be surface mounted, and then the wiring sent into the routing channel underneath through ahole in the pickguard. The original Trashmaster was mounted on an upside down Humbucker frame. The bridge humbucker is a 8.4K Ohm EMG Select - which this time I'll have a coil split function on this guitar (which was not on the original) so it can be something more like Johnny Ramone's guitar at a moment's notice.
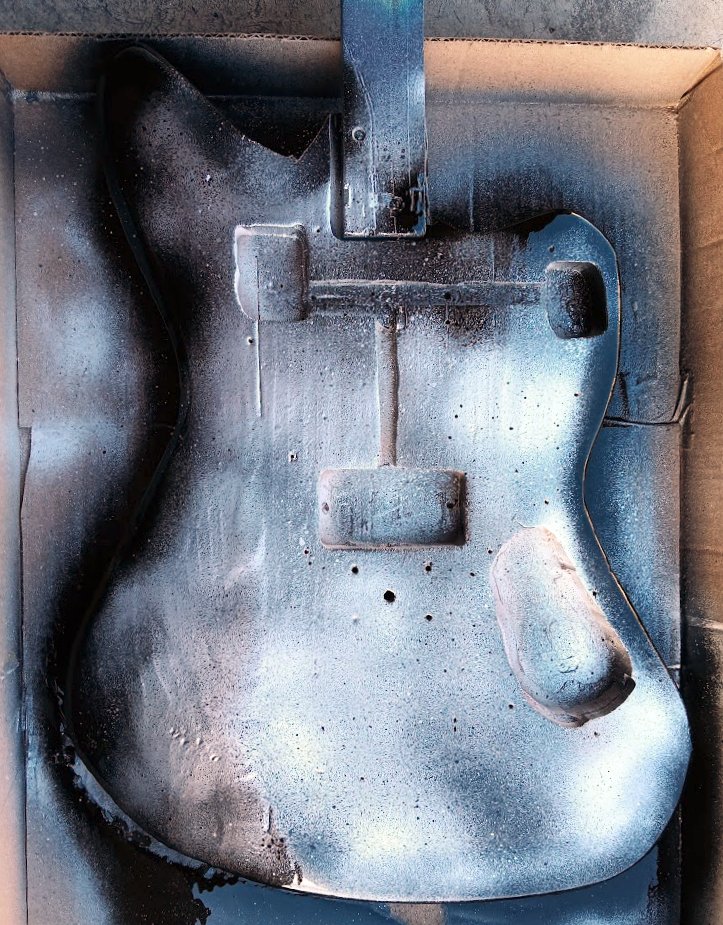
 This go out, I have three paints in aresol to work with: Mold Blocking Primer (white), Behr Black, and some Krylon "Chrome" Paint that looks more like a really fine-flake silver metallic, lol. I painted in this order. THe initial inspiration was that weird black/silver finish you used to see inside old ovens, or on old Silvertone Guitars from the sixties. In particular, the crazy color you saw on the old Silvertone 1448 Amp-in-Case model. Just a little more "Extreme".
 I started with the white mold blocking primer. I did the headstock first, then the body. When I did the headstock, some chunky crap flew out, so I waited for the primer to be "just dry", then sanded, before I started rattle canning it black and then flecking it with silver paint. I chose just to do the top of the body - a nod to the original. The back will be black oil-based stain instead. Both ends will be clearcoated with water-based clearcoat.