
| The Boss ME-6 Page How To Get the Most out of this Decent-Enough Effects Processor |
||||||||||||||||||||||||||||||||||||||||||||||||||||||||||||||||||||||||||||||||||||||||||||||||||||||||||||||||||||||||||||||||||||
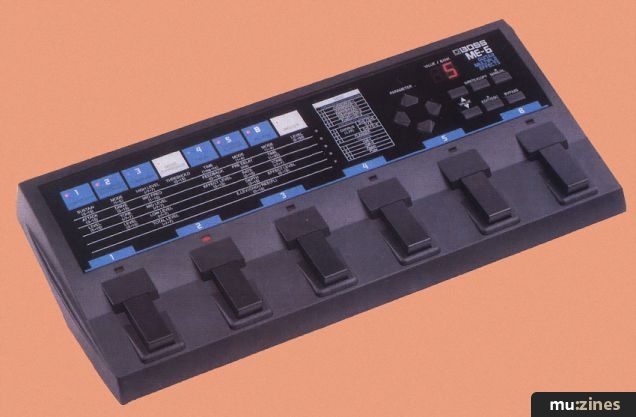 The BOSS ME-6 was a digital multi-effects unit released soemtime around 1992 by BOSS/Roland. It features storage for 5 banks of 5 presets for a total of 25 patches, and features multiple effects on-board including: compressor, distortion, EQ, chorus/flanger, delay, reverb, and noise gate. My experience with this device was that it was my primary effects unit in the local Montgomery/Opelika based Nu-Metal band Lithium from 2000-2003, and was used on my M.J. Project until 2004 when it died. The BOSS ME-6 was a digital multi-effects unit released soemtime around 1992 by BOSS/Roland. It features storage for 5 banks of 5 presets for a total of 25 patches, and features multiple effects on-board including: compressor, distortion, EQ, chorus/flanger, delay, reverb, and noise gate. My experience with this device was that it was my primary effects unit in the local Montgomery/Opelika based Nu-Metal band Lithium from 2000-2003, and was used on my M.J. Project until 2004 when it died.
The ME-6 features outputs for a 1/8" stereo heaphone, dual outputs allowing for mono or stereo operation (send out to 2 amps), a tuner-output, and some remote for manual mode and bypass (using 1/4" monophonic cables and footswitches mostly). There is no MIDI Capability, no any way to edit patches digitally using a computer (this thing came out in a time where you'd need MIDI Ports or a regular RS-232C Serial port for that - as a "cutting edge" PC was the intel 80486! - but this features neither of those). My general opinion was it was an okay-ish unit, but it was incredibly difficult to pull a good distortion sound out of. Where it really shines is it's reverb, modulation effects, and it had a pretty darned good noise gate. This is why later on, from 2002 onward, I had a Korg AX30G in the front-end of my effects setup in Lithium to use a much better distortion than the ME-6 could offer. Editing however, was a tedious process as the buttons, while quite tactile, took a fairly firm push to activate in some cases.On-Board Effects Explained The BOSS ME-6 had the following effects... Compressor - There's only one type, and parameters for Sustain, Attack, and Level. When I used the ME-6, I usually used the compressor to punch up the input gain for the Distortion/Overdrive so that it would break up a lot more for that "metal" type distortion. Overdrive/Distortion - This offered 5 modes of operation: Overdrive 1, Overdrive 2, Distortion 1, Distortion 2, and a Distortion that shifts the Equilizer BEHIND the Distortion, allowing for a PRE-EQ effect. Has controls for Drive (distortion), Tone (mids), and Output Level. Equalizer - Allowed you to adjust High, Middle, Low, and total output level. This was ESSENTIAL early on to make patches sound good, usually you'd want to augment the midrange somewhat, and bump the lows quite a bit as bass response on this was not the greatest out of the box, especially when going through a regular guitar amp as I was using it. Noise Suppressor - As you can guess, this is a Noise Gate, and it has ONE Setting - Threshold. I usually turned the threshold all the way up, and then backed it down until I was just getting some buzz/hum/noise through, because I wanted to have some volume control. It was actually a decent-ish noise gate, but did not completley remove noise. Delay - Just one, a digital delay, with time (1ms-1s), Feedback (repeats - keep this in mind, it's ESSENTIAL here), and a "Effect Level" which was really just your "Mix" control. This was actually my first ever experiences using Delay in any competant way. Chorus/Flanger - this had 4 modes of operation: Chorus with D+E and D+E in L/R which I used most of the time in Lithium when I was playing mono through a guitar amp, Chorus with D/E - which gave a really cool "tunnel effect" when used in stereo, and D+E/D-E which I rarely used, and then there's the Flanger effect. It has controls for Mode 1-4, Pre-Delay, Rate, Depth, and Effect Level for the Chorus, or REsonance for the Flanger effect. The Chorus later became the piece d' resistance of the ME-6 as I was using it more like an Eventide Harmonizer H3000 using the "Jape" effect EVH Used using the D/E setting for the Chorus, I did not use Chorus as much in Lithium. Reverb - This was the other rock-solid effect. It features 4 types of Reverb: Hall 1 (small), Hall 2 (larger), Room (ambience), and Plate (metallic sounding). It featured settings for mode, Time, Tone, and Effect Level. This was KEY in that "voices" patch with the Delay I used in Crystal to get that sound (plus a compressor). As far as I know, I was the first guy to ever do "reverb trails" like this, but it did require me to change up my playing technique massively, from my usual aggressive, hard attack, to a very light, gentle touch to "tickle" the notes out of the guitar gently, otherwise it'd just make a lot of loud racket and white noise. Master Volume - The Master volume control was key when I was using a 2 pedal setup. I actually use it with the AX30G out front for awhile since that yielded a cleaner sound, but due to the digital nature of the control, fine adjustment was VERY hard to get, so I moved the AX30G in back due to it's analog knobs which made "load balancing" between the two much easier. Editing Patches on the ME-6 The BOSS ME-6 was a "Manual Only" edited system. Basically put, what I did was put it on a music stand at home, plugged in headphones, and then sat literally for HOURS and programmed all the sounds you heard out of me at the time. Luckily, I was a single teenager living at home at the time so I had all the time in the world to do this. What you'd do is use the bank and patch footswitches to select the patch you wanted to edit, then hit the "Edit/ESC" button, and you could use the arrow keys to navigate the effects and their various parameters, while changing the levels of each parameters using the "value" buttons on the left of the cluster of six under the seven segment display. When you were ready to save (the most time consuming part was editing the patches, because I was constantly having to jog between multiple effect, changing their levels and various parameters to get the best sound), you pressed the "Save/Copy" button. Press it once and IIRC the seven segment display would blink as would the LED for the patch's corresponding footswitch. This allowed you to save a copy or an edited copy of the pre-existing effect to another part of the board. This was how I made consistant sounds for all of the different variations that I would switch between in a set. This is also how I copied patches 1 & 2 to every single bank so I had a "home set" of patches I could rely on being there should I need to go back to my "normal" sound. The only way I could backup presets was to make a spreadsheet in Excel, or even just draw my own grids on paper and write them out. There was no "computer backup" or "save file formats" back in the time the ME-6 was new, actually, most people did not even have a computer in the home back then. Lucky me it was already almost 10 years old when I got one, and I had just built myself a 486 (Creeping Net 1) so I had access to Excel/Microsoft Works, and I also was constantly toting around various notebooks.Patch Organization Example of Patch Organization I typically organized my patches in a way that I could play with them in a setlist without having to change up very much. Most of the time I was on Patch 2 of any bank, which allowed me to pick a bank for an adjoining track. Say, we were playing "Freezing" and "Crystal" came afterward, I'd just switch to bank 5, and use Patches 1 & 2 for "Freezing" then when Crystal came I'd switch to 5/5 for the Voices right after and we could literally Segueway into Crystal without even needing the on-stage banter if we felt like. Keeping a certain level of flexibility due to having the same patches that you use the most on almost every bank is very useful.
Patch Guide - These are ALL Manual I have not written any of this out in awhile, but I'll add them as I remember. I have an example/template below of how I'm organizing the patches. Basically, each patch will get it's own table, and the parameters will be typed out under the PRM fields. This matches the front panel of the ME-6 so it should make programming one a breeze. I may eventually purchase one (assuming I can get it cheap) and build out a bunch of patches with it before I sell it off (after resetting to default).
PATCH NAME
|


