
| HOW I SETUP MY ACOUSTIC GUITARS Building Speed and Ease in Unplugged-Land |
 I'm not particularly an Acoustic guitar player in a great capacity, but sometimes I do play one when I want/need that sound. As I am predominantly an electric player, that's what I tend to focus on. So I have different wants/needs from say, someone doing fingerstyle all the time, and other people who just strum chords over a mostly electric band. But this is what I tend to do to ALL Acoustic Guitars I have in my collection. Take it or leave it. I'm not particularly an Acoustic guitar player in a great capacity, but sometimes I do play one when I want/need that sound. As I am predominantly an electric player, that's what I tend to focus on. So I have different wants/needs from say, someone doing fingerstyle all the time, and other people who just strum chords over a mostly electric band. But this is what I tend to do to ALL Acoustic Guitars I have in my collection. Take it or leave it.
While there are many kinds of acoustic, they all need the same things to play well - level frets, properly placed bridge at a proper height, proper nut height, and working tuners. This is typically how I take in a used acoustic guitar and start tweaking it up. I.) ASSESSMENT The first thing I do when I assess an acoustic guitar is a far away inspection just to see if there's any indications that this thing was mistreated and messed up. On Acoustics, this is far more critical, because it could mean many different things that are far harder to fix than on a solidbody electric guitar. First thing I look at is the strings. How heavy are they (low E is usually a good indication), how worn are they, and how high off the fretboard are they. Typically if they are high off the fretboard, the next thing I look at is the soundboard to see if the bridge is being pulled off the top. This is a common problem with acoustic guitars on the cheaper end, or nylon strings that people have put steel strings on. Sometimes the soundboard is a little warped and that's causing high action. It's also often caused because the guitar was kept in too try or too humid an environment (acoustics are heavily impacted by the humidity of the room they are in). Another thing I look at is how well the tuners work if it's a guitar I've not worked on before, because I'd rather replace those now than when I've already got a fresh set of strings on it. I look for any places where glue is letting go, because that could a disasterous, if not a dangerous proposition to put the guitar under any further stress without proper repairs, if it's even repairable (actually, they all are, but is it worth me spending six months of time clamping this thing up? Will it even hold? Is the wood strong enough?). II.) REMOVING STRINGS Okay, I'm not one of those guys who removes his strings by cutting them. I remove them by unwinding the machine heads. I do this for a reason, especially if it's older, because I might be able to bring grubby machine heads back to life this way, and also, it loosens the tension on a well worn guitar a lot more gently than just a sudden loss of tension. One thing that does piss me off though, is people who try to "tie" their strings to the headstock. There's a right way and a wrong way to do this. So on acoustics, I might spend 30 minutes pulling out twisted up chunks of metal wire from the machine heads, and filing off burrs if required, just to undo this silly practice. But more on that when I get to restringing these things. There are one of three scenarios you will encounter with machine heads. The rarest of them all is the friciton tuners used on Flamenco guitars, which is something we never really see in the USA, but it exists apparently still. Basically, some tapered pegs fit into tapered holes in the headstock, and the player turns them to tune the thing. The two most common through are slotted headstocks, used mostly on Classicals, but some Palour style steel strings and other vintagey-looking antiquey things have them as well with steel strings, or regular capstans like we find on electric and other instruments of the modern age. For slotted headstocks, I undo string tension all the way, and then slice off the knots at the end of the string to let them through the tuner. I've used toe-nail clippers or a pair of wire cutters to do this. ON steel strings, if I restrung it, I just loosen the string all the way, and then pull up and off the machine heads. Once all the strings are off I continue evaluation to see if the nut is still glued on (common issue), and pull the bridge to see how deep the bridge slot goes, in case I need to lower the bridge by sanding down the bottom of it.III.) SELECTING STRINGS For acoustics, you have two types of string to be concerned with....
Nylon Strings
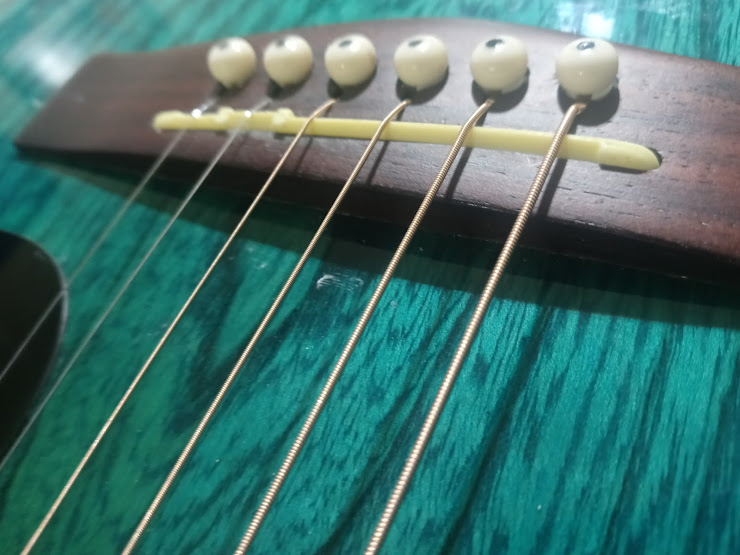
Steel Strings On Steel String ACoustics, I've seen at least 3 different methods of mounting strings. The most popualr, on most Dreadnaughts and other standard hole-in-the-middle acoustics, is a set of six pins that lodge the string against a reinforcement plate under the bridge using friction alone. The string tension pulls the pins against the sides of their tapered hole and locks them in place. Another method seen on more modern guitars like Ovations and whathaveyou, is where they just attach through the back of the bridge. This is not very common, but it's a much easier method, and makes restringing your acoustic something more like restrining an Electric guitar. The last one is kind of rare these days, but was more common in the early 20th century, but there are some tailpieces where the strings are attached to six little pins on a metal tailpiece that screws to the tailblock of the body. This is more common in mandolin construction, but is seen on some F-hole acoustics and dobro resonator acoustic guitars. If you're a seasoned electric player and not accustomed to buying acoustic strings, well, here's the rundown. "Light" for an acoustic is not the same as "light" for an Electric. You could literally make an Electric work with extremely light strings, but an acoustic will sound thin, brittle, and quiet if you don't but thick enough strings on it. You need extra mass to move more air to make the acoustic louder. The lowest gauge Acoustic strings I've seen are .010-.046 gauge, which is what I use, since I'm primarily a rock player, and I record at home so I don't need a very loud acoustic guitar. The most popular gauge on acoustic steel strings is around .012-.048/.056. The gauge used for sets is the gauge of the "High E" string - so a 0.12 gauge set has a 12 gauge high E. These seem to go as high as .014s. Most of the time myself, I stick with .010s. The Higher the gauge, the higher the stress on the guitar, and the most likely higher the action. I usually suggest light strings on cheaper acoustics because they will tend to be less likely to warp or rip the bridge off without proper "caddilac care" - ie - using a humidifier, and keeping track of weather to make sure the guitar is properly cared for. It also will make it easier to play. IV.) RESTRINGING I always start with restringing the guitar because then I work with what I have in real-time. Basically, I restring the instrument per process above - I'll do a separate page for that stuff, and then I'll do a second assessment using the strings I plan to use. The reason for this, is string tension can change if you go from one gauge to another. For example, the Fender DG-04 I have had .012s on it, I dropped to .010s, this lead to a backbow in the neck because the Truss Rod was setup for .012s. First thing I'll check is the fretboard straightness. I'll hold the headstock at my face and look down the centerline of the neck (between D and G strings) and make sure all of the frets have an even gap between them all the way across. They should look like the worlds straightest set of railroad ties...if a little curved across on steel string instruments (usually). If they are closer or dissappear on one side, that means you have a twist in the neck, and most likely, the guitar is either no good, or will need some severe neck work to put it back into true. Second thing I'll check is press at the 1st fret and the highest fret and see how much neck relief there is, if there's a gap bigger than a business card around the middle of the neck (4th-7th frets), then you need to tighten the truss rod to bring the neck to the right amount of relief, but if you have no relief, and can see gaps at the high and low ends of the neck, you need to release the Truss Rod a little bit and let the neck relax because now you have an "Upbow" scenario. This can hahppen if the previous set of strings were a heavier gauge and now there's not as much tension pulling the headstock toward the body. The last thing I check is the action, I check at the 12th fret, and the highest fret. ON most acoustics, the 12th fret is more than adequate enough, since most people on acoustics don't play higher than that. While action is a preferential thing, I try to get it as low as I can on most of my guitars, even my acoustics. However, some rhythm players, especially those with hard strumming or hard pick attack, prefer higher action because it produces more volume, sustain, and a warmer tone, and causes less "buzz", but me, I use a light attack, and if I need volume, I'll install a piezo system into the guitar to amplify it.V.) NECK STRAIGHTNESS (TRUSS ROD) So now that we know how much relief the neck has, I'll adjust the truss rod accordingly. If there's enough relief to fit a thin business card in between the strings and the frets around the middle of the neck with the 1st and last frets pushed down - or less - then we're fine. But if it's more than that, I might need to tighten the Truss Rod. Nylon string guitars don't have truss rods, since their tension is not that high, so you can skip this part. If the neck is bowed on a Nylon string, you're in a pretty bad place, and most likely, some dolt put steel strings on it. I always adjust in 1/8 turn increments. The truss rod nut is located either at the headstock - indicated by a hole or a plastic plate with screws in it, or under the fretboard inside the body of the acoustic guitar (that's where my DG-04's truss rod is). Same as anything else, lefty loosey, righty tighty. As for the Fractions of a turn - imagine the nut is a pizza, and each slice is 1/8 of a turn. You may even want to do slightly less if the bow is not that bad. Just turn 1/8 of a turn, check, turn 1/8 of a turn, recheck. If you really take your time dialing the truss rod in, the action and neck relief will be just right, and then the guitar should play amazingly well. While a perfectly straight neck is ideal, it's not very likely, especially on an acoustic. VI.) SETTING ACTION Once the relief is set, then it's time to adjust the action - at both ends. Some lucky people have acoustics with adjustable bridges, but most of the time, you're going to end up using sandpaper, patience, and careful eyeing of the piece. Usually I want that same business card relief between the 1st fret and the low E, and a fraction of a thousandth of an inch lower for each progressive string at the nut. Getting the nut and bridge height just right at both ends is ESSENTIAL for an amazing playing guitar. It's all a game of angles. If the nut is too high, the strings will get closer to the fretboard, making lower chords harder to play, and "Fretting out" at the upper frets, causing buzzing or deadening of the note entirely. If the nut is too low, while low chords will be easy to play, playing up high on the neck will make string bending, especially on acoustic, a royall pain in the ass! It might sound great, but you sure as heck are not going to want to play it for anything other than cowboy chords. I think this is one way some of the cheap guitar makers get ya'. They'll set it up for a beginner learning C, G, D, and Em, and what-have-you, and then the kid wants to play something harder with leads and finds out their acoustic plays like utter crap! If you get the angles just right between the two, you'll end up with a neck that feels almost as fast as a well setup electric, but with volume, thickness, and great tone. And this goes for almost any acoustic, not just a $2400 Taylor. Now, I'm not suggesting a $50 used Harmony or Emperador will sounds like a $2400 Taylor....that's impossible, what I am suggesting is the best attributes of that instrument with be sonically on display because it plays well, and therefore, might make some cheap instruments really surprising sounding. For the nut, I always choose to lower through the slots with a needle file, preferrably one made for the gauge of string I'm cutting for. I'll maybe make 5 cuts with the file, put the string back in, retune, and check playability, another 5 cuts with the file, try again. I'll do this sometimes for an hour or more, just to make sure the height at the nut is just right. Just right is enough that when/if we lower the bridge, the neck is roughly the same to play up and down the neck, rings out cleanly, and sounds good. Each string should be business-card height from the 1st fret (hair more or less), and then we shall address the bridge. That said, acoustic setup differs from electric in that it's better to take off too little than too much. So let's talk about bridge adjustment. For the bridge on a nylon or steel string dreadnaught where the saddle is held in by string tension alone, I'll loosen all the strings completley slack with focus on the lower three, and then I'll lift one side of the bridge and gently slide it out to adjust the height. Now here is where it gets a little more complicated. Because different guitars have different bridgeplates that are at different heights. So what I do is usually this... If the action is too high, I'll take the bridge out and sand it about 5-10 times across a sheet of 800 grit sandpaper. Then I'll refit the bridge, and test. If it's still too high, I repeat, until I have the right height. I use 800 grit because it gives the finish I want, and it removes just the right amount of material in 5-10 passes. This task can take me hours sometimes, if I'm trying to get it exactly right. I'll usually stop just a hair or two before the guitar starts to buzz. I usually want between 1/16 and 4/16ths of action at the 12th fret on my guitars, but your preference may vary. 1/8" is about the highest I've seen, while 1/4" is way too high, and signs that something is wrong (separating bridge, warped soundboard, bridge cut too high). I will often take days doing this process just to get it exactly right for myself. Hence the Fine Tuning below.VII.) FINE TUNING So for about a week or two, I'll let the guitar "Settle" in a bit to it's new setup. During this time, I'll play it periodically, and check to make sure the tuning is stable, the action is staying consistant, and I continue to like the feel of it. During that time, I may revisit any one of the items above to get it tweaked or tuned right, as acoustic guitars are made out of wood largely, and changes in stress may induce either relef or more stress on the wood, and cause it to react differently. You almost have to think of a guitar as a living/breathing creature, especially acoustics, because in a way, they are. I usually find after a time with me, it will settle into what it likes with my setup, and generally stay there after awhile. I have spent at most a month doing this, and ending up with precisely what I want. |


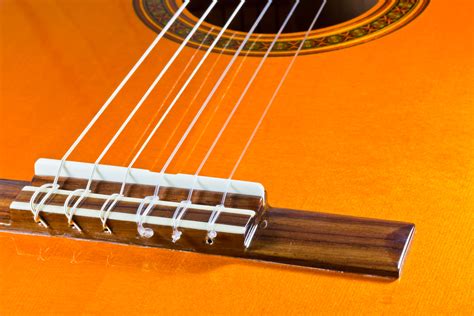
 Nylon strings are typically used on Classical and Flamenco acoustic guitars. I'm not exactly an expert on these strings, but I know for a fact most of the time they are not marketed by string gauge, but rather by "tension" ie "low" "medium" and "high" tension. "Low" tends to be more mellow and easier to play, while "high" has a much brighter attack and clearer voice overall. They are attached to the guitar by looping the string around itself several times after passing through the bridge, then wound around the tuners at the headstock, which are wider diameter than steel string slotted peghead tuners.
 Steel Strings are the most popular and used on all sorts of "steel string" acoustics ranging from the standard Dreadnaught, to the Parlor style acoustic, Style "O", Jumbo (named after the Gibson J-200 Jumbo), F-hole archtops (used in Jazz before electricity came along), and even "solidbody" acoustic electrics designed to only be amplified - such as the Chet Atkins Gibson models. These strings are where things get a bit confusing.