
| PROJECT VEHICLE CreepingNet's Adventures in Auto Mechanix 1993 Ford Explorer Sport |
 So, let's start this with a little storytime. I'm a bit nervious posting my "car projects" on here, because we are talking about my Daily Driver - for all intents and purposes - it's a 30 year old, 400,000+ mile old SUV that I am the 2nd owner of (my mom as the first). I got it at age 18, and I never replaced it because it's been a rock solid, reliable vehicle, like an old Honda or Volkswagen - but unlike an old Honda or Volkswagen, it hardly has any rust. So, let's start this with a little storytime. I'm a bit nervious posting my "car projects" on here, because we are talking about my Daily Driver - for all intents and purposes - it's a 30 year old, 400,000+ mile old SUV that I am the 2nd owner of (my mom as the first). I got it at age 18, and I never replaced it because it's been a rock solid, reliable vehicle, like an old Honda or Volkswagen - but unlike an old Honda or Volkswagen, it hardly has any rust.
The presumpton by my own family is that I still have this car because of "Sentimentality" - but hear me out, there's a LOT more to it than that, sentimentality is nice, but as should be obvious by now with how much I'm willing to alter long-standing guitars in my collection, or getting rid of the original Creeping Net PCs when they became more of a chore to fix than to replace, that if this thing was a REAL problem I could afford to replace, I would have already. As it stands right now - I'm nearing 500K (that's right 1/2 million miles) with no work done to the engine at all - just maintenance - and one rebuild of the original transmission due to bent shifter forks (which I bent learning to drive stick). That's it. Only "major" projects I have are rebuilding and upgrading the A/C to R134a (totally doable, late 1st gens used the same system with different seals and pipes for R134a,and the refrigant of course, which can be bought at Wal-Mart for $10 a can and $7 for the oil), and a fuel send replacement when it's convenient for me and when I feel like, because it still works, but the float leaks in these trucks, so the gas gauge is out (but the trip odometer still works). Other than those two things - the other 97% of the truck still works like it should. That is why I keep it. But the rest of it, to outline this journey, started because of crooked mechanics either breaking/losing parts, reinstalling parts they said they replaced, replacing parts that don't need to be replaced (and charting too much for them), or just outright refusing to work on the truck because it's too old now (which is fine). Ford made over 1 million of these SUVs between 1991-1994, and have made 8.4 million since then. Parts are plentiful and cheap, many are still in production, and those that are not are often replaceable with a updated, more reliable, and modernized equivalent that often improves the quality of life, handling, capabilities, and wear-and-tear on the vehicle. Because of this, the economy of scale on this is insane. A clutch job cost me $150 in parts. New front coil springs were $122 with the coil insulators, and they are stronger than the originals. A tune up works best with Motorcraft platnium plugs and wires that costs $100 or less if you shop around. A clutch job done at a shop costs $1300, a Tune up about $300, replacing the coil springs would have been 4x the cost of me doing it myself. And all of these involve waiting DAYS to get the vehicle back, whereas my repairs, at worst took a few days when it would have taken a week or more to get done. The only things worth a shop doing is radius arm bushings and maybe an oil change (about $45), and tires/alignment due to special equipment - which you'll need to do to ANY Car, even an EV (actually, it's it's own special kind of hell with an EV) - the rest I'm finding is just too cheap and easy to NOT DIY it.10/13/2023 - The Great 417K Tune-Up 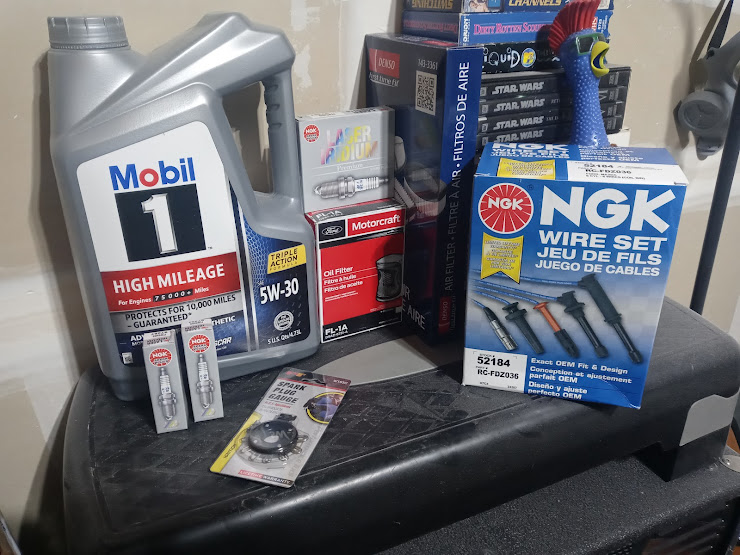 I'm going to take you on a journey....through lots of time. SO I've been talking about tuning the X up for months now, and I decided after $86.00 in fuel and a reduction to 13mpg....it's time. This truck has over 150K on the current set of plugs n' wires, and they ain't getting any younger. I know what I have are NGK Double Platinum Plugs, and Wires. And I'm doing most of the other stuff as well.
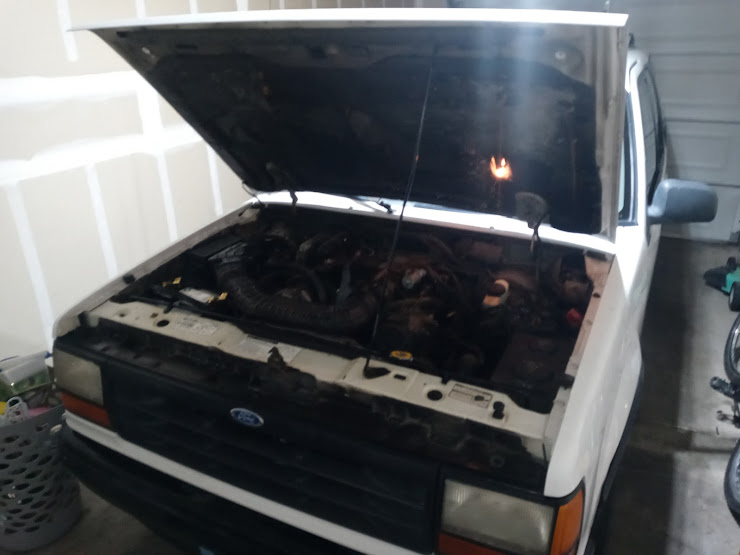
For this round of truck maintenance, we're changing the oil, replacing the plugs and wires, and air filter. I'm holding off on the fuel filter because we had it tested and I'm still holding stock 45psi fuel pressure, and fuel filters are a bit high on RockAuto.
Oil changes on this truck are so dead simple I got this one done in about 10 minutes. Same as usual, lay down garbage bag, drain pan on garbage bag, unbolt the oil pan plug, check for "glitter" (metal particles from engine wear), take out the oil filter (unscrew it), drain that, let the whole thing drain out, reinstall drain bolt (cleaned up), install new Motorcraft FL1A oil filter (or equivalent Wix or Purolator product). Then fill with 5Qts of Mobile 1 5w-30 High Mileage full synthetic. Dipstick will show double capacity until engine is run for first time. Next was gapping the Spark Plugs. What you need is one of those wire gauges (little circle with the bending tool on one side, and a bunch of "wire" hoops on the edges) with a .054 spark plug gap gauge on it (1991-1994 Ford Explorers, maybe just anything Ford with the Cologne 4.0L V6 in it, uses a .054 Plug gap). With iridium and platinum plugs - be very gentle, and careful, not to touch the electrode. I got the gap 100% dead-on 0.054 on the gauge before installation. Then came the new fun one.....replacing the plugs and wires. Turns out the auto shop who did my last tune-up claimed to use NGK everything like it was some kind of magical mystery thing - nope, just Autolite XP 150s and I think either Autolite or Motorcraft wires - not sure which. The stock plugs for the Explorer are Motorcraft SP486 platinums (you can guess why I remember the part number, LOL - 1993 was the year the 486 DX2 came out - spark plug# is "Spark-Plug-486", lol). These...however, are NGK 97287 Laser Iridiums ITR5H19/3 (can't remember if the last was a 9 or a 3, lol). Iridium plugs have longer life and a higher heat tolerance than Platiums do, and a lot of modern cars use them. I was also interested to see if there was an improvement in response. Each plug and wire is replaced in succession - one at a time, to make sure we match up the firing order with the plugs. And no, it's not "logical" with the layout at all (well, it is for the passenger side, the driver's side however....I think it has to do with how hte coil is wound. BTW, who wound this thing? EMG Pickups? After seeing the plugs, I swear this truck has to be wound as hot as my Jag-Stang's bridge pickup). All joking about hot-wound guitar pickups and coil packs aside. Here's the firing order and layout for a 1993 Explorer 2wd Manual with a 4.0L V6. 
Once completed, we replaced the air filter. Usually I use Motorcraft, Wix, Fram, or 3M (not sure on that last one), but this time I went with Denso - who are the company that makes stuff for Toyota....and probably fitting because this truck think's it's a Toyota (considering the service record darn near mirrors a 10th gen 2009-2013 Corolla). Put it all together, and fired it up for the first time. Truck eagerly popped-right off. Changes? Well, a bit better throttle response and it feels like it's makimg more power for some reason - just a hair more, but not much. I can still creep around in 1st and 2nd gear without pressing the gas....go figure. Now, lastly, we'll take a look at each spark plug and give my analysis. These were Autolite XPs. Looking around now, I can't find the exact #s - but they were high performance plugs - and they DID perform premiumly, because I got 150K out of them and they were still firing off in this truck apparently despite very wide gaps (.060 on one of them which was the 2nd highest on my gauge), electrodes burned off, and whatnot. The general concensus is overall healthy with light gray all over, the burned off electrodes were on the cylinders that were getting misfire codes - which were only 2 of them (2 and 6)...strangely #4 had a burned off electrode and was still getting down. I could tell the plugs and wires needed done before even getting into this becuase I know this truck's gas mileage is STIFFLY in the 18-24mpg range. Cylinders 5 and 6 had a LITTLE bit of oil on them....but I mean I had to FEEL it to tell for sure. I'd say at 417K - my engine health is pretty darned good, though it does seem it hit the hots a couple times (be mindful, these plugs were in there when I decided to do the cooling system so the NGKs should look a lot better). So at 417,000 miles with a year on the oil (about 10K at most), no glitter, plugs with almost no fowling and minimal oil residue on 2 cylinders, though the electrodes got some burn (hey, these plugs were in there AT LEAST 150,000 miles - that's a LOT of life for a spark plug) - I'm a bit excited to see how the gas mileage is going to hold up. Part of the reason was mileage started dropping to around 14.6mpg city, 18.8hwy (basically, window sticker mpg for a 1993 Explorer Automatic trans model). I should not need to touch it again until about 517,000 miles.8/11/2023 - Fucking Mechanics (ugh-gain!).....Front End Clunk FINALLY Found and fixed 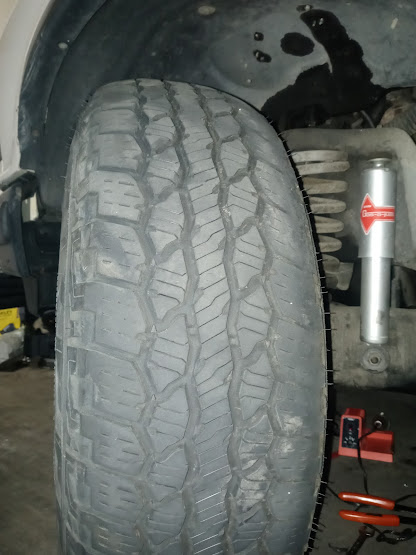 So I've been chasing a front-end clunk for about half-a-year now. And after seeing my front driver's side tire had abnormal inner wear....I FINALLY figured it out, and it was the most stupid, easy, and inexpensive thing (I'm guessing Tire Pricks was aiming to rape my pocketbook rather than resolve the issue). Trying to fix this, I've replaced the radius arm bushings with neoprene ones, upgraded to KYB Gas-A-Just Shocks, replaced the steering gearbox (or had the "shop" do it that claimed that was the problem)....and well....I did some SELF diagnosis, and I think I FINALLY Found it. Seriously, maybe I shoudl take the ASE Certification exam (rolls eyes).
So we know it's not shocks, we know it's not the radius arm bushings, we know it's not the radius arm bracket (perfect 100 FT-LBS on each Grade 8 bolt), we know it's not the wheel bearings, even with 1/8" of play in it. Everything's tight, everything SEEMS perfect.....so what does this leave us with? TWO things - the TIB PIvot bushings - the bushings that attach the Twin I-Beams to the Explorer's frame, and of course, my SPRINGS. While behind the truck I noticed it seemed to lean toward the driver's side. Fearing the worst, worn leaf springs...which makes no sense noise-wise, I decided to break out my tape measure and do some measurements. I went in back and first measured the bumper height in the rear, I was getting about 1" less on the driver's side. "Uh-oh" - I thought. But I was not going to stop there. So I decided to measure how much my springs might be sagging......how do I do this? I measured the distance between the sidewall on the tires, and the wheel well. I checked the Driver's side rear - exactly 7", pass side rear 7", pass side front 5", driver's side front...about 4.3-4.5".....okay....I think I know where this is going. Bumper height is 25" on one side, and about 22" on the other. Also the same if I checked the distance between the floor and the wheel wells, the same on ALL THREE but the front driver's side. So now we know, from measurement alone, the suspension is SAGGING on the front driver's side. I don't remember the number, but I remember them ALL being the same except that one corner. So here's what we know, 5" is the magic number for the distance between the wheel well lip and the tire on all 4 sides, and the distance should be the same on all 4 corners as well. My truck's almost dead-on on an exact number of inches on each corner - except one - the front driver's side. I'm getting almost 1/2-1" less on the front driver's side. THis means the suspension is sagging in that region. That's ALSO where the clunk is coming from. Now let's consider what this Explorer has been through in it's 30 years and 417K. First off, I've been Airborne THREE TIMES in this truck. Twice offroad jumping stuff, and once on the highway back in 2002 doign 70mph hitting a step ladder. All three of those times, the weight distribution was focused on the front driver's side, because I'm the one driving the truck, I hover around 245LBS when healthy and no "looking overweight". So it most likely touched ground slightly sooner with more force on that corner. Most people riding on the passenger side are far more petite, not heavily built like me, and add to it there's a 19.3 gallon GAS TANK on the driver's side. That's a LOT of weight being put on that corner of the vehicle. So little surprise to me that the front driver's side spring would wear out. But we need to do some more diagnosis and looking as well. I see Ford (probably Derek Elliot or Bill Gilles) tried to offset this by putting a lot of heavier engine components on the passenger side - which did work. Just so you know, I'm n ot mad about this part wearing out. This is a 418K vehicle with 30 years on the road without a break - like the old Ford ads said, "the Best never Rest" and this truck has not rested since Auburn Ford in 1993, actually, with work just down the street low-speed, she's still "rolling" while the repair is in the cards. So under visual inspection there's nothing visibly wrong. Both springs have mild surface rust at worst but nothing out of the ordinary for this vehicle. Look about the same as they did 10 years ago. Both springs ALSO are sitting correctly in their mounts, with the small end at the bottom held in by an inverted "cup" of sorts, and the top being held in place by a 4 prong spring-guide/retainer with one corner curled to hang the spring off of. The bushings for the TIB also are still fully rubberized and doing their job. Next came my own stiffness test. First using a 3' long flathead (same one I use for punching out the caliper pins when doing the front brakes), and putting force on various points. First I did the front TIB pivots - tight as tight can be. Radius Arms, also tight. Sway bar...same thing, even the bushing for that look nice (still replacing them eventually though with neoprene to match the RABs). Even the springs themselves seemed well seated. At one point I decided to lift the front corner of the truck up on the driver's side with my two hands, and I could hear the clunk, with a resonant ring to it. So I tapped the spring with my screwdriver - same pitch - so this meant the spring was making noise. When I pulled up on the fender, the noise would happen once, and then never come back. When I pushed back DOWN on the fender, the noise would happen once, and never come back if I pushed down on it again. So what I'm hearing is a spring that is binding on it's mounting somewhere. Could be the spring is broken, could be the hardware is broken. But it's somewhere I can't see. And this totally lines up with the tire wear - pun not intended - because a sagging/broken/somewhat-messed-up spring would allow the I-Beam to pivot a little upwards, and by the nature of the upward pivot, would cause negative camber on the tire, and cause it to wear on the inside edge where it would now be meeting the road. Driving after pulling the truck up - around the parking lot - revealed the ping went away until I hit a speed bump, then it came back. So now we have a game plan - replace the springs, and possibly the mounting hardware as well. Then replace the two front tires, and get an alignment done. When dealing with stuff like this, you ALWAYS do it in PAIRS, because you want it even on both sides, and you want the parts to wear as evenly as possible. Springs I priced out to be under $100 for a pair of two from Moog - which is a brand I trust as that's also the brand Ford uses for their own OEM parts. I was seeing prices from $86 on RockAuto to $104 at places like AutoZone (so I think you know where I'm going with this one). Now, I found Firestone Destination AT2s in P235/75R15 for $158.88 on Amazon.com, but I might just go back to Tire's Plus and have them do the tires and alignment, and charge it. After that is an alignment. So yeah, this one will be a little more expensive, but still will likely come in under $500. So that's the gameplan - springs, tires, alignment. in that order. Unfortunatley, the tires and alignment will have to be done at a shop...so I'll just make it a point to be really cautious. Now let's talk about how I SHOP for Auto Parts..... I use five vendors: Summitt Racing, O'Reiley's, AutoZone, Napa, and RockAuto....maybe a 6th in LMC Truck but I've not had to use them yet. So here's how this works. So we know I need 2 front coil springs for a 1993 2wD 2-door Explorer - that's what we know. What we don't know is the parts. The first part is OEM parts are going to be expensive. Especially from the Dealership (who'll probably hurang me into a test drive of a 2023 Ford Explorer I can't afford while I'm asking for parts). The key is to find the SOURCE of said part. For these I'm going with MOOG. Moog makes chassis components FOR the OEMs, including Ford. This is exactly how I did my clutch too (LUK Made the Clutch that came in their M5OD vehicles which included the Explorer, Ranger, F-150 (M5OD-R2), Econoline (yes, you could get a manual Econoline, but rare), and Bronco). Moog made the chassis components, and no not hte same moog that makes Synthesizers, these guys make bushings, springs, chassis components. So that's what I'm goign with. The next part is the part# - so I matched it up to p/n: CC870. I can get a relatable part from other shops like AutoZone and O'Reiley's - O'Reiley's has their own store brand version - which I'm not opposed to, but costing within $10 of the Moog part means I'm more likely to go with the Moog part. Summitt has the part I want at $92.99. And Summitt has them in stock - so I know I can get them. Round about this time, I looked at the diagram of Explorer front TIB suspension on LMC Truck and came to the conclusion I might want to replace the isolators while I'm in there. The Insulator is a plastic/thermoplastic piece that fits between the spring mount on the I-Beams and basically stops noise - seeing this helped me a little further in my diagnostics....because it could be also, that coil spring isolator. It could also be the only part I need to replace....so I'm giving it one more look before I go for it. I'm wondering if mine just crumbled off. So now we do worst case scenarios and gather parts.....
Okay, so now we have our base parts laid out. But this particular proceedure has more parts than just that.......see, we have one problem, I will NEED to replace the front tires. And I want them to match. This means I will need to purchase two P235/75R15 Firestone Destination AT/2 tires for the front, get them balanced and installed, and then get an alignment done by some place that is NOT Tires Plus, and willing to work on a Ford TIB system (since that's considered "obsolete"). I'm almost considering installing the tires myself and THEN having them balanced. So let's see some prices.... Tire rack has them at $161.99 e.a., Wal-Mart has the same price. I found them on E-bay for $158.88. While I MIGHT be able to get away with just one, I'm a bit iffy because on one hand, I have not worn my tread down much at all....but on the other hand I HAVE put 5 years on the tires. But the killer is the LABOR. I'm okay with Tires Plus doing the install, because I know they have them. I'm NOT okay with having to fucking pay this shit to get shit fixed that should not have happened in the first place. Dumbfucks. Anyway, the week afterward (payday) I bought the springs and spring insulators on Rockauto for around $123 total. Not bad. Came in about 2 business days later. During that time, I've been doing some HARD looking at it. So to explain the front TIB suspension on a 1991-1994 Ford Explorer 2wd is this. The coil springs sit in a metal box called a "Coil Bucket" - the same piece the shock is bolted to. The coil bucket has metal fingers in it that act as an index for the coil spring - the spring is spun into one in back that is bent over to lock it in place - that's how it attaches at the top. Stock, this is fine, a lot of lifted Explorers (and by extention, Rangers) sometimes have an owner-added metal strap for reinforcement when lifted.
After looking at Shango66's video from when he broke the Radius Arm on his 92' XLT, it's clear to see the spring sits on top of the plastic spring insulator, which sits on top of the axle. There's a 18mm nut that has to be removed, lucky me, my 93's not very rusty at all in that area, so removal should be a lot easier than his. So my plan of attack is this. Loosen lug nuts on tire, jack up by frame, place jack stand under frame rails right before the radius arm bracket, lower truck onto jack stands. Remove lug nuts, remove tire, disconnect the top of the shock, disconnect the sway bar (if needed, I've read some EF posts saying they did it without this). Then I'm thinking, since my spring mounts are nice, new-like, and strong, I'll unbolt the spring FIRST with the suspension hanging, then lower the suspension down using the jack, and unscrew from the mount. Then screw the new spring on, put the new insulator on the axle, raise the axle up to the new spring with the retainer and nut, tighten the spring down to 42-75 FT LBS per Ford Manual, reconnect Sway Bar (if needed be), reinstall tire, put on lug nuts, jack up frame, take out jack stand, drop truck down, tighten lug nuts to 100 FT LBS each - then rinse and repeat on the other side. I will try and take video of my process after looking at how the truck goes together. So then the parts come in, and this is going to be the most important part of this adventure... First off, let's talk about my #1 issue with looking up auto mechanics stuff on the internet, especially YouTube, with a truck like this. 2wd specifically. It seems there's almost ZERO interest in 2wd Rangers and Explorers with the TIB setup this truck has. So finding the specifics on it is incredibly hard for a first timer. So here's how I did this, and all the SPECIFICS on the 2wd Ranger/Explorer TIB setup 1989-1994 First, loosen the lug nuts, jack up the truck from the I-Beam on the side you want to do, and then put it on Jack Stands, and REMOVE the jack from the equation - because we are going to need it later. Then take the tire off - just remove 5 lug nuts, and take the whole wheel off, and you're done, obviously. Spray PB Blaster or your penetrating lubricant of choice on the bolt inside the spring on the bottom to free it up, otherwise you're going to be fighting with it quite a bit. Now is where the fun begins...
After some pulls with the breaker bar, which I reposition by lever-ing it against the coil bucket and returning to the position to pull/push from - almost like shifting the car - once it's loose enough, I exchange the breaker bar for a 1/2" drive socket wrench and a 2" extention, and finish the job quickly with the ratchet). Once undone, unjack the jack a little, remove the wrench, and then jack it back up again into a resting position. Take out the bowl-shaped keeper for the spring, and the 18mm bolt, and set aside to clean off. Now the next piece is vital to get the axle low enough for the spring to clear it - you NEED to only disconnect ONE thing - the Sway Bar Link(s). That's it. Don't even bother with the Radius Arm Bushings - there's no need, they flex enough to let it go down low enough, it's the Sway Bar that needs disconnected. I unbolted the top bolt only, and I did it this way for a reason. Should I be unable to line the holes up for the bolt with the jack - I will be able to do it by using a 2" breaker bar, prying the swaybar down, using the frame as a static surface, so I can get the bolt placed during reassembly.
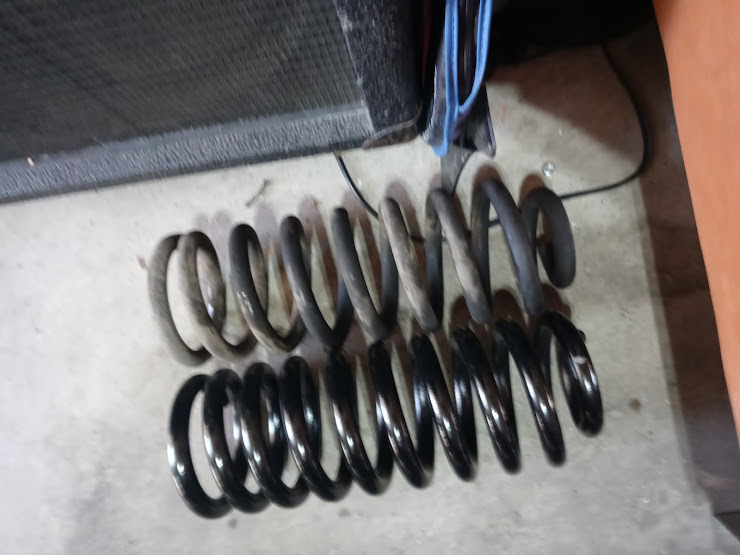
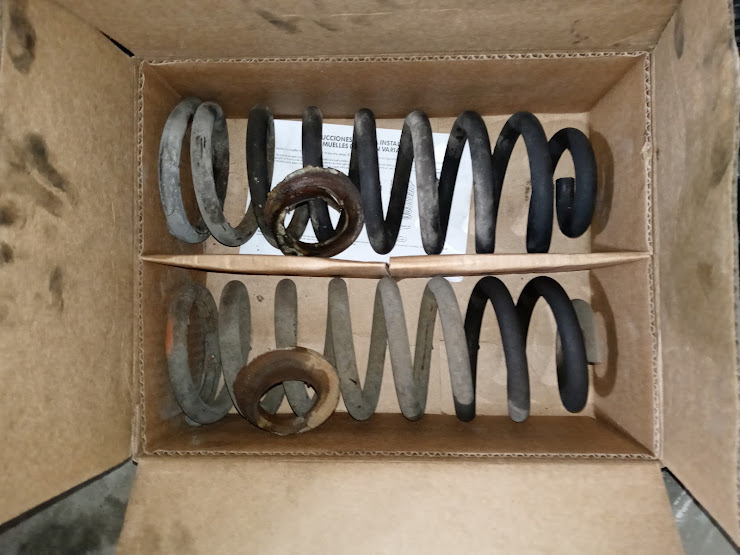
The problem and cause of the clunk was the front driver's side coil spring, and it's insulator. (left), the front coil spring lost about 1/2" or more of height due to age, losing it's "Springiness", but to add to it, (right), the coil springs (both) and their Insulators had aged to that point, with the driver's side insulator being so cracked and rotted that it was no longer really insulating everything...so the sound I was hearing was the sound of teh lower coil spring sliding around and getting hung up on the bell-shaped mount under the insulator - kind of like how a guitar goes sharp when you use the whammy bar and then goes flat after a string bend with a poorly cut nut - the spring on the Explorer was not designed to "raw dog" the mounts, it was designed to be isolated. The new Moog insulators fixed the problem, and the new springs restored stock driving height with a bumper top height of 24", and 7" spacing between the top center of the fender well and the inner ring of the sidewall of the tire - and 5" in the front. Now, I SLOWLY decompress the spring using the Jack, letting the axle go down as far as it will go, and there should be even further travel. The spring should now clear it's Insulator and the mount on the axle. Now is when you are going to "unscrew" the spring from the coil bucket if you still have the fingers intact like my truck does. There's 4 tangs in the coil bucket and only ONE of them bends down and around the spring, wedged in between the spring's top two coils where they meet, and the coil bucket itself has an indentation where the spring should stop once fully screwed in. Once the spring is unscrewed, I removed it, and then there's a plastic/rubberized piece called the "Coil-Spring" insulator. During my round of this, I noticed immediatley what the issue was 100% - that the insulator started literally rotting off the truck - little surprise, it's 30 years old. Also, putting the old spring next to the new one also meant my hypothesis was correct - the springs had aged and were no longer that springy, actually, the driver's side had compressed the top two rungs of the spring together losting about 1" of suspension travel, roughly the same as I was measuring. Each tire in the front sits about 5" away from the top of the wheel well, and 7" away in the back (hence that awesome, sporty, forward rake the 1st Gen Explorer Sports had that I like so much). The driver's side was at 4" when I measured before this.
With the sway bar re-attached, we can now bolt the spring in, so drop the jack down, give enough room, put the 1 1/8" wrench on the bottom bolt, and then your 1 1/8"/18mm socket on top with extentions, and tighten down. Once it's as far as it'll go, use a Torque Wrench and torque it down to 45-72 FT-LBS. Check the spring's alignment before doing this. After that, just reinstall the tire, torque the lug nuts to 100 FT-LBS each once the vehicle is on the ground, and then take it for a test drive. I did 2-3 that night and the noise was 100% gone, plus it felt tigheter. While I was in there though, I did find my passenger side sway bar link was a bit loose on the bottom, so we'll be doing those next. I also forgot the washer on the driver's side, so I reinstalled it with the truck on the ground and found that that forced the suspension components to be perfectly lined up for reassembly - so you might want to take the sway bar bolt off before jacking the truck up. I must have done things 100% correctly because now the driver's side tire is 100% 90 degrees just like the pass-side, the truck pulls straight, and I feel a 1.5925986350052% improvement in handling as a result.8/1/2023 - Starter 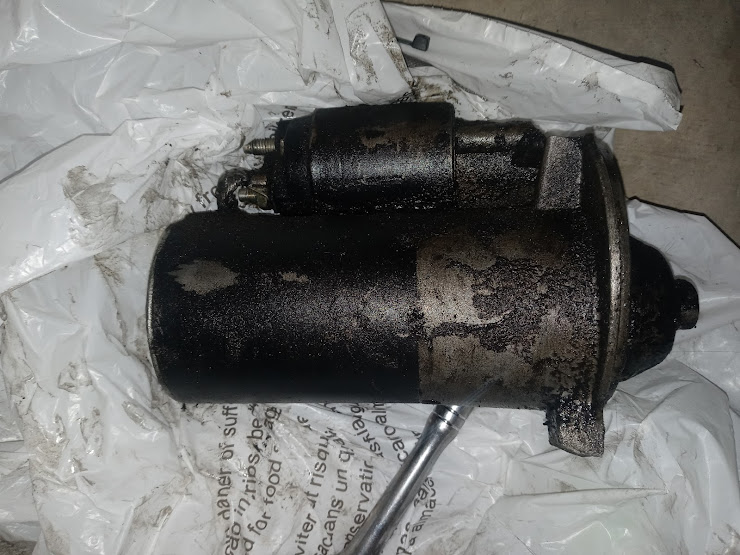 So it was midsummer July when my jankily attached Starter started coming loose and falling off the truck. I knew it was coming already since the top tab was broken and holding on by friction and like a puzzle piece since quite some time before early 2020 when I did my clutch. However, I had to hold off an entire month because I needed to move house, and money is tight.
So the truck did it's due dilligence to hold itself together (as usual) until we could get to an apropriate spot. But finally, on a tuesday, decided to dump it's starter in the parking lot of our new apartment. Nice. So right in front of the management office I quickly screwed it back in enough to fire the engine up and get it home. So I went out on Tuesday night, bought a new starter, was sick Wednesday with a stomach bug and a headache, so I just called in sick and slept all day to recover ASAP, then came back the next day. Initially, I'd planned to hold off. I spent a good chunk of the evening pricing out and looking for the best Starter. Probably the most "drama" of this whole situation was finding the goddamn AutoZone. I drove around for 20 minutes in my newer vehicle, parents at the local Chuck-E-Cheese giving me dirty looks like I'm some kind of criminal element - as I discovered that our AutoZone is INSIDE the PepBoys store. Seriously, Google failed AND I failed in this instance. So for $216 I picked up a reman Ford starter and I found what the inherent challenge would be this go around. See, there was a wire already attached to it with a big orange tag that said "DO NOT REMOVE THIS WIRE - See Instructions". I looked at it a little crosseyed for a second thinking "oh boy, what does this mean". So the instructions said that I needed to solder the old wire to the new wire and that it was a "Design Improvement". Old style = blade terminal, new style = bolt-on-terminal. Okay. So guess which one my truck has.... So Thursday afternoon, right after work, I tried to start it back up, starter fell out....so then I pushed the truck into my *new* (to me) garage and started work on it. First off, that original starter was THE original starter. Not replaced as the shop that "replaced" it years ago said. I think they just bolted it up and then bent me over the table saing it was "replaced". So basically, I just got 417,000 out of a O.G. Ford 4.0L starter. It had all the original (now oil soaked) tags on it. Secondly, I had the damn spade terminal. Great. And my soldering iron is in storage. Removing the old starter was very easy - obviously - because I had to unbolt the two bolts holding nothing but a chunk of attachment "ear" to the bell housing. Then remove the bolt for the positive lead to the starter solenoid, and the signal cable. Grounding is done on the starter itself (which loops to the chassis ground through the engine and the engine mounts - mine look beautiful at 30years old - no cracks at all). All in all, easy dissassembly. Then came installing the new one. The first biggest challenge is finding a socket thin walled enough to fit next to the starter and not cause fitment problems. The second problem is that damn signal wire. I decided to try just a "crimp fit" of the signal wire with heat shrink provided. This did not work out that well...basically broke before I could get the starter attached to the truck...oh well. The second struggle was getting the darn starter into the bell housing just right. The problem is that the upper bolt tab was sitting about 1/8" too high off the bell housing and the lip was not going inside the flex plate like it should. Getting the lip inside the flex plate would get it perfectly flat. It had me wondering if maybe the shop that put my clutch in in 2008 did this, and this is why the tabs broke off. I decided to do a test run with the crimped wire and slightly off starter - just a one shot. All I got was a click...so I disconnected the battery again, and just placed the signal cable into the new wire - held by friction alone, reconnected the battery, and hopped in "X" and hit the keys "VROOM" - fired right up by just barely tapping "Start" as usual. So Friday afternoon comes and I hit up AutoZone for some heatshrink and much-needed Lava soap,then storage and snag my Soldering Iron and solder and head home. I then removed the starter again, laid it on the ground of the garage, and made myself a nice under-Explorer workbench - and soldered the "signal cable" together, heat shrinked it like a pro after testing continuity, and then proceeded to the strength building exercise of installing the starter. Getting that lip on right with both bolts removed was easy, however I found the bottom bolt was the one that was constantly throwing it off. Could it be the shop re-tapped it and got it slightly off. in the end, I did get things sealed, but it took about 30 minutes of looping one arm between the frame and Radius Arm and the other arm holding the starter up while using a dounble-ended non-ratchet wrench to bolt the starter in. I did this for two reasons - one, prevent over torquing and damaging the threads in the M5OD-R1's aluminum bell housing. Once the starter was in, we While I was in there I did find something odd - the inner tread of my driver's side front tire is wearing down fast. So I decided to check out the wheel bearings as well and did another try on play. We will see if the wear continues and get that tire replaced and an alignment done. THis is another reason why I don't trust ANY auto mechanics shops anymore, because they all seem to be lying, cheating, scamming, stealing, jackboots. Tire's Plus said "you don't need an alignment" - so hopefully it's my own wheel bearing that is the issue, and if not - then it's time to take it to an alignment shop (sigh). Also, when they said that, my suspension geometry was likely different. In that time, the truck has got new shocks, new thermoplastic radius arm bushings, and thusly, the Suspension Geometry has probably changed a bit...so I will be doing that anyway just for some self assurance.6/2023 - Battery Terminals 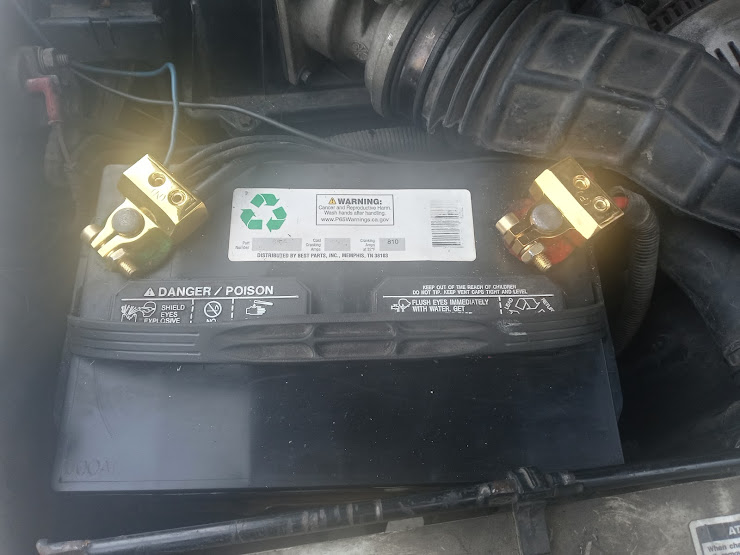 I think this X is watched over by Mogwai rather than Gremlins. There's no other way to explain how I have managed to use a pair of battery cables for 30+ years and have to replace only the terminals because they are so worn out from the 6 or so batteries this thing has had in it's lifetime that I'm having to shim them every time. Plus, it might be time to look into getting some of my hitch-work fixed up again...as the Tekonsha Commander brake controller has been offline for about 10 years now - at least.
Admittedly, this was one of my more "primitive" and "spur of the moment repairs". Basically, I spent $25 on terminals from AutoZone, gold ones - with the hex-wrench connections. I then proceeded to saw off the old connectors using my Gerber and the foiliage saw it has. Then I used the knife on the Gerber to carefully cut the wires back on the wire terminals, and put those in the big holes on the new terminals, and lock em' in with the hex bolts. Then came the Tekonsa Commander X10. I used the Schematic found in the manual to figure out the wiring to the battery terminals, and carried that out. Of course, it did not come b ack on, but I'm pretty sure it might just be it needs some better wiring done - or a full recap (like anything else from 1993 these days needs). I have plans for a copper or brass metal block to put under the dash as a common grounding point - out of harms way - so I can add accessories in the future. The way the Tekonsa was installed, was by putting a ring of grounds around the bloody firewall where the steering column goes into the engine bay with crimp on loop connectors (rolls eyes). Basicall put, you're smashing them with the brake and clutch every time you use them. Not smart in the CreepingNet book of engineering. I put everything back together, bolted it up, turned the keys, fired right up. This was kind of an easy one, but well overdue. Kind of nice to know that I have wires that are not corroded at such an old age. The copper was clean enough to eat off of - awesome.3/2023 - Rear Brakes 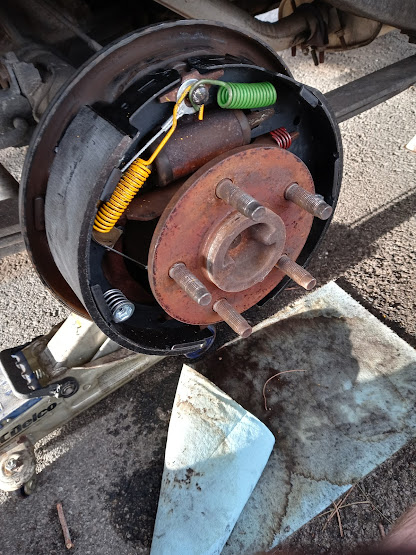 So I was driving to work in the ice and snow and had to make an emergency maneuver because it seems America has lost the ability to drive properly post COVID-19. Well, the X jerked to the left...so I knew something was amiss with the brakes again. Hopefully it'd be something simple and mechanical.
So I bought all the parts to do my rear brakes, about $75 in total. New shoes, new hardware. Doing the drivers side revealed some "meat" left on the pads. Okay, so we're good here. Everything was dirty with dust. Dismantling the mess meant using my RoboGrips and a flat head to pull the springs out, starting with the top, frontmost one first, then the second one down, then removing the adjuster pawl, self-adjuster lever, and the brake shoe and E-brake lever, that crossbrace thing with 2 springs (red), the self adjuster screw, and then unpinning the shoes from the backing plate. Cleaning the backing plates revealed they were clean enough to eat off of, a miracle considering someone lost the plugs for the adjustment access holes a long time ago. I gave em' a nice dousing in brake cleaner, then lubed with silicone brake parts lubricant on the back (the purple stuff). Looking at the brake cylinder revealed no leaks. So that's a good sign, actually both were surprisingly clean for as long as they've been left alone. Reassembly was a PITA for both sides. I had to start by pinning the new shoes on the backing plate, then twisting this end-cap thing on over a spring while holding what's basically a barbed nail in place to twist lock the shoes on. Then comes the cosmic balancing act of the self-adjuster, self adjuster pawl, self adjuster cable, and the blue spring on the bottom. By far the WORST though was getting that bloody E-brake cable back on the lever on the driver's side. It was so terrible when I did the passenger side, I just left it attached. Seriously, unless you like fighting 80lbs of spring tension to fit a nipple sized retainer through a pair of marker-tip sized fingers....just better off to leave it on the cable and reattach the shoe without removing the cable. When I opened the passenger side I realized what the problem was immediatley, the self-adjuster cable had broke off, which meant that my passenger side brake shoes were no longer self-adjusting, and likely hitting at a later time than the driver's side - causing me to veer left as my driver's side rear wheel turns into a left-turning pivot while moving forward. So off to AutoZone I go again, to buy the damn adjuster cables because the hardware did not have one available. I only replaced the pass-side one, as I already had the driver's side back together and the cable was in great shape - and no way in hell am I going through all that again for a stupid $5 aluminum cable. I did pretty good at guestimating how much adjustment the pads needed, so when I put them on, the E-brake was fully functional again, and self-adjusting was working. Test drive showed marked improvement in braking speed. The pads I used were Duralast Ceramic, to match the fronts. This has made the stopping of the truck a lot smoother, and has also improved the whole problemw ith dirtying up my rims in brake dust. That's about the only benefit.8/2022 - Clunk II, Wheel Bearings...and thoughts So now htat I've addressed the shocks, Radius Arm Bushings, and both ME AND a Mechanic have looked the truck over for loose suspension components - of which there are NONE. The Ball Joints - something a lot of guys on EF say is a problem - on my truck, they're dry, they still have factory shape, and there's ZERO play. Ditto the tie rod ends. I'm not sure which to be more befuddled about - the fact I have a nearly 400,000 mile 29 year old Ford Explorer that has suspension as tight as James Hetfield's guitar riffs, or where the hell that clunk is coming from. I looked at the pivot arm bushings (the parts of the Twin I-Beam Suspension that tether them to the crossmember under the oil pan), and while original, they still look tight, and feel tight, and prying them results in no movement. So I have a suspension so tight you can play Master of Puppets on it up-tempo, but still getting a weird clunk somewhere around the driver's side. The bearings look alirght, but since I have not ever touched them myself, and apparently no mechanic has in a long time, the grease is black. I decided to redo the hubs with Timkin bushings, and used STP High temperature grease (black can) on them. Disassembling the hubs on the 93' Explorer 2wD involves jacking up the truck, put it on jack stands, remove tire/wheel, then pull off the grease cap. I did this using a pair of old Craftsman Robogrips that I rely on like Derek Bieri does his Vice Grips. You can also whack it off with a rubber mallet - that also works. Then we need to remove the brake pad/caliper assembly - that of course is done by knocking out two metal/rubber sandwhich pins and then pulling the caliper off. I just hang it with wire off the coil spring bucket so as not to strain the brake lines. Next, there's a large cotter pin to remove, after that's removed, there's this bottlecap with a blown-out-top thing (Castle Nut) to remove, then there's the bolt that holds the hub on the spindle (axle), which is finger tight. Then a washer between the front spindle bearing and the Unscrew that, and then the hub lifts off with the seal and bearings and bearing races inside. Pry the rear seal off to remove the back bearing. The bearings looked good but I saw some wear on the inner bearing, or a dark spot where some of the old lubricant had congealed, so I replaced them. The outer bearings looked great.Now, onto packing bearings. A lot of people these days use this weird tupperware looking thing that you just sit the bearing in and it squeezes grease throughout. I do it the oldschool way - rubber glove, a glob of grease in the hand, and sweeping the bearing over it till it's nicely packed with grease. Did this with all 4. You want to keep sweeping until the grease comes out of the grease holes on the sides, and between the roller bearings inside the bearing. You can also replace the races at this point, mine were perfect, so I left em' alone, and just put the bearings in. Also a nice glob of grease added to keep it lubed up. After this, it did not get rid of the clunk, but it did make the truck roll easier it seems. So I guess that's a plus. I saw my MPGs get a little better as well by about 1-2mpg. 7/2022 - Clunk, Big Money for some Big Fat Shocks 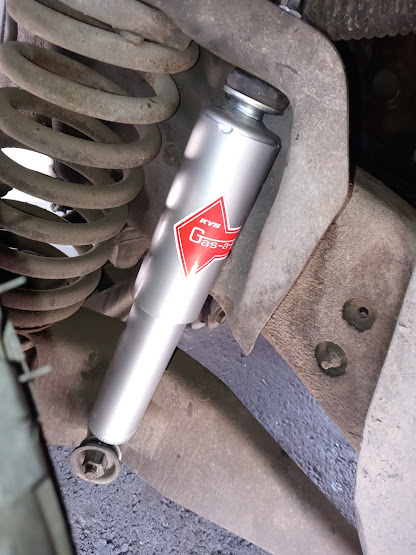 So I'm diagnosing the front end-clunk, and another thing I've been ignoring for a long, long time was my shocks. Why? Because I don't really feel that they are worn out. The truck does not bounce much, and the shocks are dirty, but not by much. However, it is getting due time - these blue ones (later found to be OEM style Monroe shocks) - have over 100,000 miles on them. So I decided to take care of all the suspension crap I felt I needed to do at the time, regular manitenance, and wound up getting a steering gearbox done at the same time for a bit more than I'd like to - but willing to anyway.
So I went out and bought a set of KYB-Gas-A-Just shocks - knowing full and darned well these would be stiffer. $244 at AutoZone. Turns out doing shocks on this truck is one of the easiest jobs, lol. The back took me a whole of an hour, with most of it being chatting on the phone with a doctor about computer memory (I was on-call, so my office was under the Explorer for that morning). The backs involve unbolting the top two bolts, then the bottom two, which I was warned would be "horrible" on explorerforum because they are "rusty". Well, whatever rust-repellant Auburn Ford used really worked....I did not have to battle rust at all, even the top bolts were clean. The KYBs came with all new hardware so they just bolted right in without a fuss, and I was able to position before cutting the strap so I could just let them "expand" into place. Then bolt in with the new hardware - torque to spec - and done. The front was a LOT harder but went by a LOT faster. I opted instead to replace them with the truck on the ground. The hard part was not the positioning, but rather, getting the shock bushing on fast enough while it expands and then getting it properly seated into the shock tower/top-spring mount. My workaround for this instead was to expand the shock, put the bushing on, then use my jack to push the bottom up, and gracefully and carefully push it onto the Radius Arm bracket where it belongs. Then bolt the bottom on, and then put all the hardware in on the top of the shock tower and torque to spec. I think I got it done 30 minutes a side again, but I was really tired afterward and my arms ached from some newly developing muscles. AFter this, the ride and handling was a lot better, but I still had that goddamn front end clunk. So I opted to take it to the shop to take a look. Tires Plus said there was no loose components but I did end up spending $800 putting a new steering gearbox in ( a decision I rather well regret because it's easy to do yourself and I could do it cheaper) - this was on top of having them just drill the bracket for the Radius Arm bushings so I could replace them, which they replaced with red, thermoplastic bushings - just like I'd planned to do anyway, so thankfully, that job was done. However, truck came back, still getting a clunk. The truck steers tightly now (about 1/8" play at most), and the handling is so good I can corner this thing like a passenger car almost and it bites into the road like a hungry black bear that just found a nature ignoramus for lunch. So I'm happy with this result...dat clunk tho.....I get it less, but it's there.3/2020 - The Great DIY Clutch Escapade  Probably one of the biggest reasons for doing this section, was because I basically "life-hacked" this whole truck when I did this. See, most people in 2023 don't even remember or know what a "standard" or "manual" transmission is. So for you Gen Y and Z kiddos out there - IE, people my age and younger - here's an explaination of Manual Transmissions, maintenance, and ownership.
It's called a "manual" because you change the gears manually. When you are stopped, you put the vehicle in neutral, and let go of the clutch, and press the brakes. When you're ready to move again, you press the clutch, slide the gearshift into 1st gear, let off the brake and slowly let off the clutch while pressing the gas to accelerate. Once you - at least in my truck - hit about 15mph, you need to press the clutch again, move lever into 2nd gear, and then give a hair of gas while releasing the clutch again, then 30mph to 45mph is 3rd gear, 45mph-55mph is 4th, and 55mph+ is 5th. Same applies to reverse, which is the same as 1st gear anyway. Basically, that "second brake pedal" is the "clutch pedal", not a brake at all. What it does is disconnects the engine from the transmission via a clutch disc - a 7" round disc with brake material on both sides sandwhiched between a pressure plate and the flywheel. When the pedal is pressed, a lever or hydraulic slave cylinder pushes a "throwout" beearing against concentric levers on the pressure plate, and that lifts the pressure plate off the disc fully - releasing any attachment to the engine. The whole shebang rides on an input shaft that is held into the crankshaft on the other end via a "Pilot Bearing" - which gives the clutch assembly a solid shaft to sit on, but allows it to freewheel when the clutch is disconnected, or spin nothing BUT the input shaft when in neutral. THis is how pretty much all cars worked up until the invention of an Automatic Transmission sometime in the 1950's. The benefits of a Manual Transmission is better gas mileage, less power-loss compared to older Automatic transmissions, more control over the vehicle's power, and less maintenance because it's actually a very simple system. On a Ford Ranger or Ford Explorer with the M5OD-R1 manual - 5-speed manual with Overdrive (5th gear), expect about 75000 to 150000 miles on a clutch. Roughly about every 100,000 miles - maintenance is replacing the clutch. This is not a "fault" or a "problem" with the vehicle, this is called MAINTENANCE - seemingly a four letter word to Gen Y or Gen Z. You'll know when it's time because the clutch will start to "slip" - ie you will need to apply more gas and it'll feel like you're losing power. That's because the Clutch Disc itself has brake pad material on it, and that material wears down over time, and once it's worn down enough, the pressure plate can't clamp enough force to make solid connection with the flywheel and clutch disc. The problem with this is it's a very costly maintenance task. Basically, I send the truck to a shop, who sends it to another (Transmission) shop, where it sits for a week and gets worked on once the parts are in, after which, I am to pay about $1300-3000 for what I achieved here in 2.5 days and $250 in parts and new tools (tools reusable - so really $150 from here on out). And in the mean time, if I'm lucky, I get to drive some sluggish jalopy loaner built like a piece of Ikea furnature with worse problems than my truck has. Most of the snooty Seattlites in my social circle would hear this and say "Buy a new car" - failing to account for the fact even a used car is more than the shop, and if I forego the shop, it costs less than a budget lawn mower to carry out. Let's see $58,000 and 8 years, $1300 and a week, or $250 and two days + a free education....I'll take a free education for $250 Alex! Parts and tools were accumulated before I got started. I bought a Luk Clutch Kit P/N: 07-096 (IIRC - it includes pressure plate, clutch disc, and pilot bearing), Ford Motorcraft Slave Cylinder F1TZ-7A564-A, FelPro Rear Main Seal Gasket BS40619 (we're doing this while we're in there, this alleviates oil leaks), an OEM FLywheel from Summit Racing, DOT 3 Brake Fluid (3 bottles), and I kept the original master cylinder with metal pushrod I was using beforehand (O'Reiley's PowerTorque CM1281 - which some guys claimed was for an F-150) - oh, and 5 qts of Valvoline Long Life Dextron III/Mercon ATF - yes, the Mazda M5OD-R1 uses Automatic Transmission fLuid. This is because the Explorer/Ranger's application generates a LOT of heat down there, and regular gear oil is just "not enough" for the task of lubricating the transmission. Valvoline ATF was one of all the things I vetted here from explorerforum.com and The Ranger Station. Some notes on WHY I chose these parts. I picked the LUK Clutch kit because that's what Ford/Motorcraft uses OEM. And it's a hell of a lot cheaper to go direct to Luk rather than order the Ford/Motorcraft rebranded part. These are also the BEST you could buy for stock application per just about every manual user at TRS/Explorerforum. For the Clutch Slave cylinder - the most notorious part of any in this entire list - you MUST USE THE OEM FORD/MOTORCRAFT SLAVE CYLINDER!!!. If you don't your Ford light truck/SUV will only make it 24,000 miles before it starts leaking DOT3 and becoming hard to shift, and requiring a long warm-up period to re-seal the slave enough to drive the vehicle safely. There is no excuse NOT to use this part. I bought mine on Amazon for $55. YOu can also buy one at a Ford Dealer for $55-300. Ford used this design all the way up to the Vulcan 3.0 2011 Ranger so it's still being made and revised. FelPro is a good enough, decent rear-main seal. It's one of those "while you're in there" things because I was planning to take the Flywheel off while I'm in there and get that done since I did have motor oil leaking between the bell housing and the back of the engine. Since I replaced that, my engine no longer needs a quart of oil ever 6 months regardless of how much driving I do, and I only get one or two dots of oil on the pavement instead of 11. I'll discuss the Master Cylinder again though I don't cover that here. I picked that particular unit (PowerTorque) because all the new ones are mostly chinese crap made of plastic, with a PLASTIC push-rod (or more specifically, a metal push rod with a easily shattered plastic actuator molded onto the end). For a refresher, I had to reuse the resovoir, diaphram, and the quick-connect-release pipe to the master cylinder from the original. I don't see a point in replacing it unless it has a problem, which then it will promptly be replaced with the same part. And mind you this will probably be the most tedious job I've ever done, further compounded by the fact that I have a crackhead neighbor terrorizing us the whole time, and I'm doing this in shitty, wet weather during the late winter/early spring of 2020 - just as COVID-19 was taking hold. I think I was more scared of the neighbor trying to kill me by releasing the parking brake or shaking the truck off the ramps than I was of anything I was doing. I came home every day looking like a wet alleycat grease monkey. Day One Day one started with my first time driving up ramps. Lucky me, I had a nice set of 1970's, heavy steel ramps I borrowed. It took a few tries but I got the X on the ramps. Once on the ramps, I checked the truck for solidity - it was nice and firmly planeted on those ramps. I now had about 3-feet of space up front, and just enough in the rear to get at the driveshaft yolk. Now I chocked the tires. I did not have chocks, I had some big ass rocks though...well, one big rock, and a broken chunk of street curb. I think they weighed as much as the Transmission did, lol. First was the interior work. Pull off the shifter knob. Then remove the 4 screws under the rubber boot for the shifter on the plastic bezel, pull that off. Now, at the base of the shifter is this crazy bolt-assembly where you swap the bolt to the other side to loosen, and to the other side to tighten. So I put it on the loosen side, and took the shifter out. Now I cralwed diagonal under the passenger side and unbolted the drive shaft using a 1/2" socket and a set of high torque, thick wall, star sockets. These are around 96 FT-LBS and I needed to use my breaker bar to get them off. Luckily on a 2wd, the drive shaft is lightweight aluminum, so easy to move. Now was time to remove the starter. So I climbed in front, and unbolted the bottom bolt, which at the time, I assumed was a hack-job by my once upon a time mechanics...only to realize the summer of 2023 that Ford indeed had a stud with a nut welded to it - because that was to hold the wiring harness for the starter on the outside bolt (DOH). I removed that and the starter came off, revealing the top "ear" that attached it had broken off. So I unbolted that, and set it aside, since it was broken in a way that it could still pin the starter in place with enough force for it to stay. I did not bother removing the starter wiring....just no point, and a good idea to let old wiring go undisturbed. After the starter was removed. Now time to put focus on removing the transmission itself. First is the crossmember. 2wd Explorers have a cross member held by a single bolt on the driver's side with a sort of locking-blade thingy, and then 2 bolts into the frame on the passenger side. The middle two bolts go to the "harmonic balancer" for the transmission. I took all of those out and removed the crossmember, supporting it with my new Pittsburgh Transmission Jack. Then came removing the harmonic balancer, because I"m sure my wife would not appreciate finding me in a pool of my own blood with a harmonic balancer lobotomy. One bolt, set aside. Done. Now Ii decided to tackle removing the Y-pipe - big mistake. See, my truck still had, at that point, the original exhaust system from the cats forward. All tutorials said to remove the "Y Pipe". The "Y" pipe goes from the 2 cats, and splits it off to two inputs for the exhaust headers on each side of the 4.0L V6. It's a big steel pipe that routs across the inside of one of the frame crossmembers - right under the transmission (oh joy) - and it's held on by 7 rusty-as-fuck-all bolts. I hit that thing with PBlaster, WD40, Anti-Seize, and Kroil, and I still couldn't get those bolts off. And I'm not about to risk blowing up 1/4th of the complex with a acetelyne torch trying to remove ancient exhaust components. The whole goal here is to get the truck working for less money and time than the Transmission shop. I think I laid < for 40 minutes trying to get the rusty bolts off. Forgettaboutit! So then I decided to leverage one of the secret weapons in my mental toolbag - working with TIGHT tolerances. Yes, we are removing the transmission WITHOUT removing the Y-Pipe. And after some observation, it's totally doable, though I might dent the pipe (note: I did - making a short 2" section ever so slightly more "oval"). Getting the Transmission out would have been something someone like Rube Goldberg would appreciate. A ratchet strap, and the transmission jack. I'd liken it to a giant chinese puzzle game. To remove the remaining six bolts for the transmission (remember, I took the two out BEFORE driving onto the ramps), I used 2 2-foot socket extentions, a socket wrench, and a 14mm socket. I had to run the 4 foot of socket extention to the bell housing, and turn - working by FEEL alone. To help, I threw a neodymium hard disk magnet on the socket to hold the bolt on after I got it out. This part was not so bad, just a lot of feeling around and re-attaching the magnet. Once those bolts were out, Now it was time to remove the transmission. I had to do some very light prying with a flat-head screwdriver first to help separate the bellhousing from the flex plate. To support the transmission, i had a light duty ratchet strap looped around the frame rails and under the tailshaft, with the pittsburgh further forward to support the gearbox portion. While I worked the transmission loose, I would loosen or tighten the ratchet strap to keep it secure, but allow for movement in the right direction. At some point I found this was getting difficult to get through the hole in the cab. I needed more angle. To achieve this, I first removed the aluminum plate by bending it up a bit, and pulling it from under the carpet. The Shifter boot screws to a 10"x10" aluminum panel covering a big hole in the transmission hump. From what I know there are 4 plates: a blank one for Automatic, a 2wd or push-button 4wd Manual one, a Automatic one with a manual T-Case, and a Manual with Manual T-Case. Having that off makes it easier to manipulate the Transmission from inside the cab when needed. Periodically I used my AC Delco 3ton jack with a cut-off section of exhaust pipe to push the front of the engine up where the faceplate/timing cover is to lean the tailshaft downward. This helped move the tailshaft down and get the transmission entirely free of the engine. the first big challenge was getting the top of the transmission past that body seal. The Explorer front clip attaches with some tig-welds and a 3/4" wide lip. The trick is getting that bloody bell housing PAST that lip. Once at that point, I used m 3' long flathead I use for brake work, to "shoehorn" the bell housing past that body seal, by bending the seal a little, and by prying the bell housing past it. This part took me 2 hours and was another "puzzle" in this series of puzzles. This was also achieved by turning the transmission off to the side so the rectangular top would clear the body seam. Once past the body seam, I had to pull the transmission down onto the floor. The M5OD-R1 weighs around 88LBS empty - this one was full though, so it was more like 95LBS. I laid it on it's side and decided to go in, clean up, and rest for the night. Day Two The next morning, I woke up, put on my garbage clothes, and started the day by addressing the elephant in the room. The jerk at P-Tune forgot to put the observation window plug back on the transmission. So now I know why my clutch wore out a little prematurely - about 75K. It was because all the dust, dirt, sand, and other crap, had been flowing into my truck's transmission for years now, sanding away at that clutch disc. I started to douse the inside of the bell housing with brake cleaner after taking the slave out, and get rid of 8 years of road grime, dust, dirt, sand, and other assorted crap....motor oil...and clean it out nice. Then the new Ford Motorcraft Slave was installed, and the old Precision Clutch unit was removed. I could tell it was a Precision Clutch unit because it had a quick-release fitting. It also had a metal body. It did great as/is. Shame I had to get rid of it because no core charge. Then I removed the pressure plate, six bolts, 24 FT-LBS each, and I had the most interesting surprise in this whole thing.....Sachs must make a decent clutch disc at least, because I apparently got my truck onto the ramps with NO clutch material left! I mean this thing had been ground down and used up so much, there weren't even rivets left for the material to attach to - just flat metal. Now came the 6 lug flywheel. Removing that was a breeze, though it weighed so much it reminded me of that giant coin thing the gold diggers in Herbie Goes Bananas were trying to make off with in a Cessna (it was too heavy for the plane to take off, LOL). Maybe this is what Moses felt like during the 10 Commandments? Hey, it takes some real momentum to spin a 245 cubic inch V6! Okay, so now we're down to the two most annoying tasks - oddly only having to do with SMALL parts. First was getting the pilot bearing out. I was broke, could not afford bread, so I wound up putting a AutoZone bearing puller on my credit card because the Harbour Freight one was too big for the job. Then came the Hobo Freight "pick" set getting bent up getting the old Rear Main Seal out of the engine. I think I wound up using screws and a flat-head computer screwdriver to remove it in the end. I bent EVERY pick in that set getting that !#%@# thing out. Putting the new rear main in was easy though, just align with the tool, then hammer in using a hammer and a socket extention, going around the crankshaft carefully to get it perfectly centered, lined up, and seated. Then came the pilot bearing which I carefully did with a rubber mallet - making sure to center it. After that, the new flywheel was installed, as the old one had burn marks on it. 56 FT-LBS each bolt, done like a six lug wheel in a star pattern, to perfectly center it. The new clutch disc was put on the splines of the input shaft and slid over with spline lube to make sure it'd smoothly move around as it's supposed to. Then an alignment tool was put on (plastic plug thing), and the pressure plate installed over that. All six bolts were torqued to 24 FT-LBS - then the Plug was removed, assuring the disc was straight. I made sure to have one spline opening straight up so that I could align the input shaft to the splines in the clutch disc - and get it on. Now came reassembly.....I spent another try at removing the Y pipe after letting the bolts soak this whole time - no dice. So now I had to lift the transmission up - using a strap - and the transmission jack, and then start sliding it in. I got it up to the body seal, and then wrestled it past using the angle and the screwdriver again. It took me about 7 tries but I got it past, and now it was time to really start lining things up so that this would go together. Transmission was now turned back 90 degrees the way it's supposed to be, and I hefted it up over the "Y" pipe, using my jack and exhaust cutoff again to angle the engine the other way, and then the parts started to come together. I would use the strap less here, and more to keep the transmission from falling on me as I pushed it back into place. Working little by little, making sure the splines lined up, and there was no force on the input shaft putting strain on it. By suppertime I now had the transmission 90% of the way back in with a small gap. I managed to shove it back in using the transmission jack, ratched strap, and some careful bolting it back in to push the pieces back together. I now re-attached the lower six bolts using my 2 foot extentions. The last piece of the pie was not reattaching the speedometer cable, backup light cable, shifter lockout cable, and then time to go in, clean up, and finish up tomorrow morning. I left the Transmission Jack and strap on until the next morning. Day Three - Finally, that's done The morning started with me bolting back in the harmonic balancer, crossmember, and the driveshaft. And then doing a mild enough bleed of the hydraulic clutch to make the truck driveable safely enough to get it off the ramps and do a blood transfu...er...transmission fluid change. I then bolted in the shifter panel, wiggle stick/whammy bar/shifter lever, dust boot screwed back on, then the knob. Then I climbed under, and bolted the Starter back in - top first to pin the other 90% of the starter into place with the other bolt. Then I reconnected the batteries, backed the truck off the ramps, got out, removed the ramps, and pulled forward. Then I took my pan, put it under the "Drain" plug on the M5OD-R1, drained out the old, still rather red and kinda-transparent clutch fluid, then refilled using a hand-pump - 5QTS of Valvoline Mercon/Dextron Long Life. The top bolts were put back on the bell housing. Then proceeded the irritating process of bleeding the clutch system. What I did this time was pushed the clutch down and held in place with the 2-foot screwdriver, cracked the bleeder into a empty gatorade bottle, slowly let up, then refill the resovoir to full. Did this about 10x. By the time I was done, I had full clutch functionality. Of course, I had to do it again a few times over a few months. I think I eventually got it 100% perfect using a Hobo Freight hand-pump kit and the needle-sized nozzle to suck the air bubbles out months later. That said, the feeling of the clutch was way better. Much smoother, and softer, and acceleration was restored. I also noticed that the transmission was VERY happy now, no more 1st gear wonkiness, and it just ripped through the gears like a racecar. I also noticed I must have some kind of performance gains from the exhaust and my other upgrades because the truck no longer "lugs" when in too low a gear, it just moans a tad and rapidly picks up speed effortlessly. Felt weird leaving a Tesla in my dust leaving for pick n' pull. Why Pick'n'Pull. Well, time to right the wrongdoings of Pee-Tune. I moseyed on into Pick N' Pull for my $5 fee, and wandered into the domestic SUV/Light Truck area. NO 1st Gen Explorers ANYWHERE. All 2nd Gens, and all Automatic. THey had a Manual RANGER for sale up front with 4x4 (very tempting) with a mismatched fender, but that's it. But plenty of bashed up - presumably drunk driver cowboy Rangers - with manuals. You always know drunk driver Cowboy Rangers - pull the seats and you find shotgun shells, Copenhagen jars, condoms, maybe even some beer cans or an alcohol bottle. It took a few automatics that probably had enough Marty Stewart through the speakers the damn thing twangs in the junkyard to find a nice teal Manual supercab that had the 4.0 and M5OD-R1. And it had a plug. Problem is, it was sitting ont he ground. So I had to grab a pittman arm to god only knows what, and use that to pry the rubber cover off the Ranger's transmission. I grabbed some other parts while I was out there as well. I'm thinking after this monster job, it won't be such a huge deal in the next 100,000ish miles. I learned a lot along the way including how to do this without removing that @*%*% Exhaust. That might be the one thing that when I replace it, I might have a "pro" do it - because I don't want to deal with rusty bolts stuck in engine blocks. The plan for that is to replace the headers with some TrickFlow or Hedman high-flow headers, high flow Y pipe, new O2 sensors, and a fresh pair of cats - and a stealth high flow exhaust.3/2019 - Replacing the Durabrand DB1210 with the JVC KD-X205BT Headunit 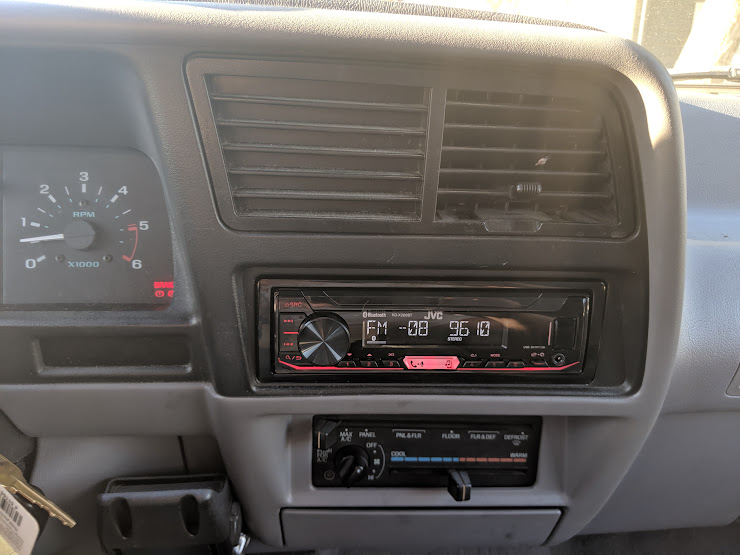 So for about a month or two of 2019, I had a dead car stereo. And those who read this page know....I'm a Musician, I HAVE To have a headunit. So I decided, during a in-law visit no less, to go to Best Buy for something I don't really remember, and while there, I decided to look at Car Stereos. Man, things have changed in 10 years.
First off, thank FUCKING god that this whole silver "chinstrap beard" Limp Bizcuit/Kid Rock douchebag shit is finally DEAD! Seriously, the last thing I want my car to look like is the kind of vehicle you'd see a Chad driving with a pile Naruto stickers down the side. Everyone gave me crap over the 80's in my generation saying "thank god it's dead" - well, thank god the 80's are back ,and thank god the late 90's/early 2000s are dead. Because teh look of this era's car stereos is WAY better (and matches my vehicle better), than that cut-rate garbage from the Chinstrap Beard/Bowler Shirt era. But being as people are starting to see these things as "Vintage" or "Classic" now - yeah - don't believe me, read below...... Anyway, being as the 1st Gen 1991-1994 Ford Explorer is becoming regarded as a "Classic" to a lot of people now, It's time I start preparing it for a future more inline with the Ford Mustang you see at Hot August Nights, than the Ford Mustang you see parked in the work parking lot.
Now, this is not meant to be about the validity of the 1st Generation Explorer as a classic, but a radio install. I'm already getting a taste of what being a DeLorean Driver is like. "Where's the Flux Capacitor" "Did you find any Cocaine in your door sills?" "So how much did Doc charge you?" - except for me it's "So, where's T-Rex?" "Are you gonna' paint it like Jurassic Park?" "Well here it is, the J.P. Motorpool!" "Why hasn't this thing rolled over yet?" or the rollover comments, especially now since I'm wearing Firestone rubber on the truck for the first time since 1993. But the mention of the "Classic" status is important because I did something "new" here. See, when I installed the Durabrand stereo in 2008, I was not at all thinking about "value" or keeping the vehicle this long. I was thinking the engine would be dead by now and I'd be rolling around in something else, probably an automatic. Nope! But now, I was thinking "it sucks there were no adapter harnesses in 2008 for this thing, but what if I could wire in any harness (partial) I wanted to the truck, including and up to the original one!". See, I know of a thing most auto people don't, and It's called insulated spade connectors! So now, anytime I install a new headunit, or even a restored Ford Premium Audio system from 1993, all I have to do is match up the wires, and plug em' in after I solder them in on the other side. I made the ground deliberatly an opposite polarity connector (female instead of male) to keep it like it should be. This means basically - totally universal stereo, and solid, SOLDERED joints (on the stereo side at least). The headunit I picked up was a JVC X2**BT model. This was 100% what I wanted, only cost $50, was black, had red-accents (that's my truck's factory "accent color" - which is the same as any other Explorer Sport from that era), and best of all - the hands-free Bluetooth could be poked from the gearshifter knob. So essentially, I designed my own *modern* high-level audio system. I have USB now, no more CD's, no more goofey wires. Also, the bass response is great. Now just to get some decent replacement 5x7" speakers. 3/2017 - The Little X That Could It was a rainy day and I was driving to work at Microsoft. The X's lights were getting dimmer, the clicky relay for my turn signals was slowing down, and my wipers were really slow. I know that something was amiss with the electrical system, and I knew I had to stop at O'Reiley's on the way home ot have it fixed. But it got me to work.... 4:30pm I get off work, I sit in the truck, cross my fingers, say a little prayer, and then turn the keys and boom - she fires right up. Dim headlights, slow wipers, almost no voltage on the voltage - I know my battery is near dead, and my alternator is dying. THe original Alternator that is - with 348ish,000 on it. Silently saying "Im Sorry" over and over to people who probably thought I was the biggest asshole on the road with signals probably barely, if at all visible, and almost no brake lights left....I pulled into the Redmond O'Reiley's. Pull in, run the Alternator test - alternator is dead. They have a replacement though, and it's in my price range, so I buy it, and install it, and a new battery. Same boring rigamarole as they always say (how I like it): disconnect (damn near dead) battery, breakover bar into square socket on auto-tensioner, release serpantine belt, disconnect molex and ground from Alternator - 2 bolts, bob's your uncle. Now I had the alternator out, now reverse the process, toss in a new budget 80cca battery, kick the keys - boom - fixed. And the smug Seattlites in our social circle can once again eat their words as their Subarus sit in the shop for six days with a dead alternator waiting for parts to the tune of $480 while I spent just a little over $100. While I toss a battery and an alternator in a 25 year old Exploder for what I said in about 20 minutes.May 2016 - Replacing the Radiator and Thermostat So here we are, 375Kish If I recall, and I'm still getting some extra heat. Well....I have a new trick up my sleeve. I just finished reading explorerforum again, and found out about the radiator, and the "sticking" thermostat problem. Since I'm interested in preserving this engine, and not warping my cylinder heads, let's just say it's more than due for an overhaul. First was removing the OLD radiator. This might be the ONLY time I made a huge mess working on a car. See, on the Explorer, the passenger side has a check valve you can crack to drain it into a pan...problem is, this radiator's drain valve BROKE, and was stuck shut. Not even my trusty Craftsman Robogrips could turn it. Considering this is a 25 year old radiator....maybe it's time to just get a new one. So I decided to do the one thing I could....Pull the lower coolant hose - BIG MISTAKE!! On one hand, it was good news to see that there was that little rust in all of the something 4 gallons or so of coolant in the Explorer - it was almost all clear green, with some very minor rust - almost no brown. On the other hand, using up three rolls of paper towels mopping up that EPA disaster was NOT fun. But I got it, and quickly too, to the point that I think Walter Peck, the EPA prick from Ghostbusters might have given me a pass. Workspace cleaned up and all mess avoided. Now time to do the real work. I put the used coolant in a empty antifreeze containter and took that too recycling. I picked up a "Premium" Radiator - 3 row - from AutoZone, for $92. I replaced the cap too while I'm at it with a Prestone one. Got the premium thermostat as well for about $15. This would be a good time to mention why this is so important.... The Ford Cologne V6's only major folley - is if you let it overheat. What happens is your cylinder heads will warp, or crack, allowing the truck to burn coolant, and causing vacuum leaks and loss of compression in the cylinders. I'm a lucky bastard becase at that point I had almost 370K on the original engine (which I STILL have), and the last tune-up revealed 100% full factory spec compression on all cylinders but #6 with a small dip (normal). Soooo....this is why I invest in this. If you take caer of your engine, it'll take care of you, and I've been VERY careful to keep this truck from overheating. It's never been above the "A" at the end of "Normal" except ONCE - when the top rad hose blew in 2007 - and even then, I was able to limp it to the shop to replace the hose. Cooling is what puts these engines to pasture. March 2015 - Replacing the Fan Clutch So I noticed the temps were getting a little hotter, and I decided to check out my 300-something thousand mile fan clutch. This job was easy. I just rented 2 tools and bought a new fan clutch from Auto Zone. How the Fan Clutch works on the Ford Cologne V6 in an Explorer, is there is a helical copper "clutch" that engages once the temperature reaches a certain level. This themo-activated helix pushes a copper plug against the crankshaft, tightening engagement with the engine, pulling in more cold air through the radiator and around the engine. To remove the clutch, you hold 4 bolts with a special wrench, while using a second, larger wrench to turn the right-hand threads (righty-loosey, lefty-tighty in this case not lefty-loosy, righty-tighty)0. Once loosened, you can just spin it off. Then you have to remove 4 bolts on the fan itself, remove the fan from the clutch, then re-attach the fan to the NEW clutch, then spin the new one on and tighten using the tool. Mousey lady came by again giving her disapproving looks. Seriously, she needs to just get back in her Prius and shut up, or give me $58K. Seriously, put up or shut up. At 340-something thousand, I consider this "maintenance".2008 - The Durabrand Stereo System 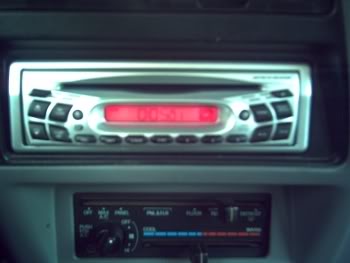 So this was the first "mechanicy" thing I did. Thing is, this came before my distrust of dealerships. Basically. My truck started off with the Ford High Level Audio System when it was new, and the stereo finally died in 2019 after getting used HEAVILY. Seriously, tunes are MUST in my truck - I'm a musician, I listen to mixes on this thing, and I need something to get me to shut up on my talking-to-myself commentary on the traffic and idiots in my life on my commute.
The Ford High Level Audio System is one of the most difficult audio systems to find a bloody schematic for, because not everyone bought it, and it's a bit more complex than the regular one. Instead of just a radio headunit connected to a series of 2-4 speakers and an antenna, the Ford Premium High Level Audio System of the time connects to Four 5x7" JBL Speakers, and a 6" Subwoofer in it's own resonance chamber in the back, as well as a Preamp that triggers and filters the audio for the subwoofer, and serves it out to the 4 speakers. Explorers came with this setup, and it was a very popular setup in that particular vehicle. Problem is, when I was 25, I was not about to drop $250 on a Kenwood, Blaupunkt, or Crutchfield audio reciever. I needed to consider my budget. So what we got what this fugly thing - the Durabrand AM/FM CD-Player - which I wish came in black. Aka, model DB1210, a "60 Watt" "chinstrap-beard-bro-puke-silver" headunit with a red display. It clashed with the interior, but you need to understand, at this point in the truck's life, this was just a minor luxury for me to enjoy on my hours long 15 mile drives to work. IDGAF what it looked like, I just cared that I could make mix CD's, slap em' in my truck, and listen to them.
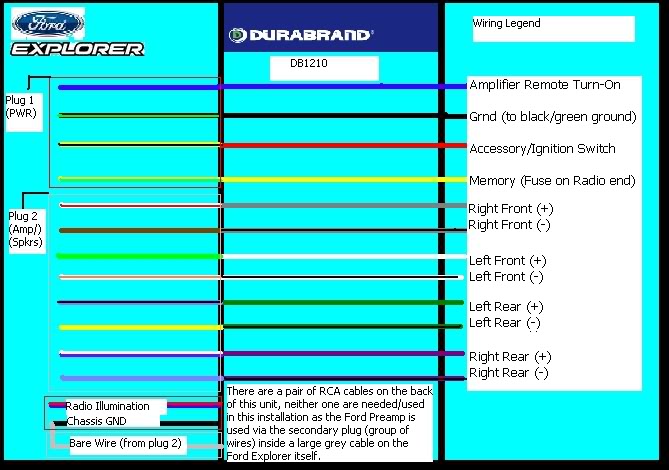 My wiring Diagram that I created for the Durabrand DB1210 Headunit to attach to the Ford High Level Premium Audio System When I wired this together, I used Butt Splice connectors. The problem with Butt Splices IMHO, is that they rely on friction alone to hold the delicate little wires in, and you cannot see under em', so I wasted a few and wasted a few lengths of wire on the original wiring harness getting it right. This is one of the reasons I HATE living in apartments, is that without a garage and without any source of power, I can't really solder these guys in right. That said, it lasted 10 years so maybe I'm being a bit hard on myself about this one. So I can't really complain for $50 and 10 years, that's a small price of admission. Installing the headunit was pretty easy and similiar to what the JVC XJ-250BT was 11 years later. My only gripe, and this goes for almost ALL of these aftermarket headunits, is how they attach to the car's radio bay. Basically, you sit in a coke-can aluminum collar, press out some legs on the sides ot secure it, and then snap a plastic trim ring around the unit. On this one I had the removable faceplate, which I kept removable. Looking back I should have just screwed it on permanant because car radio thefts seem to have gone the way of Fax Machines and Floppy Disks, and Ford Explorers are one of the most hated vehicles in America by the kind of people who steal I'm willing to bet. They're not fast, parts are so cheap there's no point in a black market, and the stereo is nothing special (the O.G. one don't "Thump"), and this says DURABRAND on it so anyone with half-a-brain-cell could tell this thing was from Wally World and not from the snooty radio store with a Porsche 911, BMW E30, and a pimp-lookin' Buick Rivera out front. That said, THIS unit DID thump, and oh boy did it thump. It had tw levels of "MegaBass" on it - one was "Terrify Gangsta's" setting, and the last one was "Audio Subatomic Missile" setting should you want to launch unwanted pests out of the truck through the sunroof. Seriously, you know all those Instagram videos of cars tearing themselves apart with their stereo systems, I think my Truck was the classy O.G. of those with this headunit, the difference is, I actively avoided that setting, because replacing glass and bolting body panels back on did not sound like a lot of fun just because I wanted to send the geriactric rhythm guitarist through the sunroof on I5 south. |


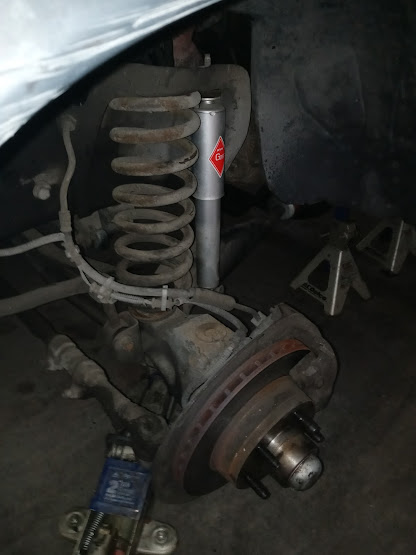 First is unbolting the spring, you need a 1 FT Socket Extention and 18mm/1 1/8" deep-well socket, and possibly a shorter extention for your socket wrench and later torque wrench. There is an opening on top of the coil bucket that allows you to drop the socket and extention down in it, no need to remove the fender well. You can loosen the bolt first using a open-end wrench, but it's going to stop letting you loosen it after a bit. See, you'll need the open-ended wrench on the BOTTOM of the 2wd TIB axle because the bolt goes THROUGH it. This was not in Shango's video because his 1992 Explorer is 4wd and has separate bolts for the top and bottom of the Dana 38 front differential. On the 2wd, it goes THROUGH the I-Beam. So, what I did...I placed the 1/18" box end wrench on the bottom bolt, and then used the Jack to HOLD it in place by tightening it against the wrench ever so slightly. Then with the breaker bar at first, I put my foot on the 1 1/8" wrench, and pull/push on the breaker bar in the correct direction, to break the bolt loose enough. It's not held in with THAT much torque - the spec is 45 FT-LBS to 72 FT-LBS - the part that makes it hard is rust and dirt, which I'm lucky not to have much of either at 417K.
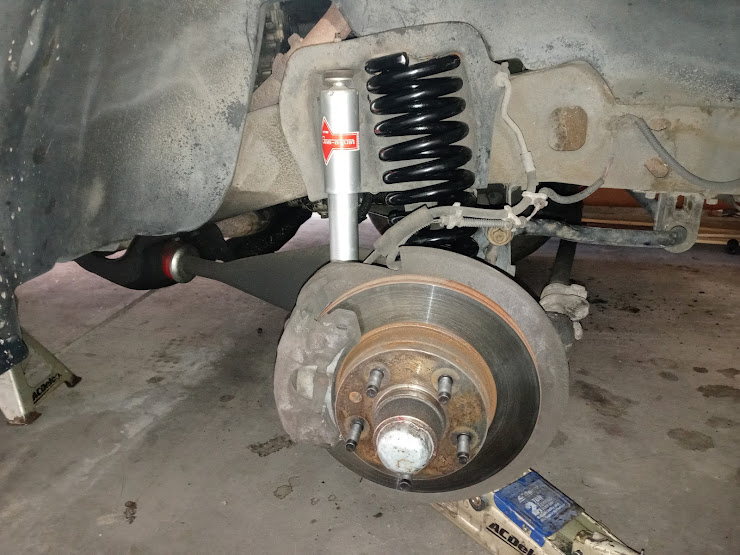 With the new spring, insulator, and the metal spring-mount piece in place under the insulator, we can now jack the axle back up and line up the coil insulator with the inside of the bottom of the spring. You want the tip of the "teardrop" shape of the insulator to sit between the bottom end of the coil spring, and where the coil wraps around and starts to rise diagonally. As you jack the axle back up, it will line everything back up correctly as it is pressurized. Then, just as you get the axle assembly and spring to meet - slide in the keeper and bolt through the lower two rungs of the spring, and then you can place your socket wrench on it and start the bolt. Jack the axle up more, line up the sway bar as well as you can, and if you can't get it lined up without lifting off the jack-stands, you can actually line them up by prying the bar down, then pushign the bolt through. THen there's a nut and washer that go on on the wheel-side of the bar. Sway Bar Link nut and bolt should be torqued to 18-21 FT LBS.