| NANTAN FMAK9200/FMAP9200 PAGE | |||||||||||||||||||||||||||||||||||||||||||||||||||||||||||||||||||||||||||||||||||||||||
Basic Specifications
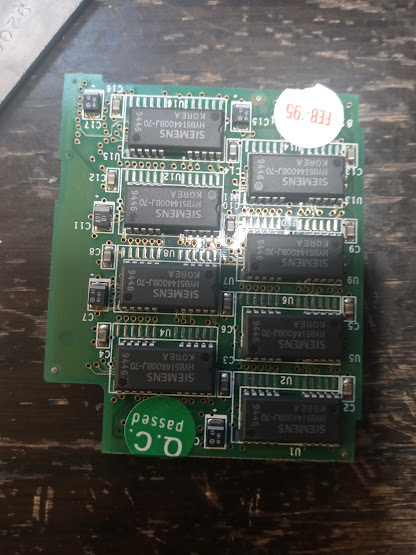
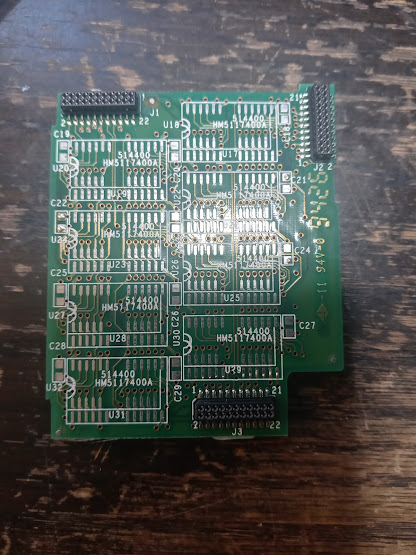
Assembly and Technical Details NanTan sold these as what they used to call "BareBooks" - basically like a "Whitebox Notebook PC" of sorts (an old term referring to how these chinese parts and assemblies came from the factories in China, to the local shops, in plain white boxes). Basically, the company would have NanTan print up a bunch of 9200s with their logo on them (or not and the re-brander would use badges at their own place). The barebones of the system comes either as a Monochrome 9.4" STN model, a Color 10.3" DTSN model, or, apparently also an Active Matrix version was available as well - in either 9.4" (Active Matrix and Monochrome), or 10.5" (DTSN). The Monochrome Panel is a Casio MD810TT00-C1, Made in Japan, and it uses a rather standard pinout. The picture quality of this LCD Panel is alright, but it's very prone to ghosting when gaming, and not very good with high speed moving items. The color LCD Panel used in the 10.3" DSTN models is the Hitachi LMG9300XUCC - which is a Dual SuperTwist Neumatic display that's actually pretty alright, but nothing amazing to write home about. Streaks a tad in Windows, and fast moving objects dissappear, but a heck of a lot less as often as they do with the monochrome display. There's some mention of an Active Matrix model using an NEC LCD Panel - which I'm guessing could be one of the NL6448AC30 series panels used by the MEC Versa, but I don't have that information. The information I got about this came from a YouTube commenter, and from a review in PC Magazine in 1994 or 1995. It seems all three models use the same graphics internal connection from the motherboard consisting of 3 cables very similar to what I'm used to seeing on NEC Active Matrix Versa models (except a few more pins it seems). These then travel into the laptop's screen assembly and likely could be connected directly to an Active Matrix LCD, or be connected to some kind of Adapter board that converts/mixes-down the signals to DSTN or STN Monochrome or Color signals to comply with whatever panel is being used. I've been tempted to try this on a regular NEC screen and see if any wiring lines up - but I'm not 100% certain. On the Monochrome version I have these three connectors go to a ballast board that likely also reduces down the signals to just 15 wires for the fairly standard STN monochrome panel, as well as provides the ballast transformer for the CFL backlight - of which there is only one. Seeing how this is, and knowing the NEC NL6448AC30-xx panels have three connectors themselves and the ballast board is directly on the LCD itself, and the three connectors here are providing some similar signals to the panel, as well as power to the ballast - it just might be possible to convert an NEC NL6448AC30 LCD display to be used in one of these, the screw mounts look similar too - but the plastic is not prone to cracking. For the DTSN and Active Matrix versions - if you have one of these and are handy, please throw me a line as to what the make/model of LCD Panel you have in your laptop is. One of my goals for my site is to provide some electronics-engineering information for people like myself who like to modify these things and/or "Hot-Rod" them as I say. If possible I'd love a pinout if anyone has information on what the pinout may be or how to obtain them from NTC/Clevo or by testing signals. Next down is removing the keyboard for access to the RAM, CPU, DIP Switches, and Jumpers. First you'll need to slide a cover located under the left side of the screen forward, then tilt it out. Next, there are 2 latches on each side of the keyboard, use your fingernail to push those in and lift the keyboard up gently by the middle, and it should lift off and out. Actual Disassembly of the System UnitThe first part to remove on these is actually the screen. To remove the bezel, use the 2 latches on the sides to open the top, then there are 2 rubber plugs and 2 covers to remove from the screen bezel. The rubber plugs are at the bottom, the covers are at the top. Then take out the 4 silver screws beneath and carefully snap the edges of the screen bezel loose and the screen bezel can be carefully worked around the latches to remove. Once the screen bezel is removed you have full access to the inside of the screen assembly. There are three cables coming from the raised middle part - disconnect these from the screen connectivity/ballast board. Then nthere are 4 small black screws to remove, two per hinge. Then the screen can be carefully removed as an assembly. I have not tried swapping screen technologies yet, though it seems doable, including possibly using a NEC NL6448AC30 panel from a Versa as the three cables seem to carry the same signals used by a TFT. The cover above the keyboard slides off, then the keyboard is removed by pressing in 2 latches at each side of the top of the keyboard. The keyboard is plugged in by two FFCs (Flat Cables), just carefully unlatch the connectors and pull the cables, being careful not to riip them or break the connectors (as they are a real b**** to replace). Now with the screen removed, you can pull the two batteries on the bottom by pushing in the button and rolling them out. If they are corroded in, you might be able to pry with a small screw driver carefully while pressing the buttons. Then the HDD caddy needs removed, which just needs sliding a lever over and pulling on the caddy to remove it. Don't forget to remove the trackball, there are two small arrows indicating the (counter-clockwise) turn to lossen the retainer ring and remove the ball. This will make handling the plastic easier. After that are about eight screws holding thte bottom on, one on each corner, then 3 or 4 in various other parts of the bottom of the case. The case comes apart in two halfs - the palm wrest which contains the trackball, speaker, logic board, and the hinges, and the bottom half which holds the rest of the laptop. But before we can fully separate these, the speaker cable, 4 screen cables, and the trackball cable need disconnected. The hinges are removed via removing 2 screws from a LED control board on the bottom of the palm wrest/keyboard bezel, then removing both screws from the latches (which also act as a support piece. One VERY useful thing you can do with these, as they a re held together with bolts, is hold the screen mount with a pair of pliars, and a second par of pliars can be used to turn the bolt counter clockwise to release tension on the aging hinges. Loosening the screen will help you to save from breaking the aging plastic quite a bit. I suggest these kinds of tweaks on ANY laptop computer that's vintage, as I'm trying to preserve these in working order. CPUS - Now it's time to talk the CPU you want to use. My Prostar 9200M had the intel 486DX2-66 that's now in my DFI MediaBook. The DFI had an intel 486 SX-25 originally, and the Duracom 5110D had a Cyrix 486 DX2/66 in it, which I put in an IBM PS/2 Valuepoint after I put a Intel 486 DX4-100 in there. This should show you the variety of CPU used in these machines. The CPU is tweaked using the jumper block - which I still cannot find a service manual for, but some experiments found that even overclocking the FMAK9200 is possible, but it does make the chip a bit...uh....unstable. That said, I believe it has some way to either auto-sense voltage, or maybe it just runs at 3.3v full time and starves the CPU for 5vdc. The best way to remove the CPU, if you don't have a 486-Spade tool, is to use a very thin flat-head Jewler's screwdriver and some kind of magnification device so you can see where the CPU attaches to the socket. Despite the socket supporting 3.3v CPUs they chose to use a Socket 1 type LIF socket where you have to pry the CPU out. Carefully pry it out, working from the sides as much as you possibly could get access, and then grab it with a chip puller (gently) or with something equally as capable that clears the hole the CPU fits into and lift it out. Another easy way to remove it is pry from the lower left corner, then the upper left corner, and then work the CPU out on the lower right, and carefully "work it loose". The flat corner goes towards the bottom right of the CPU socket. I think this also would be a good time to talk about the actual performance of the 9200, which is above average for a notebook of thtis class. Even the SX-25 in my DFI did a really good job for most of-the-era DOS games, and the DX2-66 at 50MHz is comparable to some DX2-66 systems, and comes very close ein benchmark to my NEC Versa V/50 (which has a DX2 SL at 50Mhz). NESticle also seems to run at full frame rate, though some of that could be caused by the ghosting of the STN monochrome screen. I put a DX4-100 AMD CPU in there for a day and it was a bit cantankerous because I'm looking for the jumper settings. The CPU Identification was off and I can't find jumper settings for it, so it was listed as a 486 DX2 at 100MHz (!!!), at one point I got it setup to a level that it was stable and performance was shockingly fast. It supports up to a 132MHz CPU, which means an AMD AM5x86 PR75 133MHz chip (basically 486 DX5 133) will work in one of these. RAM - This system uses a proprietary RAM expansion module on a 3 connector module under the keyboard just below the CPU to upgrade from the 4MB of Fast Page RAM on the motherboard. The 4MB Expansion module has 8 chips on it - 512KB each - for a total of 4MB on the card, making for a total of 8192K RAM. One other thing I noticed was they had all the "Glue components" in place already so it may be possible to solder additional chips to the memory module to expand it's capacity, as these modules are very hard to come by on their own and are unique to the 9200. DIP SWITCHES- The DIP Switches on the FMAx9200 series laptops are used to configure the on-board ESS 488 8-bit mono Sound Card (Soundblaster Pro Compatible w/ OPL/2). The settings are in the table below. Default DIP Switches (1-8)
JUMPER SETTINGS - There's a 16-pin block of Jumpers underneath the Memory Module referred to as JP4. These are used to configure the CPU on the computer. These are used to configure whether the CPU has an on board ALU (DX) or not (SX), and the bus speed (only 25 or 33MHz compatible). There's also a 4-pin block on the power board referred to as JP1 which is used to set the CPU voltage to 3.3vDC (486 DX4+) or 5vDC (486 SX/DX). I created my own chart for these jumpers below.... 
CMOS BATTERY - The CMOS Battery is located beneath the RAM and is a CR2302 permanantly soldered onto the motherboard. You may be able to remove this and replace it with a proper battery holder, but oddly the one in my DFI MediaBook still holds a charge despite being almost 30 years old. I think the one in my Duracom or ProStar was socketed so some of these may have had a socketed CMOS Battery instead. That said, I know the original battery is recharagable because my NanTan 9200D was flatlined when I got it, then it started retaining it's settings, and has been for over a year now, so I think the permanant batteries are recharagable. LCD Panels used on these are....
Processor Chips
Memory SWITCH.EXE Command Line Hotkeys Just like other NanTan Models like the FMA3500, the FMA_9200 series also has a "SWITCH.EXE" File that enables command line switches to make adjustments to the system in real time. See table below for these. You will need the "Switch.exe" utility downloadable in the downloads section for this model to use this.
This laptop, just like my other one, has the ability to slow down the PC Using CTRL+ALT+↓ and to run the PC at full speed using CTRL+ALT+↑. Performance seems to drop closer to a 486 DX-33 with a 486 DX2-66 installed. Either way, pretty cool to find out that the laptop can be switched in and out of "Turbo" mode - that's not a common feature on early 1990's laptops from my experience. Also just like my other one, it does not require a driver for this functionality to work. Common Issues & How to Resolve Them Beingn as these are 486 laptops released in that era where the design of a laptop computer was just starting to get normalized, they do have their shortcomings and issues. Luckily these don't have that many issues. Less than some NEC Versa models actually. Screen Hinges - Screen hinges on old laptops are usually pretty horrible. The NanTan has a design that LOOKS terrible when you look at it, basically, it's got the old, generic 4-screw (2-per side) hinge setup where the hinges anchor by tiny black screws into a set of brass screw anchors inset into the plastic via crosshatching. LUKILY though NanTan uses a more flexible, thicker, non-brominated plastic on their computers that is not prone to crackingg like NEC, IBM, or Apple tends to be. It's similar plastic to what AMT Ertl was using on their plastic model kits at the time surprisingly, where the plastic is fairly soft, but sturdy. So, typically, what happens as with most old laptop computers, is the lubrication and dirt in the hinges makes them "tighter" causing them to "stick" and then the friction is just too much for the plastic and the plastic gets bent and the screw anchors get ripped out. Lukily, with NanTan, we don't need to resort to questionable methods of loosening the hinges. Repairing the damage is pretty easy, you can use an eyedropper, baking soda, and superglue, and get it solid enough to hold onto the hinges. Just fill the gaps between the screw anchor plastic with the Baking Soda/Superglue mixture. After that, you need to disassemble the laptop and get out the metal hinge assemblies. They are surprisingly quite large, and the nice part - there's a regular bolt that can be loosened to loosen up the hinges so that you don't break the plastic. Since there is two, you can distribute the load between them pretty evenly, and then the screen will hold place, but move smoothly, probably smoother than new. Battery Corrosion - Apparently those 1800 mAH NiMH Batteries can corrode. The color DSTN NanTan I have was quite a basketcase in that it had the 1000 mAH batteries leak out in storage and drip turquoise corrosion all over everything. Luckily it did not get into the electronics, but it did eat up the contacts on the battery boards quite a bit. The eventual plan are to build new contacts for those boards, clean off the corrosion fully, and maybe rattle-can the original gray color onto the case. As that is when I discovered these laptops are painted to give the case it's plasticy texture. The plastic underneath is smooth, and the dark gray paint flakes off when corrision breaks under it. Factory Mistakes - My NanTan 9200 had a broken speaker connector that was "fixed" at the factory with hot glue. Seriously, it was factory. This laptop looked like nobody had touched it's insides until me, but the wires got pulled out of the connector by lifting the palm wrest barely any amount. This resulted in me having to wire two bodge wires into the speaker connector, and then solder the wires from the speaker to the bodge wires. I think later on when I find a 2 prong connector, I'll repair it properly, but this works for now, and it fixed how quiet the speaker is because my 9200 is bloody LOUD now. Models I've Had, the Pros & Cons of these Machines from a User Perspective Overall, this is one of the CLOSEST Things to the "perfect" retro-DOS gaming laptop you can find. It has sound, they come in color, it's even rumored there are Active Matrix versions (and if not, the wiring looks potentially hackable for Active Matrix). Overall, the trade-offs are that most have STN or DSTN LCD Panels (so not good for fast moving games like shooters, though creepy stragegy/puzzle stuff like The 7th Guest gets a cool B-movie vibe, especially in black & white). The other upside/downside is the audio. The ESS488 sound chipset is SoundBlaster compatible, uses default IRQ and DMA (IRQ5, DMA 1,5, and Addr 220, with 388 for the OPL2 FM Synth), but something about it causes various audio to be wrong on the digital side, ie, NESticle plays most games 2 steps too low with the wrong frequency generator setting, and Windows seems to be up 1/2 a step in pitch. Prostar 9200M- 2003 - I bought this as my second laptop in 2003 for $15 off e-bay from a seller in Seattle. It had broken hinges, and I tried to fix them back then using various strange methods that did not work, including bare superglue. It ran great otherwise, and came with a genuine INtel 486 DX2-66 (seems to be the common CPU for these). It had a memory upgrade, that card went to the next one. Duracom 5110D- 2003-2005 - This was bought in a stack of 3 laptops for $45 (which included a FMA3500 and an AT&T Safari 3151 with an Active Matrix Screen) in 2003. I had the Duracom the longest and used it till it could no longer pass POST for some reason. That was when I scrapped it unfortunatley, a shame since I really liked this one, and it was in near perfect shape. It had a 540MB HDD, and a intel 486 DX4-100 CPU in it and ran like a beast. It also had 24MB of RAM IIRC. The DX4 was an upgrade from a Cyrix SX/2 CPU or something like that, I remember it having a much slower CPU. DFI MediaBook NB9225C- 2022-pres. - This was bought for around $25 untested as/is for parts and turned out to be a VERY clean example. Unfortunatley, it was black and white and the original plan was to convert it to color (something I may still do). It started off a 486 SX-25MHz intel machine, but I slapped my last intel 486 DX2-66 CPU in there with a Cyrix heatsink on it. I kept the original 25MB HDD that still has a suite of Caterpillar software on it (have not wiped it yet). I also tried a 128GB SSD on it and it did not work. I'll probably just go with my standard 80GB ATA setup. NanTan FMAK9200C 9200D - 2022-pres. - This was bought when it came up for a stupid amount of money. The seller claimed it was broken but I had a hunch it had some mior issues. The corrosion from the batteries harmed nothing, the hinges were messed up but easily fixed, and the "big problem" was the dim screen - which was just a result of them not knowing FN+Fx adjusts the brightness and contrast. SOFTWARE IDIOSYNCRACIES Vintage laptops can sometimes be a bit, uh, tricky because back then, laptop computers had to account for things desktops did not, and that sometimes lead to various wonky decisions on the manufacturer's part regarding things like Memory Management (extra space needed for resources for PCMCIA cards for example), APM (memory addresses and I/O Ports used to control APM), strange hardware IRQ or Address Choices, and whatnot. This page is what I have discovered by Operating system. FreeDOS 1.2 - HIMEMX.EXE Is Incomopatible with the 9200 - Attempting to boot a Clevo/Sager/Kapok/NanTan 9200 laptop with HIMEMX.EXE will usually result in spewing of garbage down the screen of the laptop upon boot time. We tried several switches, the only one of which that did work, was the /NOABOVE16 switch - which what happens there is then the PC will boot, but it will HANG on the USING GATE A20 METHOD message - which suggests the 9200 has a special A20 scheme or something about it is non-standard. I suggest using HIMEM.SYS or XMGR.SYS - XMGR.SYS yields more free DOS RAM (I had over 600K base memory free when I used it), but HIMEM.SYS is a bit more standard and might not error out some applications. 3D BODY SIMULATOR - This game for DOS does not work with the LCD setup on this computer. It plays sound but does not play video. It should work on an external monitor but it fails on the internal LCD. There are a few DOS games like this. This is also stated in the README that came with the game. MAXIS SIM GAMES IN EGA/VGA WITH GIBBERISH FONTS (SIM EARTH, SIM ANT, SIM CITY) - These games, running under 640x200, 640x350, or 640x480 at 16-color depth, display gibberish BIOS Fonts in DOS. You need a special patch which I will later put for upload on this website to fix the problem. NESTICLE running fast! - Despite the audio issue of audio going slower, and lower in pitch, the VIDEO side of NESticle X.XX on the FMAK9200 is actually running about 105% full speed. I saw this in particular when playing Dragon Warrior IV on it on auto-frameskip. Turning frameskip down to "1" in NESticle makes it run 100% like on console - lower (and somewhat more pleasing at times) audio notwithstanding. ALLEGRO CRASH, ESS488 ISSUE? - Certain DOS applications that use Allegro for sound crash. These include "P", Post Apocalyptic Petra, and a few other games from that time period. FRUS & PART#'S
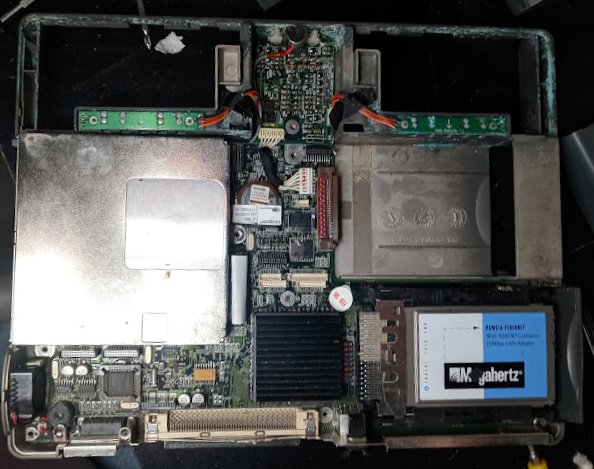
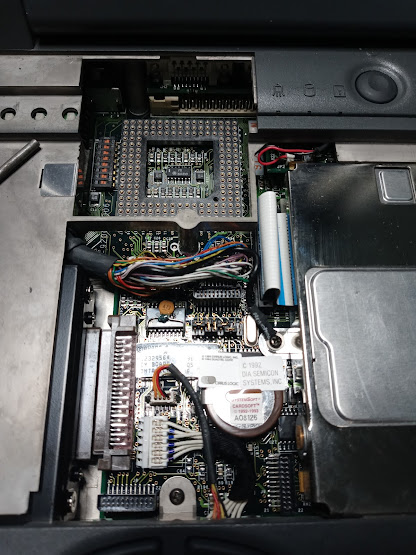
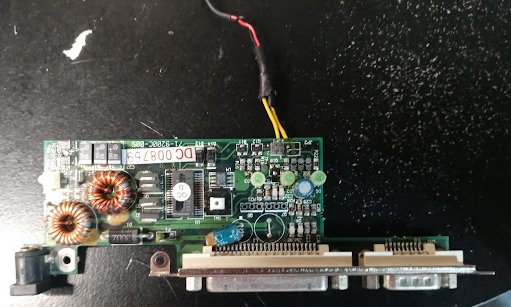
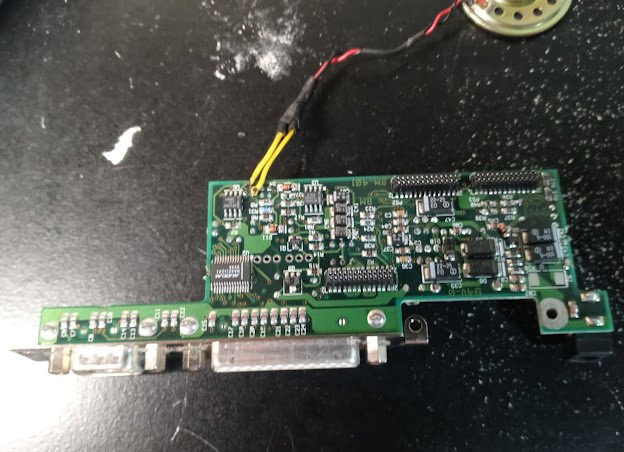
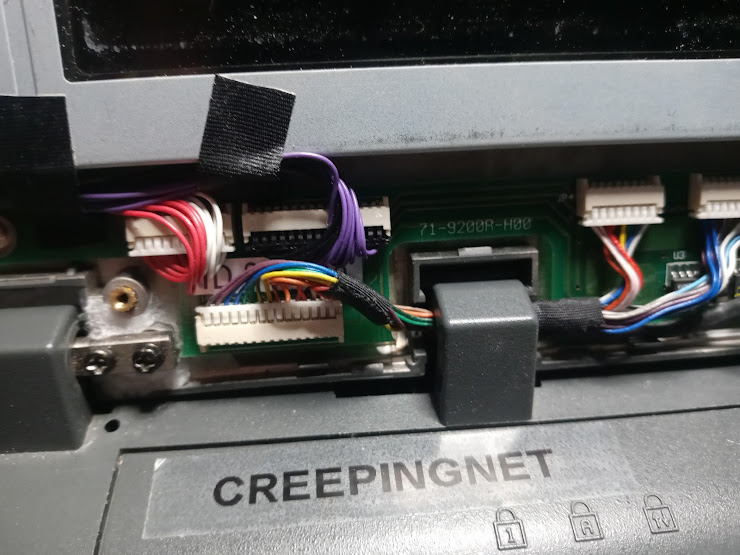
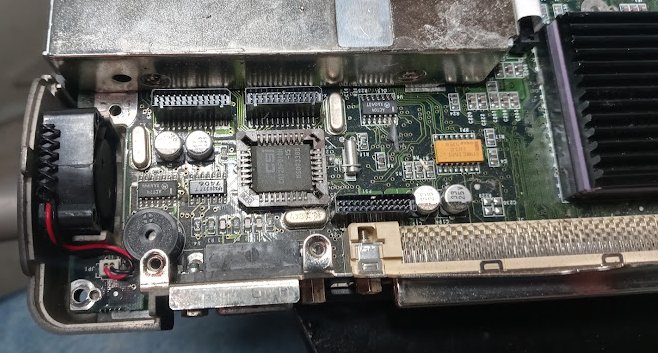
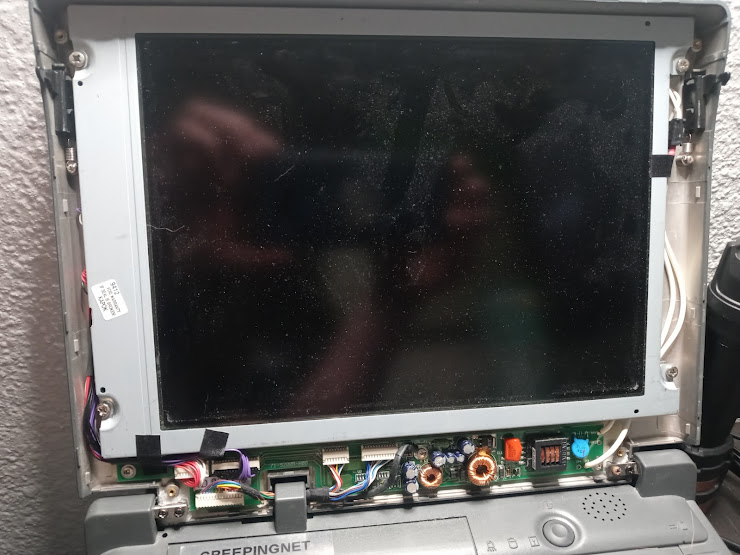
GUT SHOTS Here's some gut shots of my FMAK9200D that I took in late 2023 during some repairs/upgrades. I never realized I had not added this section to the website, but I decided to do so.
|