
 aka. Dragon Warrior (USA) |
 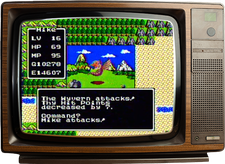 Dragon Warrior...known as Dragon Quest in Japan, is the greatest, most influential game an American has never heard of. It's a cultural cornerstone in Japan, and I'm here to tell you all about it. Dragon Warrior...known as Dragon Quest in Japan, is the greatest, most influential game an American has never heard of. It's a cultural cornerstone in Japan, and I'm here to tell you all about it.Dragon Quest is the brainchild of designer Yuji Horii who won a games contest in the early 80's for a game called "Love Match Tennis" that would net him employment at a new game company, Enix (born out of a real-estate company...go figure). Along with Horii, they brought on Akira Nakamura and his programming company Chunsoft to code for them, artist Akira Toriyama, famous in his own right for Dragonball, and composer Koichi Sugyama for the soundtrack. This dream team, at least two of which were hooked onto western RPGs like Ultima and Wizardry, decided to come up with a layperson friendly RPG for the Famicom. That game would become Dragon Quest. Dragon Quest was released in Japan by Enix in 1986 with a slow start but eventually gained a massive following to the point that Enix avoids/avoided selling the games on weekdays due to all the businessmen and schoolchildren who would cease Japan's productivity (or so the urban legend goes). Which brings us to NOA....No, not the Nintendo Ownership Association, Nintendo of America! Howard Philips, a quality playtester who would test Famicom games from Japan to see if they were fit for US Releases, playtested Dragon Quest likely sometime in 1987 or 1988, and deemed it a worthy release for the USA. So Nintendo of America brought it over, updateed the graphics, dialog, localised it, and added a battery backed save feature like the US release of The Legend of Zelda, and hit a snag when Dungeons and Dragons maker owned the rights to the name "Dragon Quest". So it was rebranded Dragon Warrior, and since kids did not know of anime in the USA, the cover-art was reworked to look like something from a Dio album cover. Nintendo bet the bank on the game's success, overprinting it, and lost! The result was that Nintendo was now stuck with a bunch of excess inventory in the form of Dragon Warrior cartridges, and had nobody buying them. So in 1990, they setup a deal where if you bought a Nintendo Power magazine subscription, you would get Dragon Warrior wiht a strategy guide, maps, and various other helpful documentation, for free. This is why this first cartridge is so common. Today, Dragon Warrior is looked at as a poorly aged, out-dated version, with people typically swearing by the SNES/Famicom Japanese release more. While this is much understood, I must say, I very much prefer the original 8-bit releases to the modernized ones, it just feels so much more, I dunno, authentic to me. Curiosity Target - My ExperienceS My introduction to Dragon Warrior was the sequel when I was 7, which my sister played until she got hung up on a certain artifact that required you shut down the game and turn it back on **SPOILER** Waterflying Cloth **/spoiler**. At that time, I was not into RPGs, actually, no red-blooded American boy like myself would be CAUGHT playing a "nerdy" RPG, so funny because it was not but a few years later I'd be getting into Ultima, go figure. But hey, I was cun'try at the time - Steak N' Bigfoot! Truk's n' gun's! So of course it would not have appealed to the short-haried, cowboy boot clad, monster truck loving 7 year old me. Skip ahead, I was 13-14-15ish or so, and I had borrowed a copy of Dragon Warrior IV from one of my childhood friends and got REALLY big into the series, and set out on a 20+ year long quest myself to get all four NES titles on cartridge. It was around this time, our local Target was not doing so hot, and selling used NES games for about $15-20 as a loose cart in shrinkwrap with a pretty lousy little laser printed manual. So of course I bought the first game, I wanted to see what it was like, see if it was as impressively big and wide as the 4th game.... My first playthrough gave me the impressison this quest would be a lot smaller, not really, maybe 1/4th the size of DQIV, but DQIV was already pretty huge a game by halfway through Taloon's Chapter, probably the same size as this at that point. That said, this was a great first outing, and I felt that this game really could be a better gateway - in some ways - than Dragon Warrior IV is, once you uderstood it. This was my official game of "Play through the entire first Loverboy record on guitar, order a PaPa John's Pizza, and slay some Alefgard monssters!" after I beat Dragon Warrior IV. The cart here is the same one I bought back then, and still have today, and it's the one on ALL of my Let's Plays of this game. I finally started doing those last year as multi-part, 1 hour long, babble-fest sort of like a cross between HCBailey, Kikoskia, and Bithead1000, except outside of the game subjects at hand, the so-called "professional YouTubers" would call it a personality-based "disaster". LOL.Videos Walkthrough Dragon Warrior is one of those NES titles I've beaten a bunch of times and know well like the back of my hand. So it's pretty easy for me to write a walkthrough of the game here without having to play it. Character Creation Notes - In Dragon Warrior (and by extention, Dragon Quest), your character is given initial stats based upon the contents of the name of the character. Initially, this was a nice way to "roll the dice" so to speak, like a game of Dungeons and Dragons, when creating a character, these days, other websites have the algorithm all worked out. Level 1-5So when you start the game, you create a character, most people seem to forget about lowercase letters, numbers, or symbols, and most people also tend to choose "Fast" for the text speed (really no reason for the other ones since the text stops with a cadence that makes it pretty easy to follow regardless of speed). You are then dropped in King Lorik's Chambers where he fills you in on the backstory, and tells you about his missing daughter, and then tells you to take what's in the three chests in the throne room for your journey. These chests will contain 120 gold, a key, and a torch. After obtaining all this, and gathering some clues from the people in Tantgel castle, you need to head post-haste to Breconary - this is a small town located to the east of Tantgel Castle, and it contains a weapons shop, item shop, and an Inn as the primary places of concern for now. First is the weapons & armor shop which you will need to purchase weapons and armor. Usually what I do is I start with a Small Sheild for 90 gold and a Bamboo Pole for 30 gold, and then grind for awhile, before doing anything else, up to at least Level 5. If you have enough left over, you can purchase the Scale of the Dragon for 20 gold at the items shop and get a nice defense bump. The Inn costs 6gp a night and you will have no choice but to rest and heal up there until you get the "Heal" spell at level 2 or 3. The Zen and Art of Grinding First off, let's explain what Grinding is. Grinding is a term related to CRPG/JRPG type games like this that have a linear-esque path through their stats systems to improve your character to move on to bigger and better things. The term likely origiates from the "Daily Grind" which refers to your "day job" where you "grind" all day long for a employer for finances to pay your bills and buy stuff, as well as gain experience in your job to advance your career. The idea is much the same here, except you're procuring gold instead of Euros/Dollars/Marks/Yen/whatever, and your experience is calculated via a seemingly arbitrary number marked "EXP" rather than by the amount of entries and eloquence of your resume. People complain that Dragon Warrior - in it's original NES/Famicom incarnation(s), is a VERY grind heavy game. This is particularly well said for Millennials and younger who are used to hand-holding tutorials and games that were designed to focus less on grinding for reward and more on advancing the story quickly. People with shorter attention spans and who are incapable of converting their boredom into meditation or relaxation like I do might have a problem with this. See, there's a ZEN to griding in Dragon Quest/Warrior, something you CAN'T get at work, in that each enemy has a unique set of challnges, and to rise to those challenges, you have to develop a strategy via the resources given, which eventually can be hohned, fine tuned, and eased up via your experience, strength, agility, and other associated stats. As we start off grinding in this game, you are fighting 2 major enemies - Blue Slimes, and Red Slimes, with the main differences being the amount of hitpoints, defense, and attack they throw at you. Red slimes can do as much as 3 or 4 damage at a time, while blue does 2-3 at most, and blue can be as low as 3 hitpoints while red can be as low as 4. Slimes look like little smiling globs of toothpaste, and are considered the "mascot" of Dragon Warrior/Dragon Quest. Fight until you have 6HP or less, then QUICKLY gett to the INN and heal up. They give about 1-2GP each, so by the time they become easy, you can load up on MP and use your Heal Spell for free to save money (more on that in a moment). That said, did you talk to the guy who told you "If thou doth cross a bridge, thy danger increases" or somesuch? Well...he's right...kinda. Truth is, the AREA in which you choose to grind determines the danger, not so much bridges. This little 10 tile by 40 tile area near Breconary/Tantgel is where you should be for right now, and you should STICK closer to the castle and/or town at first so you can hastily "RUN" from a failing battle and go heal up at the Inn. Then go back out there, and beat things up till you're nearing the "red" - the "red" referring to the coclor of text andstatus menus when you are critically low on HP. PATIENTCE is key here. TAKE YOUR TIME. Dragon Warrior is a looooooong game. About 8 hours worth at least for a very fast player with a "lucky" name that begets good stats, and some knowledge on how to "game the system" a bit. So let's move to that. Gaming The System - Free HealingSo at some early level, 3 I think youo gain the spell "Heal" this will roughly heal your character about 15hp. You will also get a small amount of MP (Magic Points) with the spell of which to use. At thtis point, you can save money on Inn visists by visiting a wizard-like man in a gray robe located in the south central end of Tantgel Castle behind a counter. No, he won't sell you anything, he'll just say "May the Light Shine On You" and it restores all your MP - allowing you basically infinite healing spells, faster grinding, and quicker money accumulation. The Importance of DefenseDefense is the most important stat in Dragon Warrior, therefore, most focus on spending should be on your Armor and Sheilds. You can hold out a really long time with good defense and an inferior weapon, but fighting can become a spotty and expensive mess of dying over and over to stronger enemies that might only do minimal damage with much better armor. So I typically get leather armor first (70GP), then focus on getting the Copper Sword last since it's a nice, long grind, well past level 5 even. I was beating up ghosts with a Bamboo pole. Levels 5-12Once up to Level 5 you can start "inching" your way northward toward Erdrick's Cave, and Garinham (thhe next town to visit). As you head north, you will encounter Drakees, which are merginally stronger than red Slimes. Ghosts also start to appear, which are a good bit stronger. Closer to Garinham, you will start to encounter Magicians, these gray robed weirdoes that cast "hurt" - which you should ALSO have in your arsenel of spells by now. Ghosts you want to dispense of, and use heal, and RUN if you are weakened. Magicians, at this point, are the "Top tier" enemy to fight, and thusly be very selective about engaging if you have a choice, and it's suggested to use that Heal Spell right after the fight, if you have any MP left. Otherwise, RUN to either town and get yourself healed up. Erdrick's cave is a cave located in a sand-field, through a forest to the west of the grassy knoll that divides the east and west sides of Alefgard's northwestern quadrant. It has no enemies, 2 floors, and now's the time to use that Torch. This cave is completley optional, all it does is tells you a further backstory about your grandfather saving the world 100-200 years ago or so. You'll notice how when you o down a floor, the music drops 1/2 a step in pitch and a few bpm in tempo. On the northwestern corner of Alefgard is Garinham. Garinham is a town created by a famous dude whose grave lies in a tomb/cave under the town (but more on that later). Anyway, the entire front 20 of the town is filled with shops including an inn, a weapons/armor shop/ and an item shop right next to the entrance - plus some people to talk to. Some new Weapons and Armor are found here to upgrade to, with the top-tier being the Large Sheild, Hand Axe, and Half-Plate Armor. Outside of that, there's not much to deal with here until we can get keys. During this time, just keep grinding, and upgrading your equipment, going up levels, saving each level, and procuring spells. During the first half of this grindfest, you'll be beating up blue slimes, red slimes, ghosts, Drakees, and Magicians. Eventually they will become one-hit-kills, with Magicians being easily dealt with using Stopspell at some point, or using Hurt. However, by the time you have the Hand Axe and/or Half Plate Armor, most of these should be one-hit kills or inconsequential battles of just trading licks until the baddie dies. Just keep watching your health and magic and replenishing as needed. Once we get up around level 8-9, it'll be safe enough to venture across the first bridge to the central plot of land of Alefgard, which is more of the same enemies and not much different there. I guess that guy in Breconary was a liar - right - well, not totally, once you ccross the SECOND bridge to the east, and are on the eastern upper quadrant of Alefgard, you encounter some new faces, mainley Magidrakees, Scorpions, and Skeletons. Magidrakees are marginally stronger than Magicians but otherwise, should not be much to deal with. Scorptions are straight-hit enemies, while Skeletons are the "top tier" you need to be a bit more conservative about attacking at first, as they hit hard, and continue to be 2+ hit kill monsters even after level 10 depending on weapons and armor. To the north of this plot of land is a village called "Kol", which has a weapon shop, item shop, inn, some old man who judges you on your armaments if you are willing to fare losing hitpoints to vsit is crappy cesspit on the northwest corner of town, and a spring that "cures Rhumatism" even though that's not even a status ailment in this game for some reason. We have some slightly stronger armor options here - full plate armor in particular - for 3000gp. It would be a good idea to grind up to that before gooing to that fabled "southern" island - which we will talk about in the next grind-fest. The last landmark, and one of zero consequence, but you might see it, on the central island - if you take the bridge to Kol, head north, and then back west again through a forested valley to a peninsula with stairs on it, is whehre we have an old codger who wants the harp from the grave in Garinham. No sense worrying about that yet. That said, that area can sometimes be a relief point from the harder enemies of that side of the map. Otherwise, not much else here, just keep upgrading levels, equipment, gaining more experience, gold, and spells, and you'll do fine. Things pick up more around level 12+. Most of my grind-fests around this time can see me spending between 15 to 30 minutes in a region, just beating up enemies endlessly, going back to Castle Tatgel, having the light shown on me a few more times for MP, while I max out my health, and then go save again. Levels 12-15Now's when things get a little bit real. By this point, you should have obtained, if you are not working your way up to them, the Hand Axe at 560GP, Full Plate Armor at 3000gp, and Large Shield at 800gp. You should also have a "Radiant" spell in your reprtoire now - which takes the job of the torch, saving you on torches now, as well as you MUST have "Stopspell" before going to the southernmost island, supposedly where there's a town to buy keys, but also fierce and "terrible" monsters there (HA). Anyway, to go to "Florida" (what I jokingly call this island), you need to head to a cave in a swampy marsh surrounded by ocean and mountains just after the 2nd bridge to the east. So suffer the mush, heal up in the cave, cast Radiant, head straight down, then right, then down, then right, then down, then left, and you should be on the stairs, select "stairs"', and you will now be standing on the other side of the dividing river on that "Dreadful" island. In the cave, you may encounter Druins and Scorpions, maybe an occasional Skeleton. Don't go to the east side of the cave yet, there's a VERY powerful "BOSS" enemy there that we are not at all ready to tackle. Once we first leave the cave, you want to avoid going west, and you want to head SOUTH on the east side of the island. At first you'll encounter scorpions, and Drakees, but you might start encountering more of those "Visicous" enemies. And now strategy gets quite important. FIrst off is the Warlock - these are crimson robed Mages that cast Sleep, and then attempt to commit acts of medical malpractice on the hero using magic. Sort of like an evil Anestesiologist. So it's very important to use that STOPSPELL spell I mentioned earlier to keep him from putting you to sleap, and then put him to a different kind of sleep. Then there's the Werewolf - these are turquoise wolves that do some pretty nasty damage, so watch your hitpoints. After some time they will become easier but for now, play it SAFE. Use discretion, run if neeeded be. You will want to head down, following the eastern-most mountains south a good ways until they end, then going around and back up where you'll see a "C" shaped moat with a town in the middle - this is Rimuldar. Rimuldar is a large town surrounded by a moat with a lot of information and NPCs, so talk to everyone. The Inn here gets expensve at 75gp a night, and the weapons/armor shop is the second best in the game, having the Magic Armor for 7700 - which should be your new goal (it's second only to the next armor we will get). Basically, your goal should be Broadsword for 1500gp, your Large Shield, and your 7700gp Magic Armoor, which will slowly replenish your hitpoints as you walk. Also, if you DON'T go over the bridges at the entrance to the town, and instead, head northward, following the moat to the north and west, you will encounter a shop where you can buy magic keys. Your inventory can hold up to six of them in one slot. Also a good idea is to use a couple of those keys to snag the free Wyvern Wing as "insurance" until you get the RETURN spell - that way you can hail back to Tantgel if things are getting too heavy for you here. A good way to grind now is to go to Rimular, heal up, and then go out and circle the town until those Werewolves and Warlocks become less of an issue. Whatever you do, don't go further south - until level 13-14-15ish - past the six hills south of the town (HILLS not MOUNTAINS). That is where the enemies get tougher. Once you hit that line, the considerably more formidable Wolflords whoh cast Stopspell, Goldmen who hit hard, give little EXP, but a LOT (ver 115gp) of gold, and Wraiths (Robin Hood Skeletons) are, who also ccast stopspell to keep you from healing yourself. The reason I'm telling you thiis is so you CAN go there when you are or feel ready, and can bounce between that line of six hills for harder enemies, and the four above it and above for the easier enemies like Skeletons, Werewolves, Warlocks, and Metal Scorpions so you can relieve yourself for a bit till you're ready for something heavy. It is by now you're probably also strong enough (actually you ARE strong enough) to tackle the western side if you have not already. Over there are Magidrakees, Skeletons, and Scorpions and a unnamed cave that contains the "fighter's Ring" as well as some other treasure. This cave is a 2 floor cave that consists of Druins, drolls, Scorptions, Skeletons, Spectres, and some other things. Once you get the fighter's ring, you have one of the better buffs from that cave so you can move on from it. The cave is located across from a big marsh in the middle of the forest, which leads to a grassy path between the mountains that leads up to it. South of here is where the enemies get REALLY hard. Afer a notch in the stream that cuts between the west central peninsula, and an island region in the southwest full of the second or third most horrifying tier of beasts in the game, you will encounter wraiths, metal scorpions, goldmen, and Wyverns. DO NOT go there until you are LEvel 15 or better. But now that you are up a level, there are some quest items to take care of.... First off, now that you have keys, you can head to the Castle Cellar and get the Stones of Sunlight from the old fogey living in the basement. Just blab with him and he'll give them to you, no problem. The Cellar is located outside the east side of the castle, next to the large body of water that flanks the front east-side of the castle. You can also buy more keys from a shop back here, so best to make sure you u have at least ONE key in your inventory at all times to replenish without having to go back to Rimuldar every time. There is a golden flute - assuming you talked to someone in RImuldar about it already - about 4 steps south from the bath in Kol (you know, the useless water tile that passes for a "bath" that "cures rheumatism"). You will need this later for a particular boss - really soon even if you are lucky/clever enough to make it there. Now here's the biggie, the Staff of Rain. That old geezer in the north central "Shrine"/cave has it. And he wants the golden harp from Garin's grave in exchange. So you have to go to Garinham, unlock the door, "push upon a wall of darkness" (no visible wall in Garin's giant sweatshop with a useless ship port), then head to the upper easternmost corner of town to enter his tomb, and fare skeletons, wizards, warlocks, wraiths, wraith knights, maybe a wyvern or two, to get the harp. By now you should have "Outside" in your spellbook and you can cast that once you get the harp, saving you some pain getting out of the tomb and fighting some of the harder monsters, and saving MP for Radience, which you are going to need at least twice in this 4-5 level tomb. The Harp is on the bottomost layer located in a chest in a room with invisible walls. There's also a Cursed Belt down here - don't use it - just sell it for some profit to buy some nicer weapons/armor - what little is left. Once you have the harp, take it to the geezer's cave, give him the harp, he'll give you the staff. Don't play it or you'll have to encounter some boring low-tier enemies. Levels 15-20Now here is where grinding is going to get even mmore difficult, stratgic, and irritating. Best here to start grinding around the southeastern bridge between the treasure cave of the Fighter's Ring. Before and just a little after the bridge is Wraiths, Goldment, Wyverns - but they bleed into worse territory as you head west more, such as Kights, Wraith Knights, Demon Knights, and Rogue Scorpions. Between Levels 15 and 17 I would SLOWLY work my way up to the harder enemies. Wraith Knights and Knights are not that bad, they just cast stopspell and hit harder at earlier levels or with worse armor. Rogue Scorpions are easy. But DEMON KNIGHTS, holy hell, are AWFUL. Demon Knights hit the hardest out of the lot, so for the rest of the teens, one MUST be very selective as to whether to engage in a battle with them or not. Something is really "off" about how they hit, starting with smaller, teens-level hits, then reaching the high 20's a little more in battles. Around this time, if you have the gold, the flute, and feel lucky, you can attempt to RUN - don't fight - RUN to Cantlin! There's also another good upgrade in the desert town of Hauksness too. Let's talk about those. Going to Hauksness is easy in theory, you go across that cursed bridge covered in Wyverns and Goldmen, and then head south a little bit, then east, and you'll come to a town, but it's not a "normal" town at all....it's a DECIMATED town. No inhabitants, just some of the second worst monsters in the game (Magiwyverns, Starwyverns, Green Dragons, Wizards, with some lower tiers periodically). But the big baddie boss fight of this town is the Axe Knight, a giant, red, silvver, and medical-blue knight that does some pretty serious damaage. Thing is, he's sitting on Erdrick's armor behind what once was the weapons & armor shop of Hauksness. Just enter town, run away from EVERYHTHING, get to the 2 marsh tiles, walk on the first, then the second, heal up to full health, hopefully you have over 60MP left, and then cast Stopspell on Axe Knight, and beat the crap out of him, never letting your HP go below 30, and if you win, search the trees he was standing on, and you'll find the most powerful armor in the game, Erdrick's Armor. This will give you a faster healing attribute while walking, as well as make you 100% immune to barricades and poisonous swampland. DO NOT attempt this without being at least Level 15, having the Broadsword, Magic Armor, and Large Shield, and coming out of the gate both guns blazing ithh at least 60MP and 80HP! Cantlin is a town located on a south central island, and is surrounded again, with s ome of the most powerful monsters of Alefgard's overworld. To get there, you have to head down the western side of Alefgard to the southwestern most bridge, go across, Running from EVERYTHING if you're not strong enough to beat them yet, then head northward until the path ends at a bridge with a swamp next to it - cross the swamp, head south, and you'll see a town surrounded by a big stone wall. Walk to the entrance and you'll encounter Golemm, basically a pallet swapped goldman who gives you tons of experience and not a lot of gold. Once in battle, play the flute, he will go to sleep, and beat him mercilessly. Cantlin is the biggest town in the game, with the entire floor being brick. Everything goes around a large, covered park in the middle. There's fruit stands, several weapon shops, quite a lot of NPCs, some clues, an item shop or two, and an inn. Probably the most important thing here is the weapon shop which is located on the east side and toward the north. Here they sell the second most powerful sheild and swoerd. There's the 8800gp "Dragon Killer" sword, and thene there's the Flame Shield which is 14800gp. I'd pick up the Dragon Killer first so that you can pick up the shield at your leisure. This will allow you to grind around Cantlin. So now let's talk a huge gaggle of other enemies.....and their grinding strategies....because there's a LOT to go over here...
As for your next part of your quest, if you have not already, it's handy (though not required) to rescue the princess. Princess Gwaelien is located in the eastern cave to Rimuldar and guarded by a Green Dragon. Beat the tar out of the Green Dragon, carry Gwaelien to Tantgel castle, and she will give you her "Love" - which for some crazy reason works as a compass (ah, the Compass of the Heart, how profound!). So now you know how many "steps" (read: TILES - ie the 8x8 pixel squares that make up the whole of the Dragon Warrior game landscape) you are from Tantgel castle. A man in Cantlin has a clue that needs this - 70 steps south and 40-something west of the castle lies an important item, and that important item is..... Erdrick's Token! Basically, it's a coin that tells everyone you are, indeed, the descendant of Erdrick. It's found 70 south 40 west of the castle, in a dual-sided, bra-shaped swamp in the second stretch of land divided from CAntlin by mountains. It's found on the right side of the "bra" in the middle somewhere. Once you found it, there's another task you can carry out necessary to your quest.... So there's another old crank polishing his dagger south of Rimuldar. The guy would kick you out/turn you away for a lack of proof of your descendancy previously, but once you have this "coin" or "token" (hey, that's how I picture it), he will take the Stones of Sunlighth and Staff of Rain, and give you the "Dew Drop". So what does the Dew Drop Do? Well I'll tell you what do the dew drop do! You need to take it to the northerwesternmost corner of the island of "Florida Rimuldar Keys", and where there are 2 sand-paths with a single water tile between them, use the Dew Drop there, our little man will go on a "groovy trip" where the ocean will do a rainbow fit for a few moments, and then a bridge will appear where there once was a water gap. Now you'll be able to get to the very thing you saw from teh beginning - your goal - Charlock Castle, that big, evil, Castle on the hill across from the river that divides Tantgel and well....Charlock. Home of the main horror, Domain of the Dragonlord, Host to Horii Hell, establishment of the main event, flame of the final fight, beacon of the end, omen of destruction, taunting tower of terror you've been looking at in all it's 8x8 pixel glory since the minute you set foot outside Tantgel at level 1 with 15HP, 0 EXP, and 0MP and not a single armament or protection to your name! But before you can go in there, and stand a chance of surviving anything more than a few fights on the castle floor, you need to be Level 20, have the Flame Shield, Erdrick's armor, and Dragon Killer Sword. You also should have Healmore in your arsenel of spells, and be ready to die - a LOT! Levels 20-25 - Preparations for Tantgel, and even beating the Dragon Lord earlyCharlock Castle. If you thought Garin's Grave was bad, well Charlock will make that look like the Kid Gloves are off! 8 Horrifying underground floors of incrementally slowing and lowering in pitch 10-second loop of Koichi Sugiyama penned horror music, paired with the most vicious creatures of the game. Some of these guys at a level that makes one-hit-kills almost, if not entirely, unattainable. Then there's the beastiary, holy cow, talk about endurance.....
One of your biggest perogatives here is to get Erdricks' Sword, which is on level 2 or three of Castle Charlock - the one that looks, eh, like the Dragonlord has more nefarious ties than just "evil" if you took the center section of where the sword is out of the room - triggered people and semetic folks beware - they meant nothing by it. Anyway, once you have that sword - it's time fo rthe final grind. Which brings me to the next part it. At this point, grinding for experience and levels is all you will be doing. Best bet is to go down into Castle Charlock and try to fight your way to the Dragonlord on repeat, and you make it there, beat the ever loving crap out of him until you die. This is a good way to measure your power. It has been said, on another walkthrough, that you NEED 70MP before you can beat the dragonlord - so that should give you an idea of how powerful your character is. I can't really givea solid figure because your name and initial + final stats are determined by what you named your character as at the beginning of the game. Levels 25-30 - ONe God Tier Dragon WarriorIt is possible to max out your character in Dragon Warrior without becoming a geriactric old person beforehand still grinding away in hospice at 103 years old. Actually it's VERY doable. The maximum experience and gold one can have is 65535, due to limitations in the number system employed in Dragon Warrior (8-bit), and your maximum level is 30. Once you reach that point **SPOLER** The King will start to question why you have not killed the Dragonlord yet. It also makes killing him a breeze or at least a lot less harrowing than it does at any other level - though by Level 25 you should be able to put him into an early grave and save the kingdom. The only other choice you have is to join him - something we MIGHT explore in Dragon Quest builders. Killing the DragonLordYou will want to only attack healed up with at least 70mp. This battle goes in 2 stages, the first one where he will cast Stopspell a bunch - if you watched the LP on my YouTube channel you'll notice I took him down in 2 hits at level 21, but YMMV. but it's not over.....you'll know cause the "dun dun dun dun" music starts...and he now looks like a cartoon dragon and not just some weird cross between a vampire and the city advisor guy from Sim City for the SNES, or a card-knight from alice in wonderland with his helmet off. This next round is all hit, heal, hit, hit, heal. In that sort of pattern. Basically, don't let your hitpoints fall below the max number of damage he's dealing. With my character, he was making hits as high as 35, so I knew, if I hit 45HP or lower, it was time to healmore. Then hit once or twice before having to heal again. Rinse and repeat. Most likely his defat will come as a surprise because you'll feel like this battle with never end, and then, you'll have done it. Seems to go that way when winning most of the Dragon Warrior Games for NES. Reviews Previous Reviews My Original Review of this game on GameFAQs from 2013 Full (Updated) Review For The Site (2022)Dragon Warrior was one of those games I sort of got into for no particular reason except that I was curious about it and wanted to try my hand at being a "mature teenager", utterly forgetting the "nerd" stigma that went with it. For me, this was my Dungeons and Dragons, as a lone Alabama teen in bedroom with a six pack of Mountain Dew, Whitesnake on the stereo, sitting in my tattered old "gaming chair" that was basically the 80's version of ikea furnature - chewed up by dogs, held together by packing tape. Not meaning to rehash too much but I bought my copy used at K-Mart in 1998 for a whooping $15, back when K-Mart sold NES games used, loose, in shrinkwrap, with a pathetic fortune cookie strip for a "manual". I actually made a conscious effort to WALK over there and get it. I remember buying it and walking home with it in my jeans pocket, excited to see what the first installment had that I had not yet experienced. AT the time, I was a hardcore NES collector and so having the whole 495 games worth catalog would have been my goal at the time (I got pretty far up there - over 100 games at one point). That said, I wrote my last review on this 10 years ago, and a lot has changed in 10 years, and a lot more has changed since I first picked up this game. When I first got it, I was surprised by the sheer size even though this was a much smaller game than Dragon Warrior IV was. Also, when I bougth this, I Was blissfully unaware that this was a much bigger series in Japan known under another name (Dragon Quest). See, in the late 1990's, noobody really knew about the regional differences that much even though we DID already have hte internet by then (albeit it was not accessible to everyone). Plot: 7/10Dragon Quest's plot is pretty bog-standard - kinda. Basically you, some unknown, lonesome hero - supposedly a descendant of the great Erdrick, have been tasked by King Lorick to save the kingdom from the evil Dragonlord. Post-haste he fills you in on how your grandaddy fought "demons with balls of light". Of course there's the standard ritual of missing artifacts that you need to find, a princess to save (or not, lol), and of course a big evil guy to kill (Dragonlord) - pretty bog standard on the surface. But I have to add 2 points because the game does buck convention in the way that the princess is to be saved (or not), and the fact they don't make it tyour priority. Had it been Nintendo proper, not Square/Enix, Gwalein would have been stuck in a cage behind the Dragonlord, and you would have had a linear path to follow without any sort of open-ended-ness to it. There's also a part you get to near the end where you can totally bring in some Creepypasta-level nightmare fuel with the Dragonlord by choice, which was later played out as a part of the Dragon Quest Iceberg something almost 30 years later (Dragon Quest Builders **ahem**). That said, there is a "linear" path that has it's linearity bucked by the ability to roam this so-called "Sandbox". There's no George Lucas in a Troll suit needing a Red herring to pass the bridges, you're free to go most places without obstruction, allowing you to pen your own story, even if somewhat restricted by the limits of the hardware. But it's not so ridigd it's "on rails" as some people say. You do have choices, it's just, by playing via hint guide, which I Think most kids do today on these old games because they're "harrrrrd!" or "Nintendo Hard" (or Atari Hard - which is worse), it' easy to mistake that this game has a fully linear experience end to end. It's not. It just feels more linear once you pay attention because - like a day job - it guides you from goal to goal without actually guiding you. Graphics: 7/10I know I mentioned it in the old review on GameFAQs but I'll repeat it here, what we got in the USA was way better than what they got in Japan. Dragon Quest was released in 1986 - Dragon Warrior in 1989. Dragon Quest had a more simplifed appearance on par with MS-DOS PC titles of the time. No shorelines on the ocean, no multi-directional character sprites, an extra talk-menu function, and some other minor differences here and there. When Nintendo picked it up in 1989 for Western Distribution - we can all thank Howard Lincoln for that - they had the graphics reworked, among some other changes so it did not look like the 3-year old game it actually was when it came out. So the character sprites were reworked into the Dragon Quest II style - which are more inline with Akira Toriyama's artwork than the original sprites that looked like pixel-stick-figures in a lot of cases. Now they were multi-directional, and were in that squat perspective that fit the game's overall style a lot better. Shorelines were added to the water to make it look better. However, there is a slight miss regarding the tables of shops and the walls of just about everything being stone that is seen as top down, when it appears to me that Dragon Quest/Warrior is supposed to be viewed as if from an angle facing north. So I have to take a couple points off. I mean, c'mpn, this game is 8-bit, cut it some slack. It's notlike you have more than 16x16 pixel tiles of 8x8 pixel sprites to work here! The overall artwork for the overworld, castles, towns, and "dungeons" really fits well, and creates a unique identity for the series onward as a whole. While this was not the original graphics, this is the original game with some updates, and htat's fine. Another small complaint is the loss of frame-rate when in dungeons. It seems due to the whole "blackout" layer the NES has to generate takes up a bit more bandwidth, and makes the frame rate a little choppier. But I can't take more than one off because the overall of it is that that choppiness sdoes contribute to an eeriness of being in the dark. Character designs for the enemies are indeed cute, and quite honestly I like it. There's element of humor being beat up by what looks like a Skeleton in bubblegum pink shoes, a dab of toothpaste with a face on it, or a flying shrimp. One benefit this game has over previous is you fight one on one with all enemies in battles, and this saved enough space on the NES to have a colorful background during battles versus the later games that lose this feature. All too often, I feel like the more "edgelord" kids who like Final Fantasy poopoo this game's "cutesiness", but what they forget is sometimes the cutest things can be quite painful - porcupine anyone? Hedgehog? Sound: 5/10 Gameplay: 5/10 Overall: 5/10 |


