  So maybe you forked out the $14.99 for "early access" and now you want to go for the gusto FULL TIME in the game. The full version of Drive Beyond Horizons is "early access" meaning items in this guide are likely to change over time depending on what Santor/Tacty does to the IP within the game. This guide has no association with them, and is just my own hints/tips/tricks/whatnot. And remember, what works for me might not work for you. Your mileage may vary. So maybe you forked out the $14.99 for "early access" and now you want to go for the gusto FULL TIME in the game. The full version of Drive Beyond Horizons is "early access" meaning items in this guide are likely to change over time depending on what Santor/Tacty does to the IP within the game. This guide has no association with them, and is just my own hints/tips/tricks/whatnot. And remember, what works for me might not work for you. Your mileage may vary.
What is Drive Beyond Horizons?
Drive Beyond Horizons is a open-world, sandbox, post-apocalyptic car simulator game. It shares some simliarities with games like My Summer Car or The Long Drive but it's largely it's own thing. Unlike the other two, Drive Beyond Horizons has more of a "RetroWave" vibe to it with some various screwball comedy that pokes some fun at pop-culture and can be as easy, or as hard, as youd like it to be (after you've driven 20Km of course).
Pretty much every mode of gameplay has the same basic gameplay loop: drive off into the wasteland, find food, and drinks for your character to keep him alive, while you care for, upgrade, and restore your vehicle along the way. Depending on your settings there can be all sorts of dangers and discoveries around the bend ranging from finding a hoard of parts, or a hoard of Zombies. The whole point is to have some light fun without getting too wrapped up in any convoluted lore (I'm looking at you Five Nights at Freddy's). It can also host up to 4 players in a multiplayer session.
The demo came out at the end of 2024, and the game has been in "Early Access" since about March 2025 with no expected "due date" in sight. Most of the community is found on Discord, though the Steam Forums and Reddit (shudders) are places you can also go for the community around the game. The game tends to shift around a lot with it's point, but it feels far more like a AAA title than something that came from a small indie dev, at least it does to me.
The Tech Stuff, What Do You Need?
The minimum system requirements for DBH are as follows: 6th Generation i7 or later, NVIDIA GTX 750TI 4GB or better, at least 8GB of RAM (16GB REccommended), about 20GB of HDD Space, and it now supports XBOX Style controllers. Actually, their GPU reccomendation is far higher, but I'm the crazy maniac who started off playing this on a 6th gen I7 with a GeForce 2GB GT 930m on a Dell Laptop, and then the 750TI card (which I also used as I did do some testing for them too). A NVIDIA 3050 RTX with 6GB of GDDR6 VRAM will get the game runnable at a very good Medium or High graphics setting baseline (which is what I use now).
Settings For Your Session Explained
Scenario Mode Explained
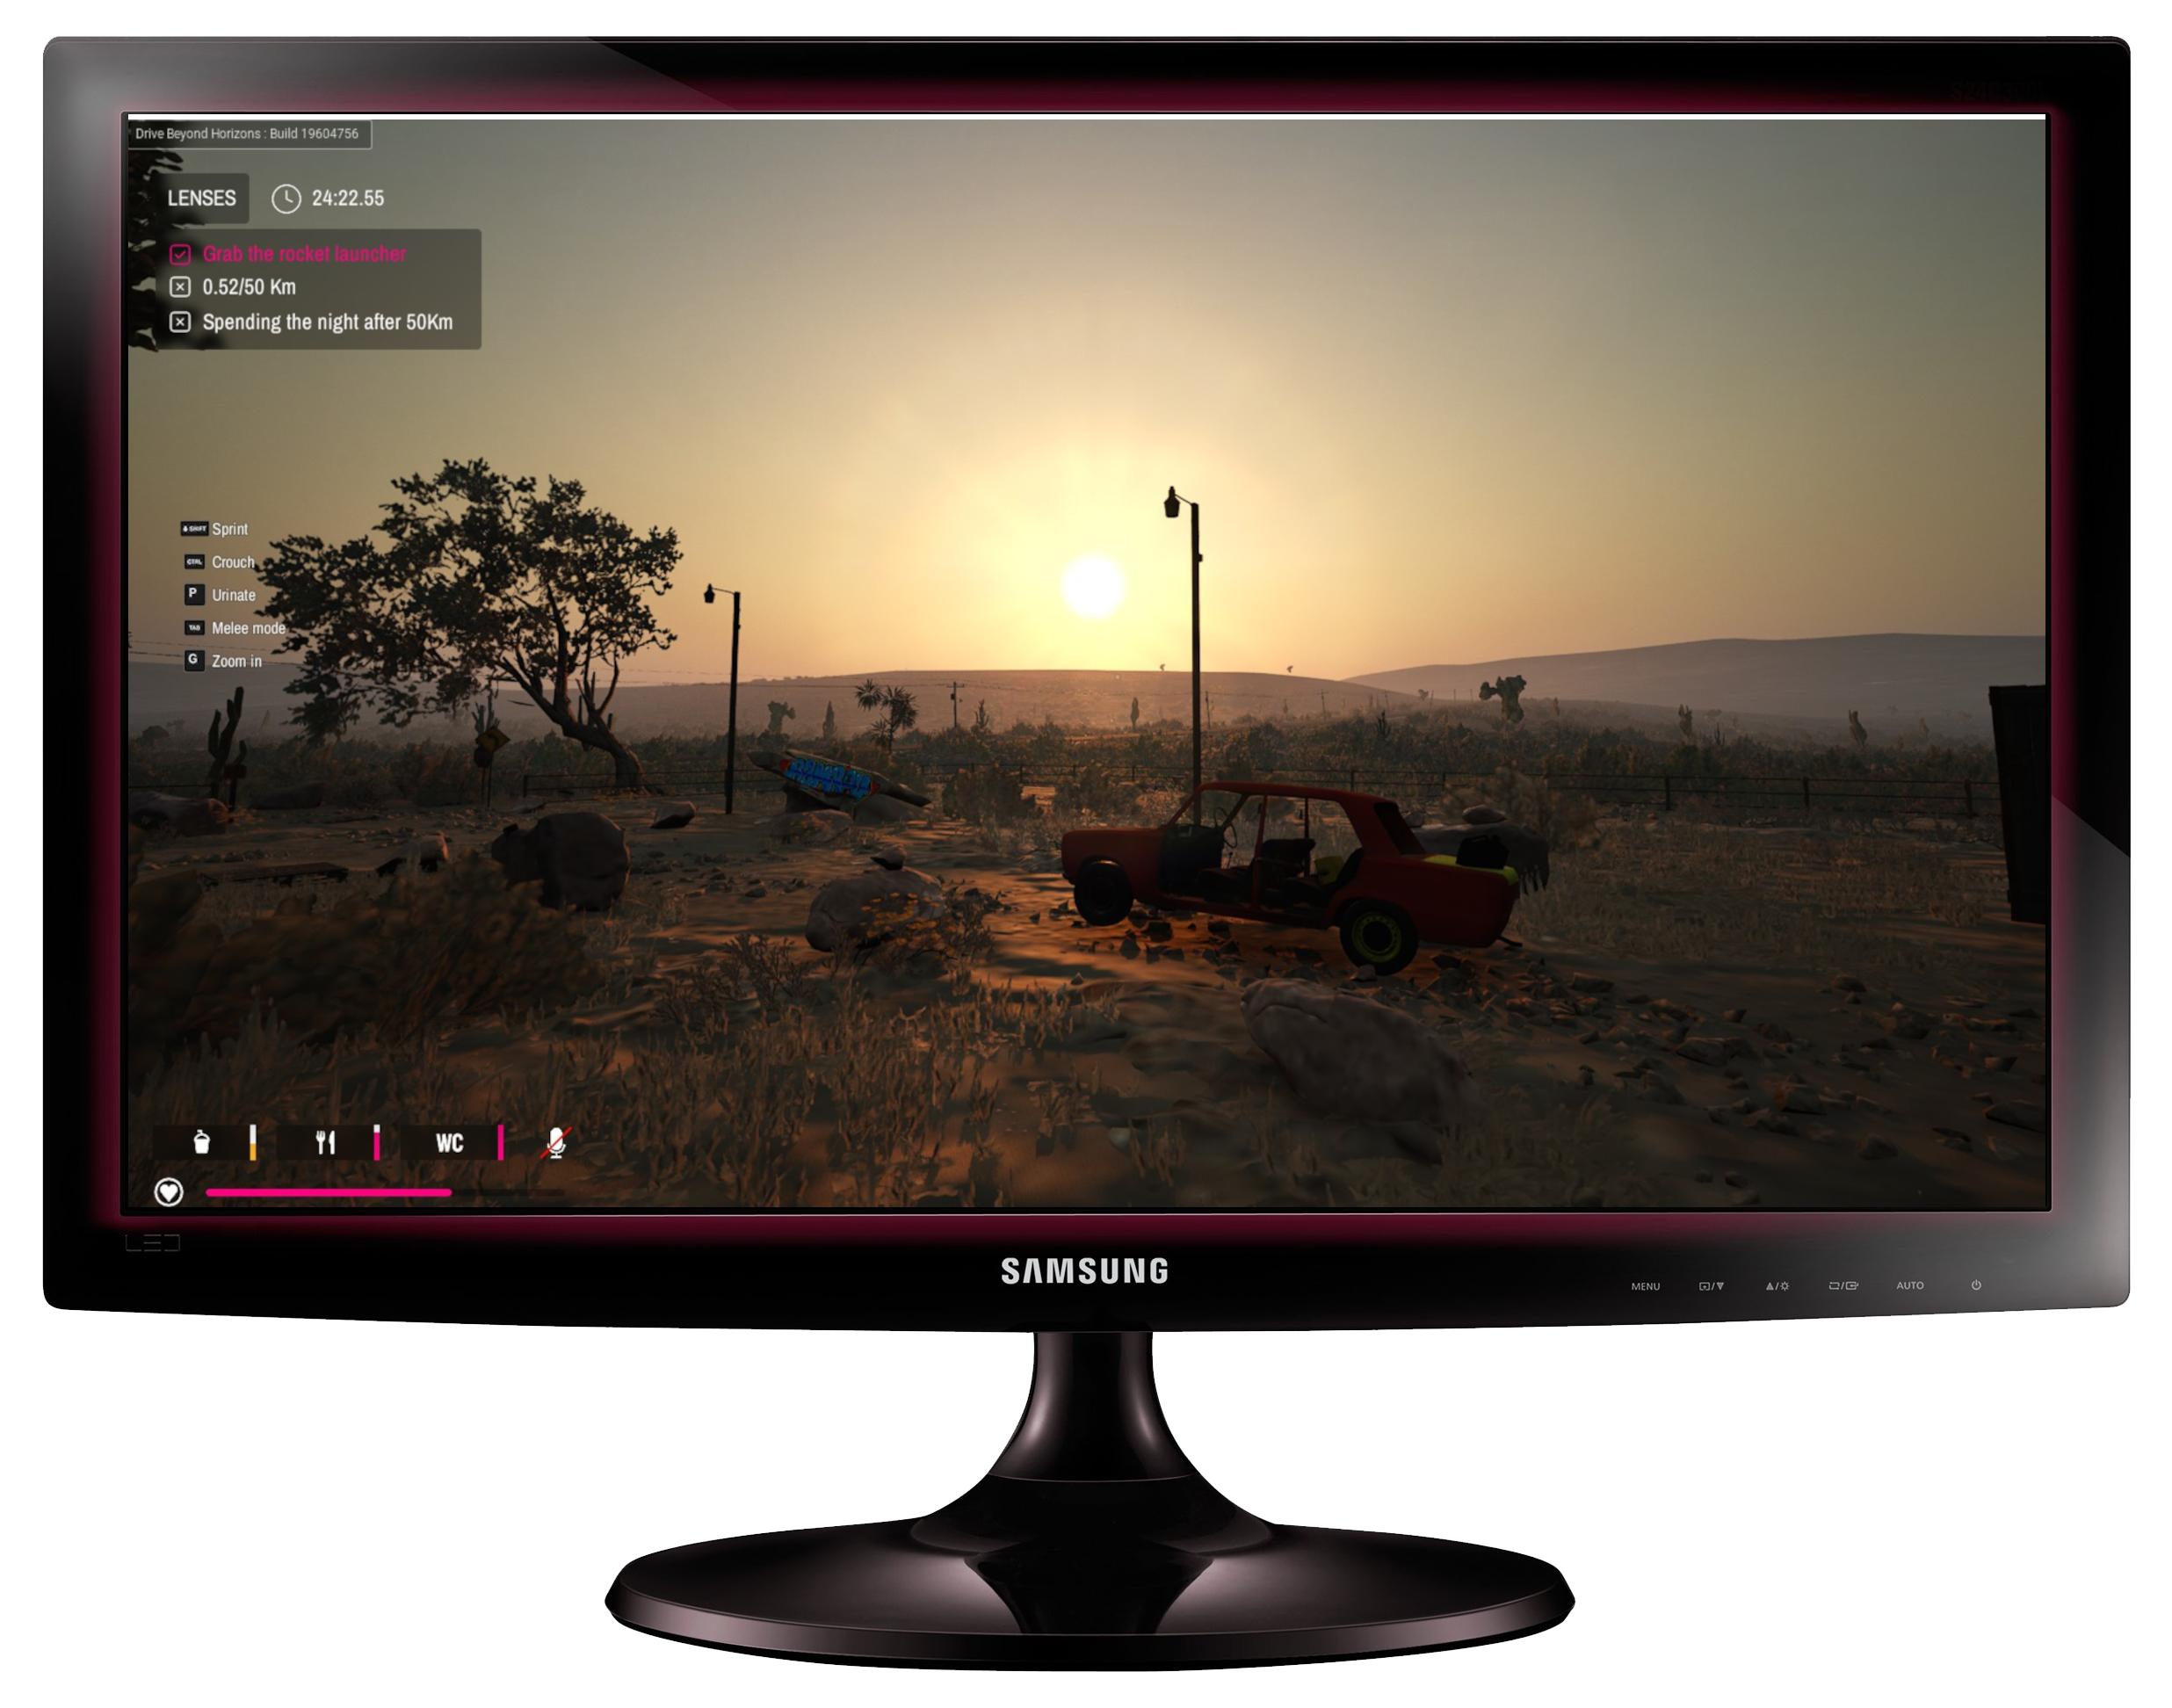
Scenario Mode (which currenlty only has one entry), is the "Story Mode" of Drive Beyond HOrizons. Basically, you are given a list of tasks to perform, and then those tasks are shown near the odometer and the clock and checked off as you complete them. Performing these tasks will give you access to some of Drive BEyond Horizon's very vague - almost seemingly secondary - plot.
WALKTHROUGH - SCENARIO - Part 1: A Strange World
In Scenario 1: A Strange World, You are the lone traveller who, for reasons unknown, was either instructed or decided to drive 50 Kilometers with a rocket launcher, and then "Spend the Night". If it seems familiar (except that rocket launcher part), it is basically a just barely more complex version of what was created for the demo (drive 50Km, spend the night, (spoiler)Get Abducted(/spoiler).
Infinite Mode Explained
Infinite MOde is DBH's Soup-De-Jour of the game. Basically, you start with a car, and you drive infinitley until you either die, quit, or somehow overflow the Kilometer counter and cause weird things to happen (that's just a hypothesis of mine). Just like Scenario, if you've traveled in either mode over 20Km, you can tailor the game to your taste ranging from "Chill Mode" where you just drive and enjoy the sights, building cars (if you wish), and chilling out....all the way to a complete 24/7 Zombie Hellfest that makes your worst Monday look like a walk in the park.
Special Event - The Backrooms
In June of 2025, there was a "Backrooms Event". Basically, you could win some Steam collectibles (NFT-ish sorta stuff I guesS) by "Beating the backrooms". So what does beating the backrooms entail.
Well first, you'll need to drive at least 50 Kilometers before you'll even have the chance to encounter the Motel California Cafe. So it's going to take some dedication. It's best to do this on Infinite so you don't cause chaos with the UFO by going to the backrooms during abduction.
Once you find the Motel, go to the second door to the left, usually to the right of a CTRL+S terminal, and go in (make sure it's enabled in the settings). Walk into thbe bathroom, the door will close, you'll hear a pounding of a heart, and then the room will go dark, and the game will save.
You will then spawn in the central room of the Backrooms with some Hazmat suits, headlight bands, and a direlict cart, some food, parts, and some drinks. Your task will be to fully assemble the 24 parts of the "Kart" vehicle, and then find the backrooms monster, and RAM him at full tilt to "Beat" the back rooms. This sounds simple, but it's not. FOr starters, the Backrooms are proceedurally generated just like the rest of the game is, and secondly, there's a couple entities and random events that will keep you spooked and on edge.
Assembling the Kart will require that you exit the seeming-safety of the central hub of the Backrooms, and roam around outside where danger lurks (though it can reach you in the hub too). Survival, depending on your settings, can range from just finding the Kart parts and the monster, all the way to hiding in walls, eating and drinking to survive, while finding the parts for the cart, and avoiding the trollface monster and the backrooms "Trumpet Monster".
Typically, I'd suggest finding the engine as soon as possible. As you have about five minutes before ol' Trumpet Robot wakes up and begins roaming around, and you'll be slowed down BIG TIME by carrying the Dada engine into the room. Hopefully it spawns nearby. It's a bit like a cross between The Backrooms Game and FIve Nights at Freddy's here. You'll need to find an Engine, all four wheels, all three pedals, radiator, battery, headlights, taillights, both seats should be near the Kart to start, and of course, the exhaust tips are a required part as well. This means you'll be running around like a maniac, trying to get the parts back to your Kart while avoiding the monsters.
A strategy I used previously, which may or may not work depending on updates, was to find a box, crate, barrel, or some other vessel (I Liked using the roof rack from the UAZ for this), and carry in 4 wheels, all three Dada pedals, engine, and the GTR Steering wheel, lights, and even the exhaust tips if I find them (the regular silver ones), then assemble the KArt quickly so I can find and Ram the monster. However, I often spilled the parts around still having to find at least a couple. This could be considered cheating though and the ability to do this could change as the game becomes more stable and improved upon.
If you just want the Kart, you could just assemble the Kart enough with the unique wheels to exit the Backrooms with the Kart and finish assembling it in the overworld if you like. That's how I got the Kart in the first place was getting all 4 wheels with the wrong other parts just to obscond with it from the backrooms.
POI - Points of Interest
In Drive Beyond Horizons, one of the main parts of the gameplay you will have to engage in regardless of what mode you choose, is visiting various points-of-interest found along the roadway.
Starter Home
| This is the house you start in, basically a 1 bed, 1 bath house with a kitchen facing the livingroom. IT has some serious Aussie vibes to it. Inside the garage is the direlict car you start out with that just functions enough to drive, but needs some TLC if you have any serious ambitions to travel. The house also has food, drinks, supplies, medkits, and some car parts related to the vehicle you choose to start with (if you have assembled anything other than the Dada). The Starter Home starts at around 0.5Km and dissappears after awhile so make sure to get all you need before leaving because you're not coming back.
|
Wrecks

| Randomly found, most often on the left side of the road, far off in the weeds, are wrecked cars which you can (usually only partially) assemble, and either drive or tow as you make them functional. Be careful though, sometimes Zombies like to hang around these spots, I suppose they are the original occupants of that vehicle waiting for a free meal (read: YOU).
|
Phone Booths
| Phone boots were one of the earliest POI, basically just a telephone and often a direlict car or frame of a car and some random tidbits nearby. They usually turn up on the right side of the road.
|
Bus Stops
| Where's the Bus? Nobody knows! Will it ever come? Well don't bother asking the Zombies. These somewhat overlap with the billboards but singular bus stops can be found as well as combination Bus Stop/Billboards.
|
Outhouses
| It used to be you could find old OutHouses out on the highway off the right side of the road. However, since some previous updates, these have been combinmed with the Minefields below.
|
Minefields

| Minefields are found far off the right side of the road. Sometimes you can see the glow of the outhouse or a lone slot machine in the middle. ON rare occasions, maybe a vehicle frame will get flipped into the Minefield, causing a loud report! Absolute hilarity when that happens if you're just whizzing by.
|
Trash Piles
| Trash Piles are found far off the beaten path and are a bit of a rare occurance. You can find them usually at night by looking for a red glow of the flaming barrel in the distance, but sometimes during the day time, a yellow tree or a particular configuration of birds will tell you if there's a trash pile out there. These are excellent for finding just-barely working vehicles that you can begin to assemble.
|
Signal Towers

| Also far off the beaten path, you can find the red blinking glow of a Radio tower. These play a key point in the plot of Scenario #1, and they also are very useful POI for car parts, money, and unfortunatley, Zombies (especially at night). If you turn one on at night, you might witness a surprise.
|
Pastures

| There are two types of Pasture found off the left side of the road, often across the street from Water Towers. One type is a bit more sparse, and full of water troughs and water resovoirs useful for getting something to drink in a pinch, or keeping your car cool (or both). THe other type is a bit more populated, with not just the troughs, but hay bales, shady spots for cows, and even food, drink, unique items, and even the occasional vehicle. MOst often you'll find a IFA, Poyopa, or Speedle at the latter version. However, the Cattle can sometimes become unruly and knock your vehicle over, but they will give you Hamburgers if you do the unspeakable. Also, Zombies LOVE to hang out at these places, making them quite dangerous, especially at night.
|
Water Towers
| Water Towers are most often found a bit of a ways off the road on the right side, across the street from Pastures quite often. Water towers usually have some car parts, maybe some drinks nearby. Generally, one of the less interesting POI.
|
Graveyards

| Found occasionally off the right side of the road, Graveyards are one of the most spooky, interesting, if a bit useful locations of the outdoor locations. Often there's a wrecked car here, a mix of parts, weapons, shovels, paint, sponges...etc, and an old timey phone booth. Unfortunatley though, if Zombies are allowed during the daytime, or especially at night, they are a literal "hornets nest" of Zombies to attack. However, if you are in need of money, food, and are so inclined, wiping out the Zombies here can pay off quite handsomely.
|
Fish Station

| Returning from the Demo, is the newly renovated "Fish Station". The Fish station features four gas pumps, featuring both Diesel and Petrol in many cases. Sometimes an old wreck will appear here as well for the taking. Lots of tires, food, and drinkl to be had, and sometimes even a vending machine, a computer behind the front desk, and other useful items can be found here at the Fish Station. However, Zombies do like to hang out here periodically so best to keep that in mind. Also, these often have the Horizon lockers so if you want to retrieve some parts for your vehicle you stored at another site, this is one of the places to do it. There's also usually a single CTRL+S garage save spot out front.
|
2 Car Garages

| Also returning from the demo is the two car garage. These garages feature two spots for vehicles, though in more recent updates only one vehicle appears giving you a potential safe-zone to work on your vehicle if there happen to be Zombies roaming around, or you just want a well lit place to work on your vehicle at night. Sometimes a ATM and a Parts Sniffer can be found here for putting money in the bank and saving your parts to the Horizon Lockers. TONS of parts can be found here from tires and wheels being the vast majority, to fluids in containers, to paint, and cleaning supplies. Also a great place to find a ladder. However, Zombies also love to hang out here too so be ready to fight - just keep in mind if you use the RPG you might destroy any vehicles in the garage, so probably better to stick to an AK-47 or your fists for that task. Out front you can usually find a CTRL+S Terminal to save your car, and a rack to do suspension mods.
|
Bar
| Off the right shoulder sometimes can be found a bar, a small roadhouse, abandoned - except for the periodic Zombie Horde. These places are excellent places for food, slot machines, making a phone call, or maybe some drinks out back from the machine. They also for some reason tend to have a lot of car parts on the roof(!!!) so bring a ladder will ya'. They also might even have a vehicle by the ATM on the left. You can park in the CTRL+S terminal around the corner from the ATM to save yourt vehicle to the garage as well. Useful site.
|
Large Garage

| Added with the "Garage Update" is the large garage, easily seen off the left side of the road in the distance due to the huge CGA red/green/yellow blinking sign out front. This large, tan building has car parts strewn around the outside, and often a quite well driveable vehicle sitting on the lift inside. Most often you'll find GTRs, Lofts, Bolfs, Bonphiacs, Musgoats, and the occasional Tomahawk in the garage here, as well as some others. You can also find a little food and drink and some money if you look around enough, as well as paint. There's a CTRL+S Terminal off to the side out front, and a Parts Sniffer in back so you can pilfer whatever you need from around the premisis. Zombies like to hang out here though, so be careful.
|
Small Chameleon Station

| Visible from the roadway via a large green lizard on the roof, the small Chameleon station turns up on the left side of the road and features one lone gas pump on the island in the middle, and rarely an old wreck beside it. It's a great spot for food, maybe not beveradges so much. It has a parts sniffer out side to the point of egress, and often has bus-stops with a landmine off the side next to it. It's also got a computer on the roof for some mysterious reason (!?!?). Zombies do like to hang out here though, so be prepared, especially if you enabled them during the daytime as it can be cramped quarters fighting inside the store.
|
Large Chameleon Station

| One of the most desired (and at one time "Laggy" POI) in the game, as it's huge, is the Large Chameleon station, a FULL SERVICE, gas station, convenience store, repair garage, parking lot, and there is a LOT you can do here. You can fix your tires on the tire changer, work on your car in the garage, find food and drinks in the store (for free even!!), parts all over, and often a trailer and a car or two vehicles to pick up or swap to here. There's also two CTRL+S terminals off to the side, a parts sniffer out back, and gas pumps out front. However, Zombies do like to hang out here, especially in the gas pump and parking lot areas, and one likes to booby trap the bathroom with a banana peel so beware!
|
Motel California Cafe

| The Motel CAlifornia Cafe is another large POI found after quite some distance like the Large station above. It features four rooms in an old-school, sxities style "MOtor Inn" type setup. Room #1 is good for food and drink, Room #2 will take you to a mysterious place with flashing lights and a trumpet monster, Room #3 might be a good place to rest, and Room #4 is a mystery. Also features a parts sniffer, a lookout area sometimes with slot machine on the roof, a direlict vehicle near the best place to get food, weapons, clothing, and tools for the backrooms. There's also a CTRL+S garage next to that m ysterious humming motel room. However, Zombies also love to hang here (surprise surprise) so make sure you're ready to fight.
|
The Garage: A Complete Guide for the Wayward Mechanic
The Garage is a place to store the vehicles you find while out exploring. It is found on the home screen of the game, and is played simliar to how the regular game is played. However, this is where the game becomes more of a "Crafting Simulator" of sorts, as you take in cars, parts, and find ways to build your ultimate vehicle(s) for roaming the wasteland.
A Field Guide to The Cars (the VEHICLES not the Band!)
It's kind of hard to have an auto garage without some vehicles to put into it. As of the latest update I'm writing from here (June 2026), there are now 18 unique vehicles and a trailer to pick from to store and modify in your garage.
DADA

| The Dada is the entry-level vehicle, and the default starter vehicle in DBH. It's a 4 seater, 4 cylinder petrol/gasoline, 4 door sedan, and has the fewest parts of any of the other cars. This was supposedly the first vehicle they created for the game (based on watching SkapeGote's Youtube videos of the early demo I wasn't quite into yet). This vehicle was also in the demo with some minor differences.
|
MUSGOAT

| The Musgoat somewhat resembles a late sixties domestic (to USA) sports car. It has a big block V8 petol/gasoline engine, seats 2 people (despite having a non-removable back seat), limited trunk space, but is very fast, and rather nimble. It shares the license plates, battery, dome light, and radiator with the Dada and Poyopa Pickup Truck below. This vehicle was also in the demo with some minor differences.
|
POYOPA

| The Poyopa somewhat resembles an Asian pickup truck released in the early 1980's. It has a 4 cylinder diesel engine, seats 2 people, has a six foot cargo bed in back for carrying a lot of things, and some off-road tires and four wheel drive. It shares the radiator, battery, and dome lights with the Musgoat and Dada, and shares the Musgoat's rear bumper.
|
BOLF

| The Bolf somewhat resembles a 1970's/early 1980's 2-door "hot hatch" - aka Hatchback vehicle. It features a turbo-charged 4 cylinder petrol engine, seats up to 4 people, has two dome lights that light up depending on which door is opened. This very popular vehicle in the game was a source of much derision when it first came out due to it's skittish handling, but since then, the dev team has tweaked it to be one of the best handling cars in the game. This vehicle was introduced with the full "early access" version in March of 2025.
|
BONPHIAC

| The Bonphiac resembles a late 1970's sports car. It has 2 doors, 4 seats, a small-block v8 Engine, utilizes a 71 amp battery (most other cars use a 50 amp), and is very fast and nimble, though it can lose some steering when running flat out, especially with twin turbos. The Bonphiac features unique parts all the way around. This vehicle was introduced with the full "early access" version in March of 2025.
|
GTR

| The GTR is inspired by 1970's Japanese racing cars. It's 2 door, 4 seats, right-hand-drive, and has a straight six gas engine with a 71 amp battery to crank it. This is one of the best handling high-speed cars in the game, capable of being driven well at flat-out-break-neck speed with impeccable road manners. However, it is very loud so it can be difficult to hear the radio over the engine when this one is tearing along at high speed. This vehicle was introduced with the full "early access" version in March of 2025.
|
UAZ

| The UAZ takes it's cues from 1960's-1990's Russian and German style vans. It uses a straight 4-cylinder gasoline engine with great torque but not a great top speed, can seat up to 7 people (strange since Multiplayer is capped at 4 people), It has the most parts in the game coming up at a whopping 81 total parts to assemble the whole van. It's also got the most sensitive steering out of the lot. This vehicle was introduced with the full "early access" version in March of 2025.
|
IFA

| Inspired by large sized Military trucks the world over, the IFA is the "brute" of the vehicles. It's powered by a giant Diesel engine that looks hilarious when installed in any other vehicle. It has four wheel drive, a huge bed big enough for some of the other cars (which unfortunatley you cannot carry them in the bed of this vehicle). Despite it's huge size, it's one of the simpler designs, but it's real claim to fame is creating "Land Trains" of vehicles - basically towing as many as four or more vehicles in succession. This vehicle was introduced with the full "early access" version in March of 2025.
|
TRICLOPS

| The TriClops might seem a big uncanny to some people who are familiar with 1940's legendary family vehicles. The TriClops is a rear engine, 4 door, family sedan with the option of either two bench seats, or two front bucket seats (shared with the Dada), and a rear bench. It's powered by a flat "boxer" style engine of amazing sound and very good power, and it is quite speedy despite it's high weight. This vehicle was introduced with the full "early access" version in March of 2025.
|
C18

| The C18 takes mild cues from European service vehicles you might see if you live in that part of the world. It features seating for two, a large, windowed, box area in back, a 4 cylinder Disesel engine that is a bit on the slow side, but is nice and quiet, and generally, would make a great chassis for some kind of overlander or survivalist vehicle. This vehicle was introduced with the full "early access" version in March of 2025.
|
TOMAHAWK

| The Tomahawk is a 1960's/1970's style 2-door sports car featuring a small-block v8 engine and stylish woodgrain accented interior. It takes the styling cues of a vehicle like the Musgoat, and refines them with a bit of an exotic European tinge. It seats 4 people, and is rather fast, with a more refined sounding engine than the Musgoat, and maybe the third or fourth best handling car in the game. This vehicle was introduced as one of seven brand new cars added to the game in June of 2026.
|
PEAK

| The Peak is a full sized pickup truck with a rather unique design. It features a large 4 cylinder Diesel engine, and all unique parts to make it work. It has much better handling and road manners than the Poyopa, and is less bouncy. The vehicle has a bit more of a modern edge to it with it's slightly more "monotone" color scheme making it probably one of the most modern looking vehicles in the game. This vehicle was introduced as one of seven brand new cars added to the game in June of 2026.
|
LOFT

| The Loft is a updated version of the 1980's "Hot Hatch" style car. It has a sleeker look, is a little bigger, it still seats four, and has a non-turbo 4 cylinder engine, and is one of the first vehicles to feature a Spare Tire as a part of the vehicle's parts list. IT shares no parts with any previous models, though the dome lights are simliar to those found in many of the first lot of vehicles. This vehicle is a drift machine, tending to slide sideways on hard braking or hard steering so lookout. This vehicle was introduced as one of seven brand new cars added to the game in June of 2026.
|
KAGE

| The Kage shares some resemblance to the GTR but is a little smaller, and looks a little more like a late sixties/early 1970's production. It's a bit like a tiny muscle car. It uses a gasoline straight six engine, with a little more aggressive engine sound, and rounder appointments that scream something that would come from the 1966-1975 time period, whereas the GTR looks more like something from circa 1979-1980. It has simliarly as impeccable handling and road manners to the GTR, but seems just a hair "looser".
|
P-51

| The P-51 is a Utility Truck designed for hauling large loads in the back. Basically, it's a 2 seater Box truck with a 4 cylinder diesel engine, and some very late 1980's "Aero" styling to it, somewhat looking like a Japanese economy car front end in a way. It's fully enclosed back section is a real treat, making this the ultimate survival vehicle for hiding from the Zombies (if that truly were possible in game). But hey, trying to grant' ya some build ideas. This vehicle was introduced as one of seven brand new cars added to the game in June of 2026.
|
SPEEDLE

| The Speedle is a seemingly familiar-esque face to just about anyone into cars, but keep in mind this is a whole new vehicle of it's own merit. It features a 4 cylinder, water cooled, boxer engine in back, with a large "frunk" in front. IT looks like something that could have come from anywhere in the 20th century. It has very good road visibilty, and excellent handling, and is a lot more stylish than your basic Dada. However, reports are sometimes the Speedle can be a rare site out in the wild so keep your wits about you finding one.
|
ESCADA

| The Escada is a generic 21st Century economy hatchback with some insane secrets to tell if you give it the right modifications. In stock form it's a mild mannered econo-box that will take you to the Horizons in comfort, but with a roof rack and two ladders - don't even ask me why - somehow this thing rips a new a-hole to the pavement, becoming one of the fastest cars in the game to the point of sheer instability.
|
KART

| The Kart is a basic go-kart made out of GTR And Dada parts, and special Go-Kart wheels and a shopping Kart - hence the name "Kart". It is a part of the "Backrooms" Special Event/Quest which is the only place where it can be found. It has about the same speed and acceleration as the Dada, but is a bit more nimble due to it's smaller tires and shorter wheelbase. It's also fun as hell to put customizations on the Kart because of it's wacky appearance. The Kart was released with the "Backrooms Event" in July of 2025.
|
TRAILER

| Not a vehicle per-se, the bog-standard Utility trailer can be found in various forms of "Discombopulated" all over the highway. It's useful to tow if you have a lot to haul around, or a vehicle with a limited capacity (such as the Kart or any of the Sports CArs). However, keep in mind that real-world towing physics play a role in things and you don't want to drive too fast or make too abrupt manuvers when towing the trailer, or it can get away from y ou losing everything you are hauling. This particular piece was found in the demo. It also cannot be saved to the Garage.
|
Using Various Tools
Battery Charger
|
|
Tire Changer
|
|
Wrap and Roll
|
|
Paint-O-Matic
|
|
Attachables
Using the Computer
A Version History of Drive Beyond Horizons (full Version)
Drive Beyond Horizons debut as a Demo in late 2024. The full version was released in March of 2025 for $25 "Early Access" meaning the game was/is unfinished and still a work in progress. Much has changed since then. It has gone on sale usually in the $15 range off/on since Early access. The Demo is more of a representation of the game as it was when it first was released while the current release has many more additional features not in earlier versions of the game. Note to both my tester pals and the Santor/Tacty team - this is ONLY referring to PUBLIC relases.
May 2024 - August 2025 (Before I started playing the game) -
| The alpha was announced in May 2024 on Steam and released as "Early Access" on March 24th 2025 with the full fleet of vehicles added (Dada, Musgoat, Poyopa, GTR, IFA, UAZ, TriClops, Golf, Trailer, and Bonphiac - total of 10 vehicles at that time). POI was also far more than the original demo already, and the landscape and overall style was different from the demo (which is a lot brighter, and only has about 4-5 types of POI in actuality).
|
August 2025 - Backrooms Event
| In August 2025, the Backrooms were added to the game with a special event where if you "Beat the backrooms" you would get some unique Steam items added to your steam inventory. This also was the introduction of the "Kart" vehicle. They also started changing some of the foiliage. I remember the game really started to stress the CRAP out of my NVIDIA GT730 2GB card when I started playing the full version in September. The initial strategy for me was to make a save per-vehicle, and then build that vehicle over the course of usually about 200Km. Zombies were a bit less aggressive and easy to avoid, and some of the cars were better than others. At that time, the Musgoat, Bonphiac, Dada, GTR, and Kart were the best handling cars, with the worst being the Golf and the Poyopa which were essentially undrivable in that state. I remember between August and October, there was a lot of talk about getting the Golf handling tuned right.
|
October 2025 - Optimization and Handling Update
| This i was the first major update I was truly around for. Performance vastly improved, allowing me to take my PCs off Potato into "Low" for some settings. The Golf started handling great, however it felt to me at the time that the Poyopa was an afterthought for them, and almost through they were going to get rid of the truck. This was probably my heaviest period of playing Drive Beyond Horizons BEFORE I became Beta Tester - that period of November-December - where I stopped by after about a month and signed up for Beta Testing.
|
May 24th 2026 - The Garage Update
| Between February and May 24th 2026, I joined the Beta, and got added to the ALpha Tester team. I will keep that part of things to myself other than that I remember being on vacation in California when the beta/alpha testing needed to get REALLY hardcore. So I spent a LOT of time in Alpha playing the game and submitting bugs before the big Garage update. When the Garage Update came out, it really changed the whole vibe of the game. Where previously, it was just a rather loose UFO/Alien and Zombie post-apocalyptic adventure where the car was just sort of a tool to use to get around, now the Cars took a far more front-and-center approach to the game than they already were from having 11 of them. When I was playing the Demo in mid 2025, I was sorta' like "cool, let's go drive around and see how well I can survive", whereas now it's like, "let's collect a bunch of cars and build some killer overlander/survivalist vehicles with them". Gone were the days of having 400 save files on my SSD and one for each car. Now I could work on all the vehicles one-by-one on one continuous save, while using individual saves for my "Dealership" on this Website with only one save apiece to save space and make it easier to make better downloads.
|
June 2025 - New Cars Added
| In Mid June 2025, seven new vehicles were added to the game: Loft, Peak, Tomahawk, P-51, Escada, Speedle, and the Kage. Some of these were obvious updates on the initial vehicles, but some were brand new ideas. Being a tester, I have spent more time actually tESTING these vehicles than actually playing the game as I would have as a regular gamer. This also changes the game drastically by adding more parts into the pool of parts to pick from, which ups the challenge of the game somewhat, and also might mean I might have to build one mondo as heck land-train at some point using every car in the game.
|
|


